Gripper Controller Troubleshooting Guide
Common troubleshooting - quickly locate and resolve software and hardware issues
简体中文 | English | Support: support@genrobot.ai
Issue List
| Type | Issue | Suggested Action |
|---|---|---|
| Software | Gripper cannot fully close after the target value is set to 0 | Confirm that initial calibration completes normally |
| Software | Encoder feedback is unstable or remains unchanged for a long time | Power-cycle and complete initial calibration |
| Software | Serial port cannot be detected | Remove brltty and reboot |
| Software | Gripper feedback value is -66.66 | Release the mechanical jam |
| Software | Gripper opening and closing cannot be controlled, and feedback value is 0 or error code -6.6 | Firmly reconnect the 24V motor power port |
| Software | V4 camera frame rate is halved | Update the camera firmware |
| Software | 640×480 resolution has obvious wavy jagged image artifacts | Update the camera firmware |
| Software | Device keeps restarting after tactile gripper heads are installed | Set the control frequency to 30 Hz |
| Software | Distance accuracy is inaccurate | Check mechanical play and reinitialize |
| Software | Why tactile data is expanded from 224 points to a 50×10 image | Restore the original sensor spatial layout for visualization and downstream processing |
| Software | Tactile gripper cannot close after initialization | Complete initial calibration with the standard gripper head first, then switch to the tactile gripper and enable it in the SDK |
| Software | Gripper cannot be controlled after motor power is reconnected | Wait at least 3 seconds after disconnecting 24V power before reconnecting it |
| Hardware | Gripper can be moved by hand when powered on | Return for repair or use remote repair guidance |
| Hardware | One side moves after the gripper is powered on | Tighten front-cover screws or return for repair |
1. Software Issues
1.1 Gripper cannot fully close after the target value is set to 0
Symptom
After the gripper target value is set to 0, the gripper still cannot fully close.
Cause
- Mechanical play exists in the gripper.
- Initial calibration did not complete normally, so the zero position is inconsistent with the mechanical closed position.
Solution Steps
- Remove the front shell, tighten the linkage-related screws, and eliminate mechanical play in the gripper.
- Before sending the first control command, make sure there is no object between the gripper fingers so zero-position detection is not affected.
- Start the SDK and send the first control command. The gripper automatically performs initial calibration: it closes to the zero position and then opens.
- During initial calibration, the gripper feedback shows the calibration code
-66.66. This is expected. Wait until calibration is complete before sending target value0for the closing test.
Verification
After initial calibration is complete, the feedback value should return to a normal distance value, and the gripper should close to the zero position when target value 0 is sent.
1.2 Encoder feedback is unstable or remains unchanged for a long time
Symptom
The encoder feedback value is unstable or remains unchanged for a long time.
Cause
This can occur when either the motor power port or the USB port is powered off and then powered on independently.
Solution Steps
1. Power-cycle the device
After each power-off, both the motor power port and the USB port must be powered on again.
2. Initial calibration
Before powering the device back on, make sure there is no object between the gripper fingers. Start the SDK and send the first control command. The gripper automatically performs initial calibration: it closes to the zero position and then opens.
After the motor is powered off and restarted, initial calibration must be completed again. During calibration, the gripper feedback may show
-66.66. Wait until calibration is complete before controlling the gripper. Verification
After initial calibration is complete, encoder feedback should change in real time as the gripper opens and closes.
1.3 Serial port cannot be detected
Symptom
The system cannot detect the serial device corresponding to the gripper.
Cause
The brltty service occupies the serial port and intercepts the device.
Solution Steps
sudo apt remove brltty
sudo reboot
Verification
After rebooting, the serial device should appear in ls /dev/tty* or in the SDK device list.
1.4 Gripper feedback value is -66.66
Symptom
When the device has just powered on, the gripper feedback value may briefly show -66.66. This is normal during the gripper power-on self-check and usually returns to normal after about 1 second.
If the feedback value remains at -66.66 for an extended period and the position cannot be read normally, follow the steps below.
Cause
Persistent -66.66 usually indicates that the motor or gripper mechanism is jammed, so the encoder cannot complete normal power-on calibration.
Solution Steps
Gently move the gripper by hand in the opening direction to release the motor or mechanism jam.
Verification
After the jam is released, the feedback value should return to the normal range and change in real time as the gripper opens and closes.
1.5 Gripper opening and closing cannot be controlled, and feedback value is 0 or error code -6.6
Symptom
The gripper feedback value is 0, or the latest SDK reports motor-not-powered error code -6.6. Opening/closing cannot be controlled through commands. At the same time, the motor has no holding force, so the gripper can be moved by hand.
Cause
This usually means the 24V motor power is not properly connected, for example the power connector is loose or the power cable has poor contact. The camera is powered by USB, while 24V only powers the motor. Therefore, a motor power issue may not affect camera detection or image output, but the motor cannot respond to control commands.
Solution Steps
Check and firmly reconnect the 24V power port. Confirm that the power adapter and power cable are connected reliably. Power-cycle the device if needed.
Verification
After 24V motor power is restored, the motor should have holding force and the gripper should no longer be easy to move by hand. When opening/closing commands are sent, the feedback value should change normally with gripper motion.
1.6 V4 camera frame rate is halved
Symptom
For V4, the actual camera frame rate is about half of the expected value, with a maximum of 30 fps.
Cause
V4 actively halves the frame rate to increase exposure time, so it cannot reach 60 fps.
Solution Steps
This issue can be resolved by updating the camera firmware. See 3. Camera Firmware Update.
Verification
After the firmware update, use the frame-rate test tool to verify that the camera can reach 60 fps.
1.7 640×480 resolution has obvious wavy jagged image artifacts
Symptom
At 640×480 resolution, the image shows obvious wavy jagged artifacts.
Cause
The earlier firmware has a known image processing issue at this resolution. It can be fixed by applying the V2 camera firmware.
Solution Steps
This issue can be resolved by updating the camera firmware. See 3. Camera Firmware Update.
Verification
After upgrading to the fixed firmware, artifacts at 640×480 resolution should disappear or be significantly reduced.
1.8 Device keeps restarting after tactile gripper heads are installed
Symptom
After tactile gripper heads are installed, the device restarts frequently.
Cause
The default control frequency is too high and causes system instability.
Solution Steps
After installing tactile gripper heads, adjust the control frequency to 30 Hz.
Verification
After the frequency is adjusted, the device should run stably without abnormal restarts.
1.9 Distance accuracy is inaccurate
Symptom
The gripper distance feedback has unstable deviation from the actual distance.
Cause
During use, shaking the gripper while the motor is powered on and enabled can introduce mechanical play.
Solution Steps
If mechanical play is confirmed, remove the front shell and tighten the linkage screws.
Verification
After tightening the screws and reinitializing, the distance feedback should become stable.
1.10 Why tactile data is expanded from 224 points to a 50×10 image
Question
Why not use the 224 tactile sampling points directly? Why expand them to 448 points first and then map them into a 50×10 image?
Cause
The physical tactile sensor array originally contains 500 sampling positions. Due to readout speed and real-time performance requirements, the device reduces the actual readout to 224 sampling points to lower data transfer and processing overhead.
Explanation
For tactile image display, algorithm processing, and alignment with the physical sensor positions, the data needs to approximate the original spatial layout of the tactile array. Therefore, the 224 sampled points are first expanded to a representation closer to the original array, and then mapped into a 50×10 tactile image. This step does not create new measured information; it makes visualization and downstream processing better match the sensor's physical arrangement.
1.11 Tactile gripper cannot close after initialization
Symptom
After installing tactile gripper heads and running initial calibration, the tactile gripper cannot close normally.
Cause
Initial calibration is used to confirm the zero position and mechanical closed position of the base gripper. It is recommended to complete it with standard gripper heads installed. Tactile gripper heads add tactile components on top of the standard gripper structure and are adapted in the SDK through settings such as tactile_gripper and the corresponding distance offset. If initial calibration is run directly with tactile gripper heads installed, the zero position may not match the actual tactile gripper closed position.
Solution Steps
- Install the standard gripper heads.
- Restart the SDK and send the first control command so the gripper automatically completes initial calibration. Confirm that the standard gripper can close normally.
- Replace the standard gripper heads with tactile gripper heads, and enable
tactile_gripperaccording to the SDK configuration. - Use the tactile gripper heads for subsequent control and debugging.
Tactile gripper heads do not need to be used for separate base-gripper initial calibration. The tactile gripper closed-position difference is handled by the SDK offset configuration.
Verification
After switching to tactile gripper heads and enabling the corresponding SDK configuration, the gripper should open and close normally according to the target distance, without abnormal closed-position offset.
1.12 Gripper cannot be controlled after motor power is reconnected
Symptom
After the 24V motor power is disconnected and then reconnected immediately, the gripper cannot be controlled through commands.
Cause
The motor driver has internal energy-storage capacitors. After 24V power is disconnected, the motor driver does not power off completely at once. If 24V power is reconnected before the capacitors have sufficiently discharged, the driver state may become abnormal and the gripper may temporarily fail to respond to control commands.
Solution Steps
- Disconnect the 24V motor power.
- Wait at least 3 seconds to allow the internal capacitors in the motor driver to discharge sufficiently.
- Reconnect the 24V motor power.
- If the gripper still cannot be controlled, reconnect USB as well and restart the SDK.
Avoid rapidly plugging and unplugging the 24V motor power. After disconnecting 24V power, wait at least 3 seconds before powering it on again.
Verification
After power is reconnected, send gripper open/close commands. The gripper should respond normally, and the feedback value should change with gripper motion.
2. Hardware Issues
2.1 Gripper can be moved by hand when powered on
Symptom
When the gripper is powered on, it can still be moved by external force.
Cause
The lead screw end stop is loose, so the motor cannot control the gripper.
Solution Steps
Return for repair or contact technical support for remote repair guidance.
For remote repair guidance, refer to the image steps below:
Final requirement:
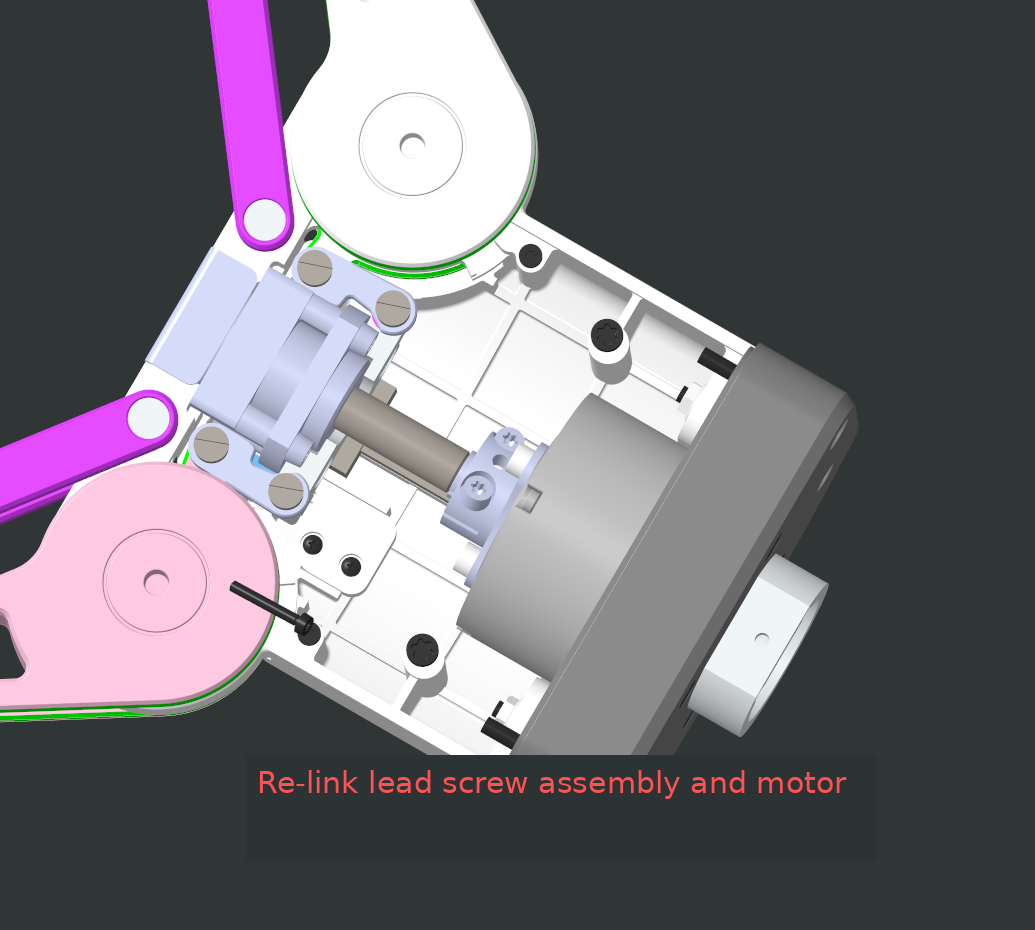
Procedure:
Step 1
Tighten the pin.
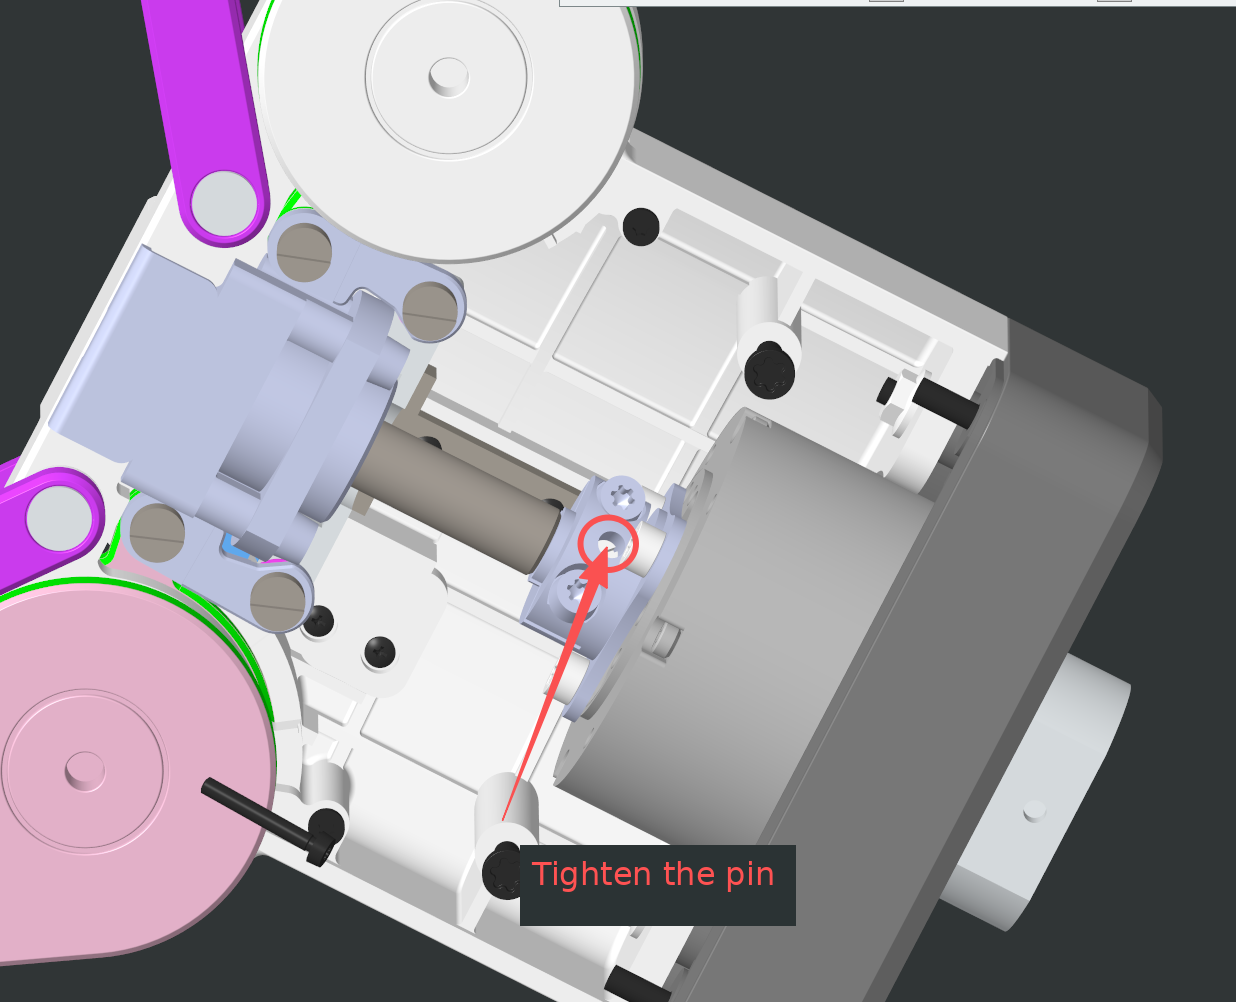
Step 2
Tighten the clamp screws.
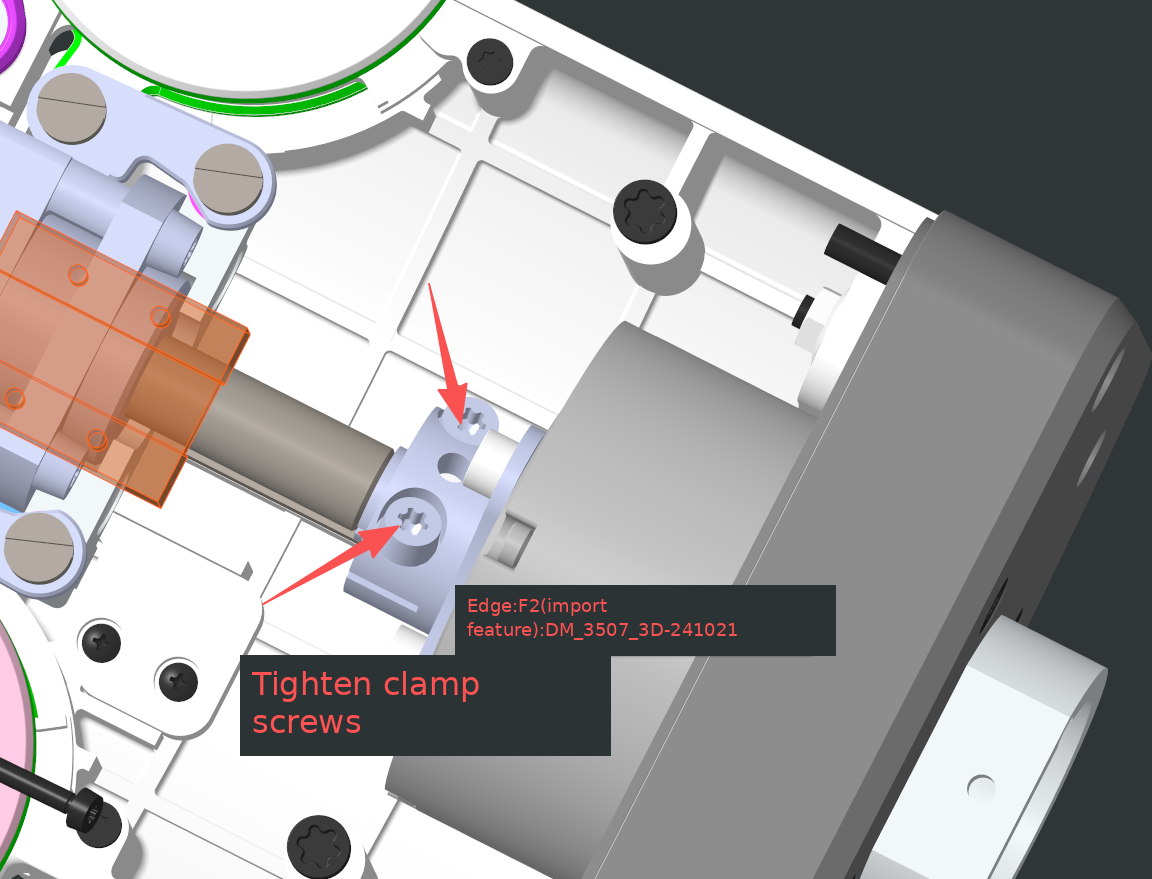
Step 3
Tighten the three motor bracket screws.
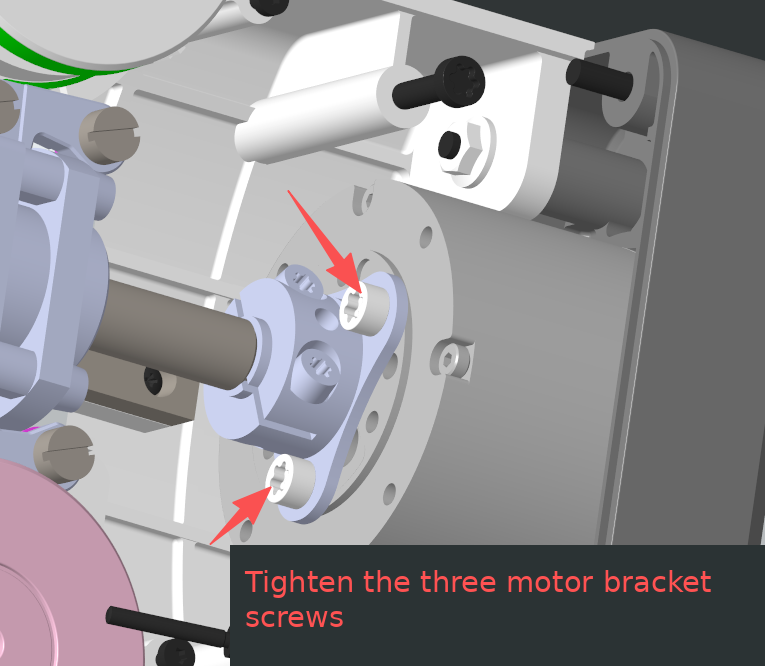
Check the assembly and complete the remaining installation.
Verification
After repair, the gripper should not be easy to move by external force when powered on.
2.2 One side moves after the gripper is powered on
Symptom
After the gripper is powered on, only one finger moves normally, while the other side does not respond.
Cause
The linkage is loose or broken, causing transmission failure.
Solution Steps
- Remove the front cover. If any screws have fallen out, tighten them.
- If the linkage is broken, return the device for repair.
For remote repair guidance, refer to the image steps below:
Final requirement:
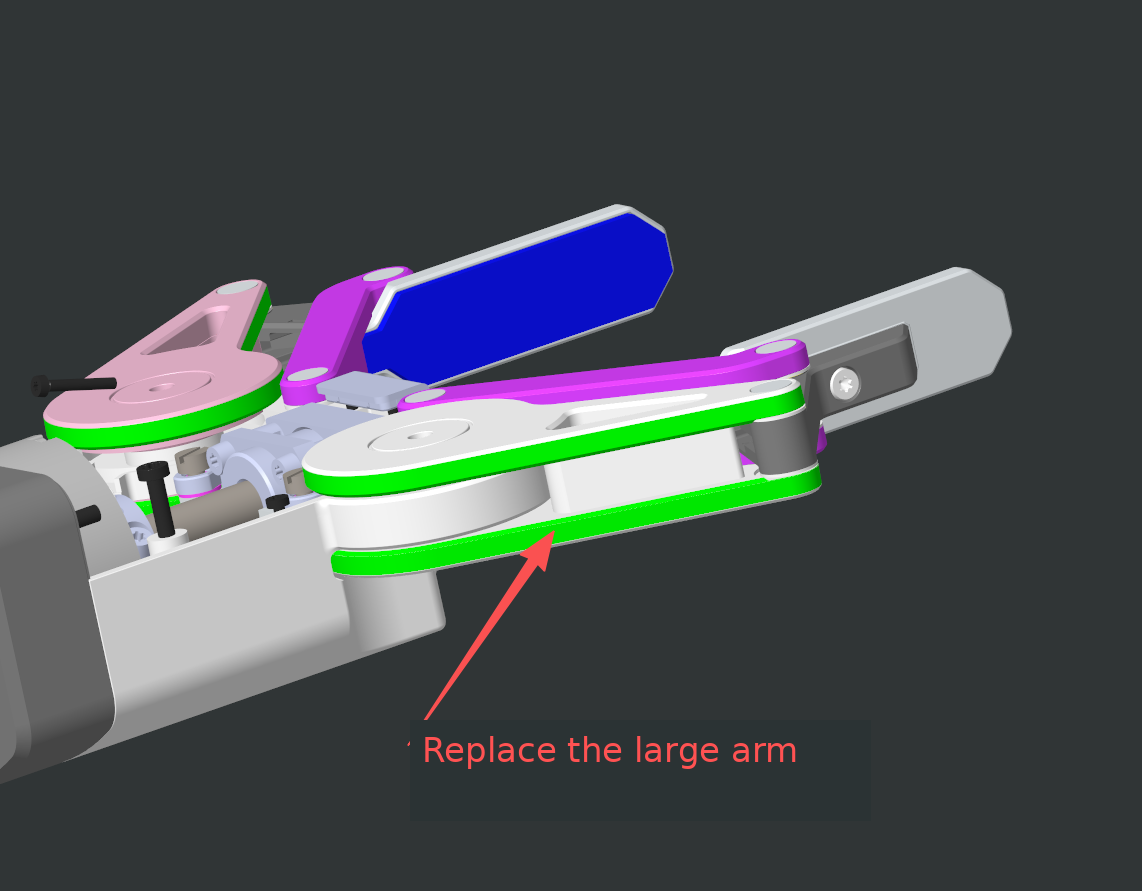
Procedure:
Step 1
Loosen two screws.
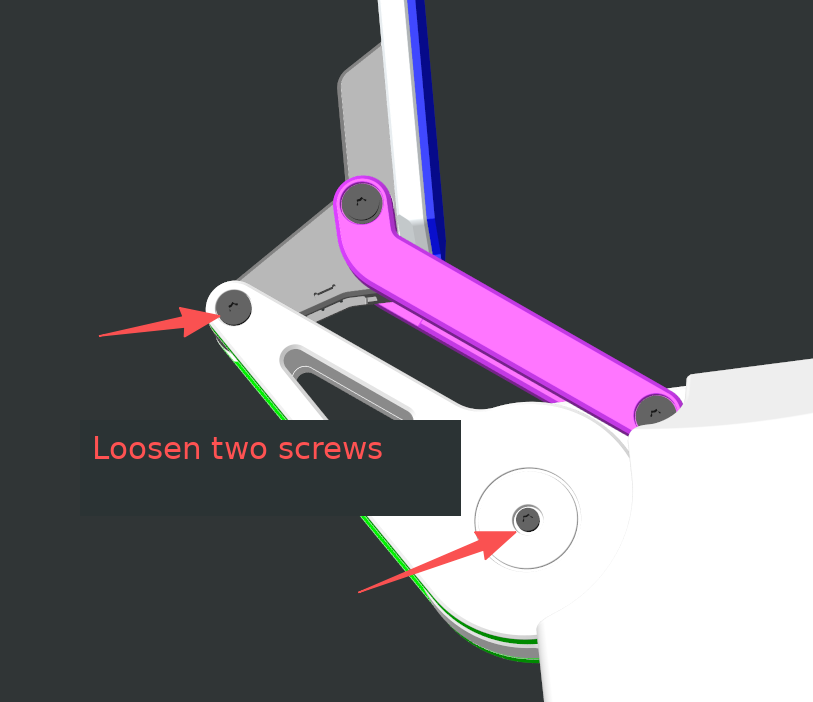
Step 2
Support from below. Press the pin out with a blunt hard tool.
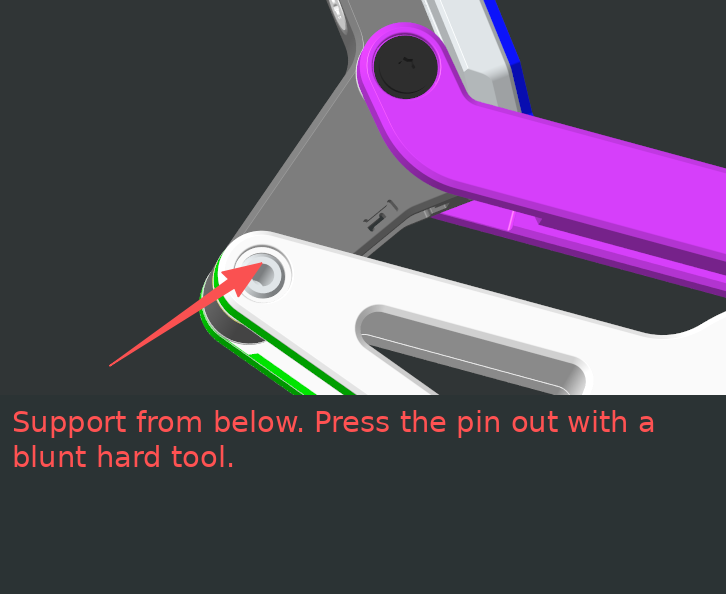
Step 3
After removing the pin, remove and replace the damaged large arm.
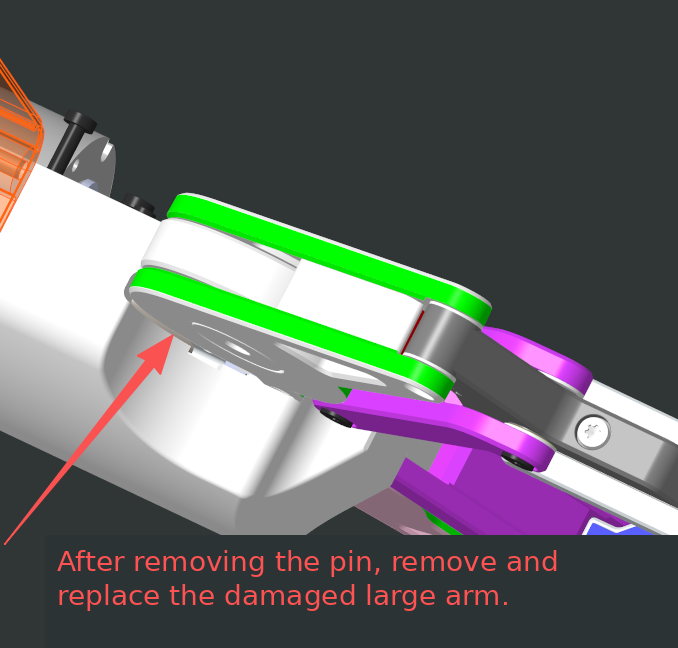
Step 4
First tighten the shoulder screw, then press the pin in from top to bottom. Avoid pinching wires.
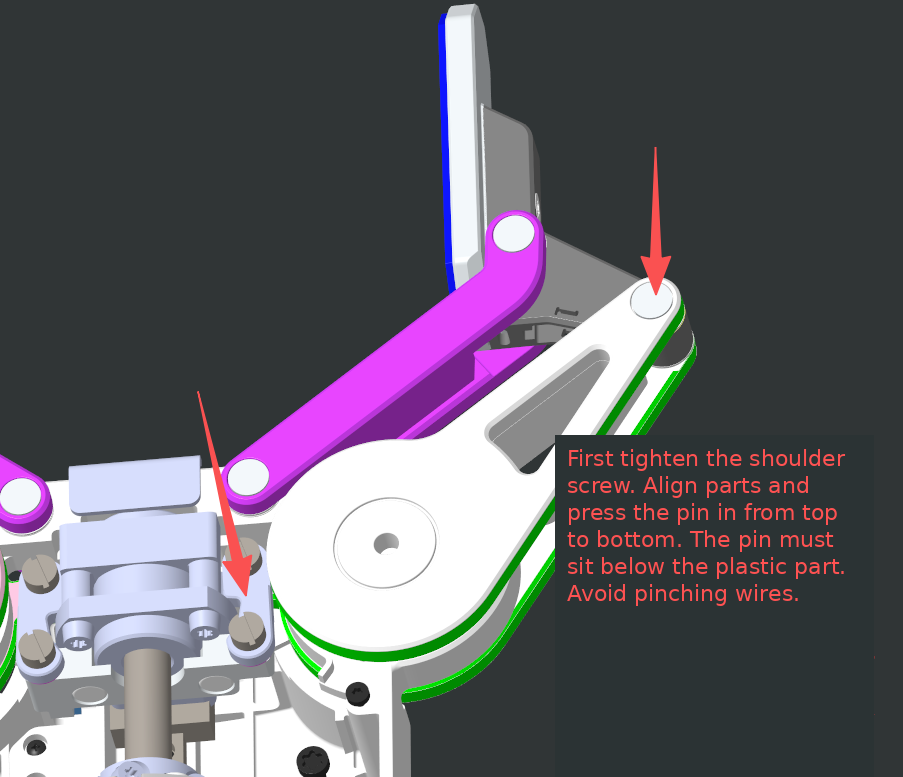
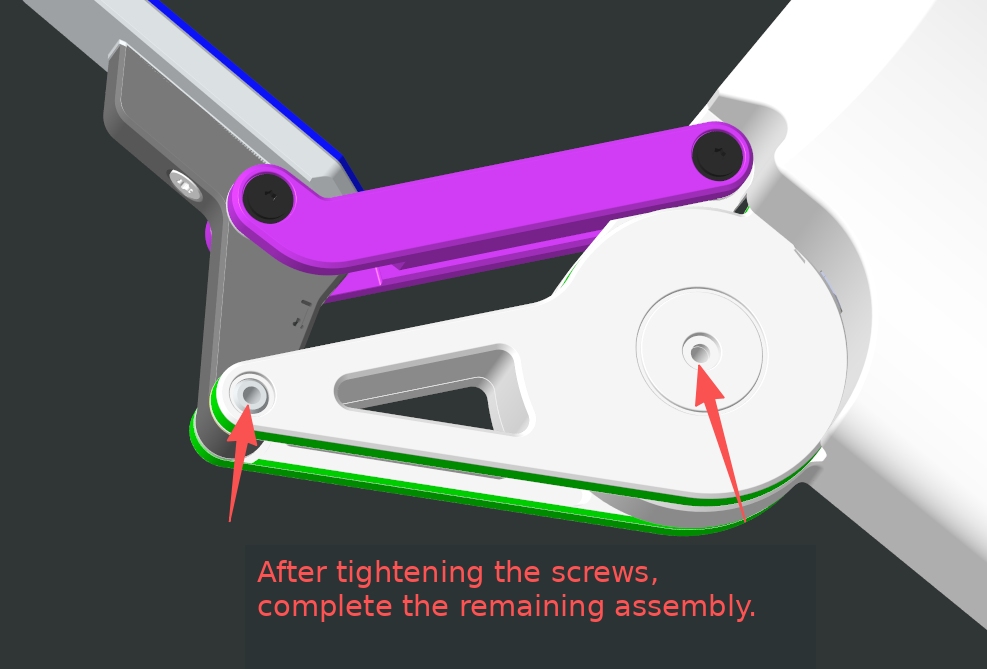
Step 5
After tightening the screws, complete the remaining assembly.
Verification
After repair, both fingers should open and close synchronously.
3. Camera Firmware Update
This section covers camera-related fixes for Gripper Controller V4. Select the firmware version according to the symptom, then flash the center camera and side cameras in order.
3.1 Applicable Issues
| Issue | Applicable Product Version | Recommended Action |
|---|---|---|
| 1.6 V4 camera frame rate is halved | Gripper Controller V4 | Use the V1 firmware to add the 60 fps configuration. |
| 1.7 640×480 resolution has obvious wavy jagged image artifacts | Gripper Controller V4 | Use the V2 firmware to fix 640×480 jagged ghosting artifacts. |
3.2 Environment and Flashing Order
| Item | Requirement |
|---|---|
| Operating system | Windows PC |
| Connection | Connect the Gripper Controller to the PC with a USB cable |
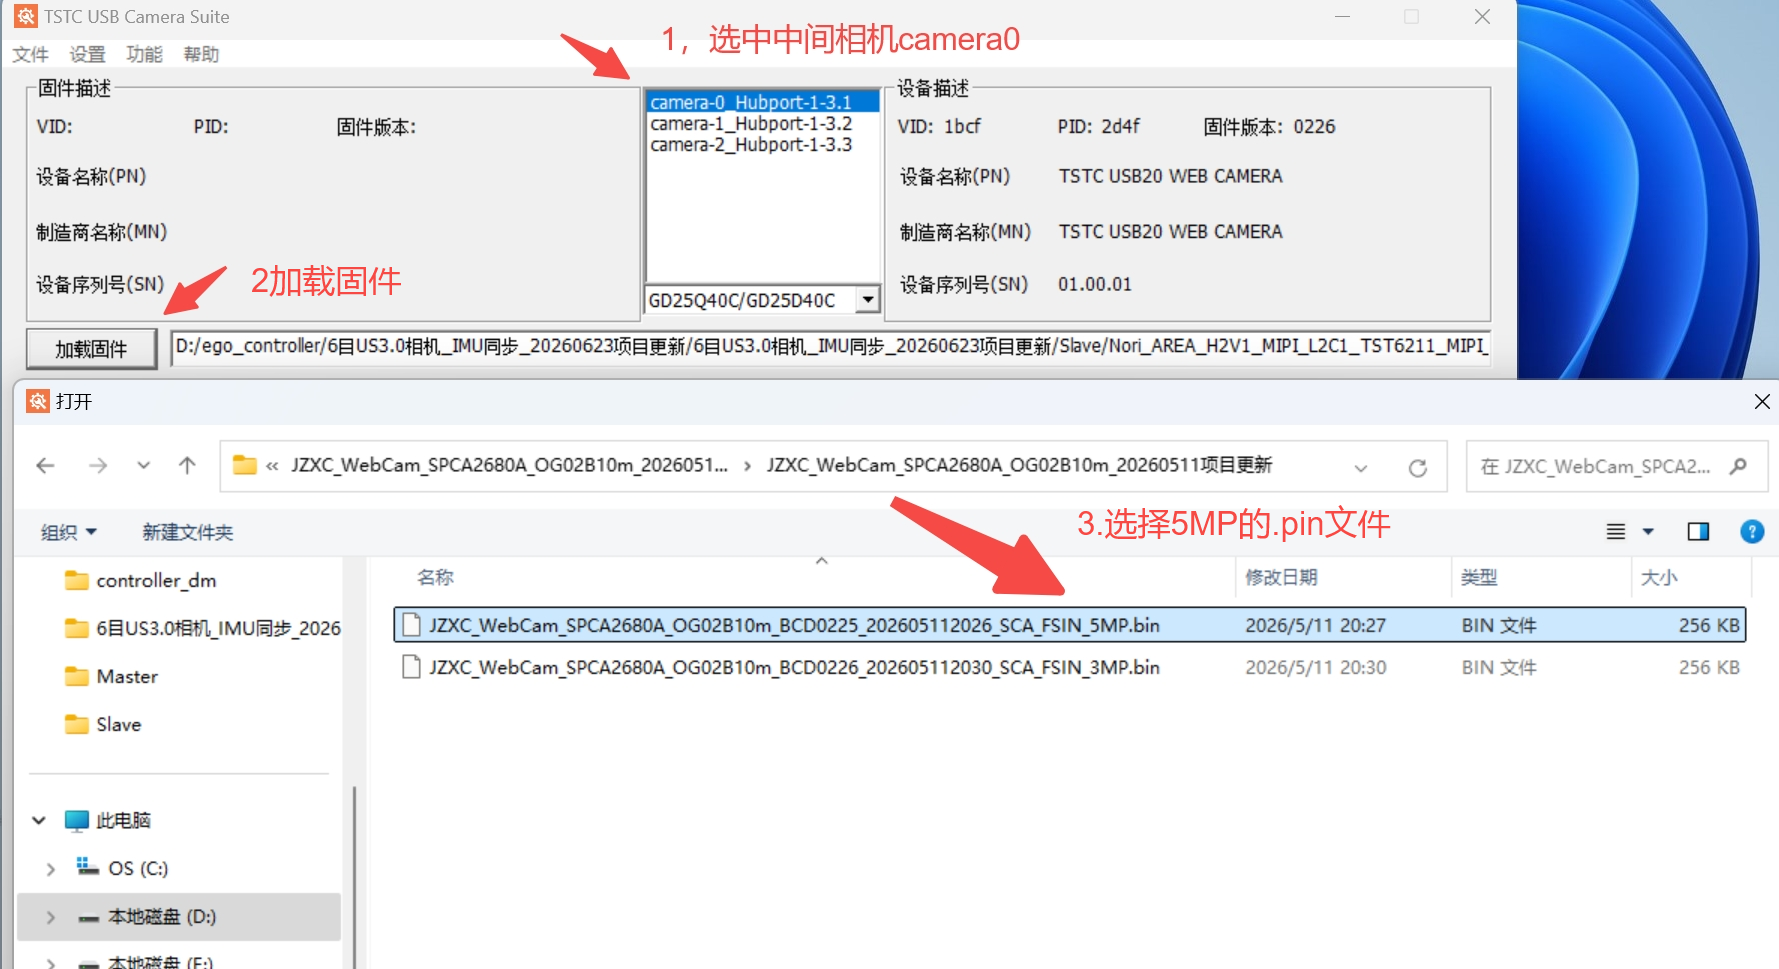
| Flashing order | Flash the center camera (camera0) first, then flash the side cameras (camera1, camera2) |
3.3 Firmware Versions
V1 Firmware Update
| Item | Description |
|---|---|
| Update reason | The actual frame rate of V4 cameras is about half of the expected value, with a maximum of 30 fps, because the exposure time was increased. |
| Version notes | Adds the 60 fps camera configuration. |
| Applicable product version | Gripper Controller V4 |
| Applicable issue | 1.6 V4 camera frame rate is halved |
| Camera Position | Firmware File |
|---|---|
| Center camera (camera0) | JZXC_WebCam_SPCA2680A_OG02B10m_BCD0225_202605112026_SCA_FSIN_5MP.bin |
| Side cameras (camera1, camera2) | JZXC_WebCam_SPCA2680A_OG02B10m_BCD0226_202605112030_SCA_FSIN_3MP.bin |
V2 Firmware Update
| Item | Description |
|---|---|
| Update reason | Jagged ghosting artifacts appear at 640×480 resolution. |
| Version notes | The V2 firmware is based on the V1 firmware and keeps the 60 fps configuration. The old firmware outputs 640×480 through sensor binning mode; V2 changes to Full Size output mode and uses ISP to scale down from 1600×1296. |
| Applicable product version | Gripper Controller V4 |
| Applicable issue | 1.7 640×480 resolution has obvious wavy jagged image artifacts |
| Camera Position | Firmware File |
|---|---|
| Center camera (camera0) | JZXC_WebCam_SPCA2680A_OG02B10m_BCD0232_202607061313_SCA_FSIN_5MP.bin |
| Side cameras (camera1, camera2) | JZXC_WebCam_SPCA2680A_OG02B10m_BCD0233_202607061315_SCA_FSIN_3MP.bin |
3.4 Tool Downloads
| Tool | Description | File |
|---|---|---|
| Firmware flashing tool | Used to flash camera firmware | TSTC_USB_Camera_Suite_Install_Package_Ver26.03.16.03.14.00.exe |
| Frame-rate test tool | Used to verify 60 fps | amcap v3.0.9.exe |
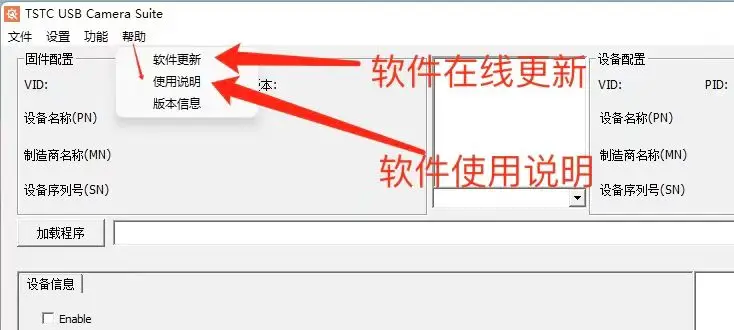
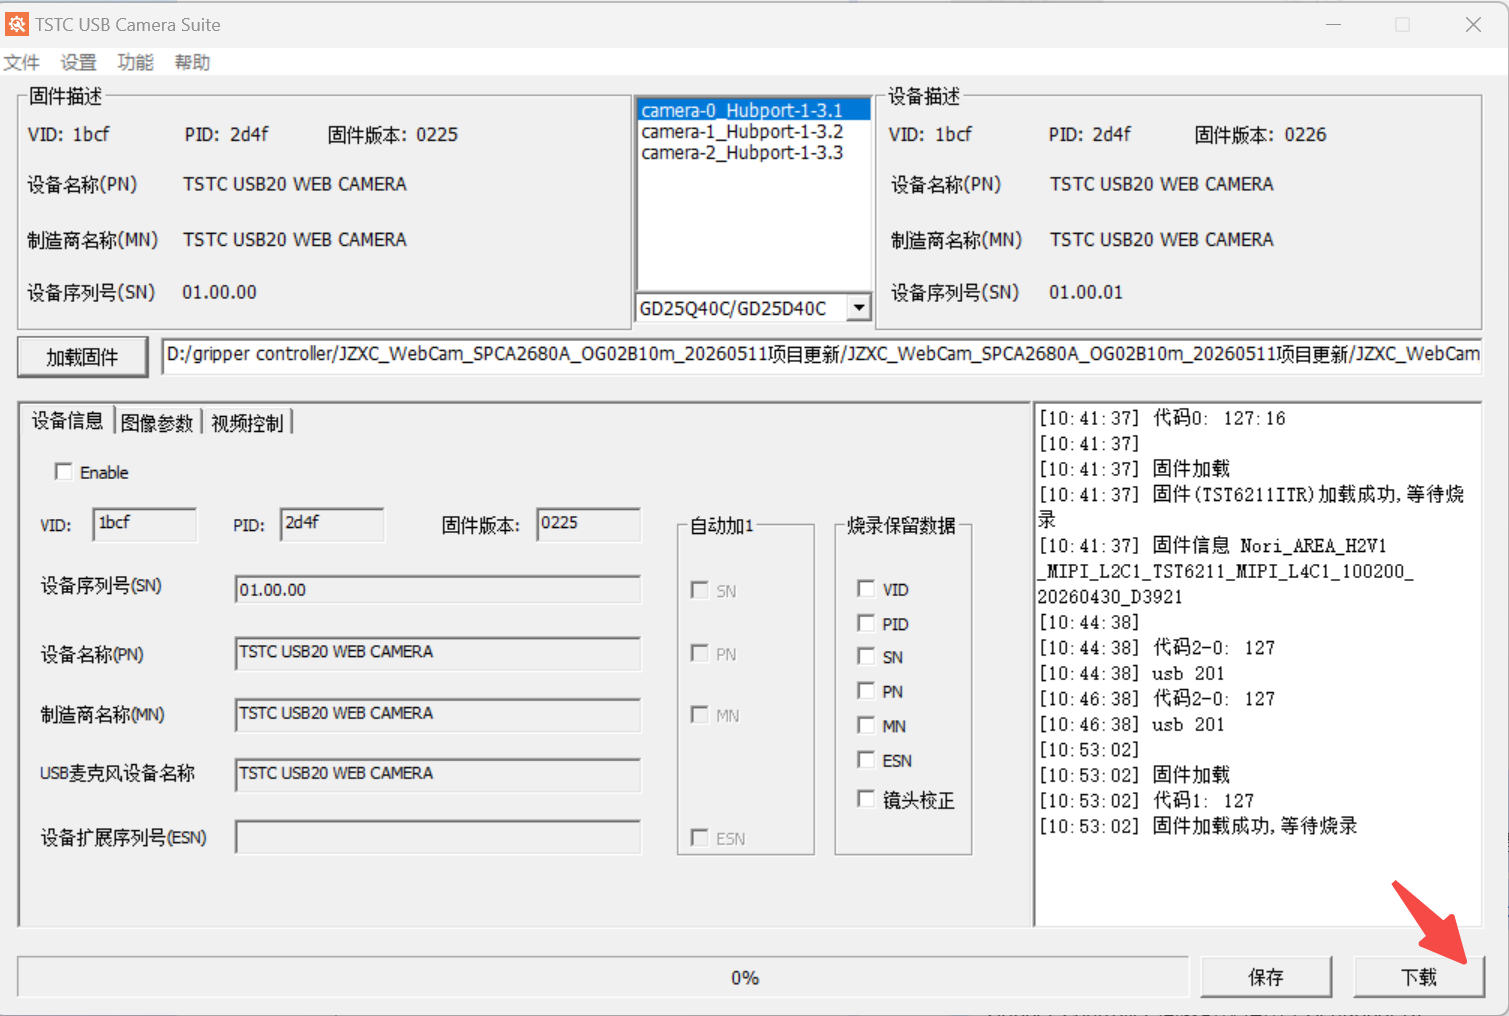
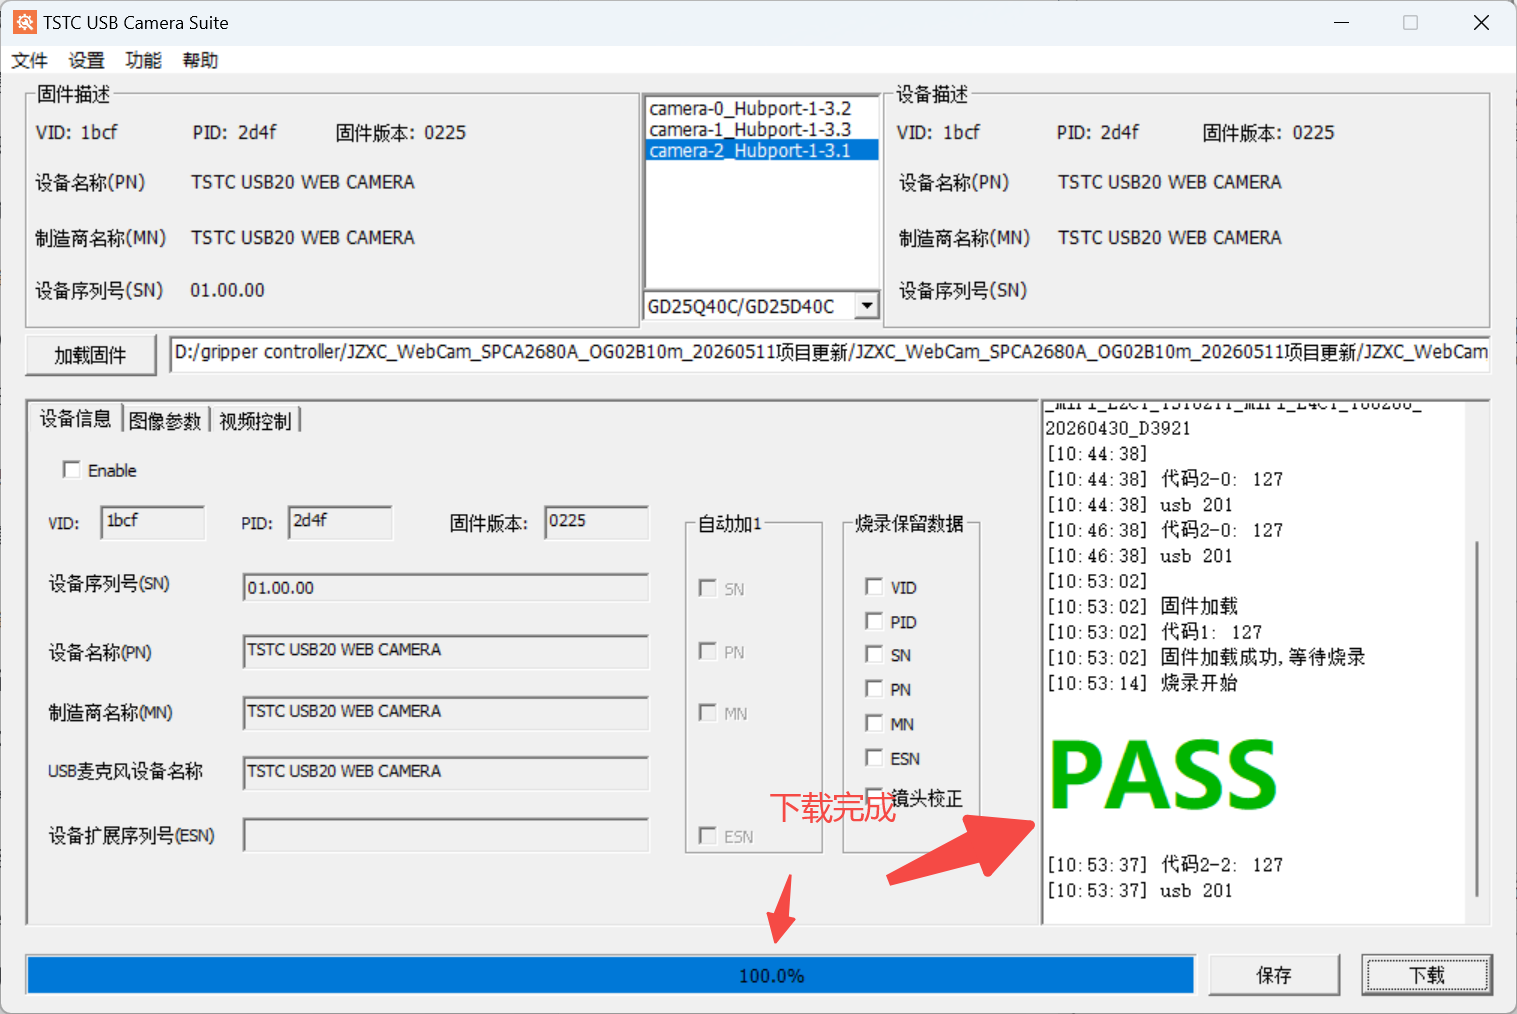
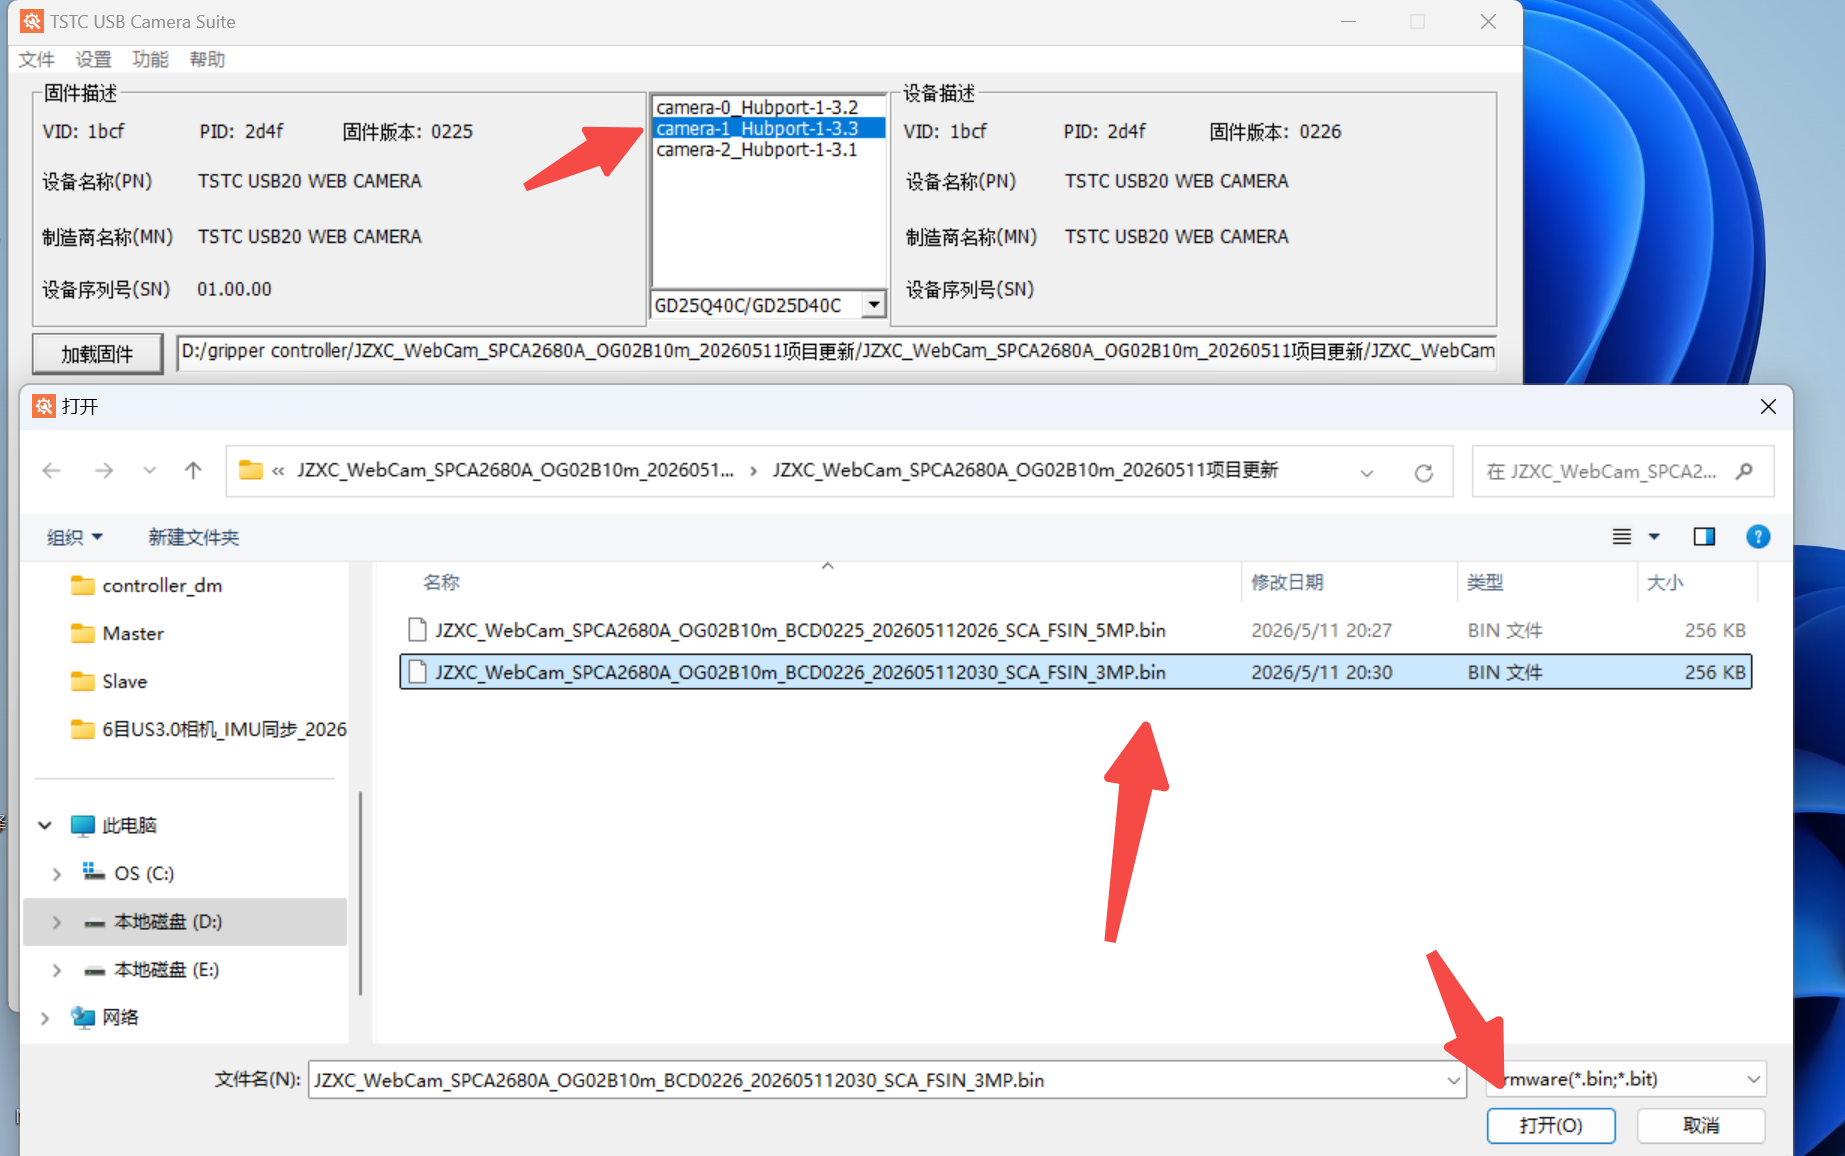
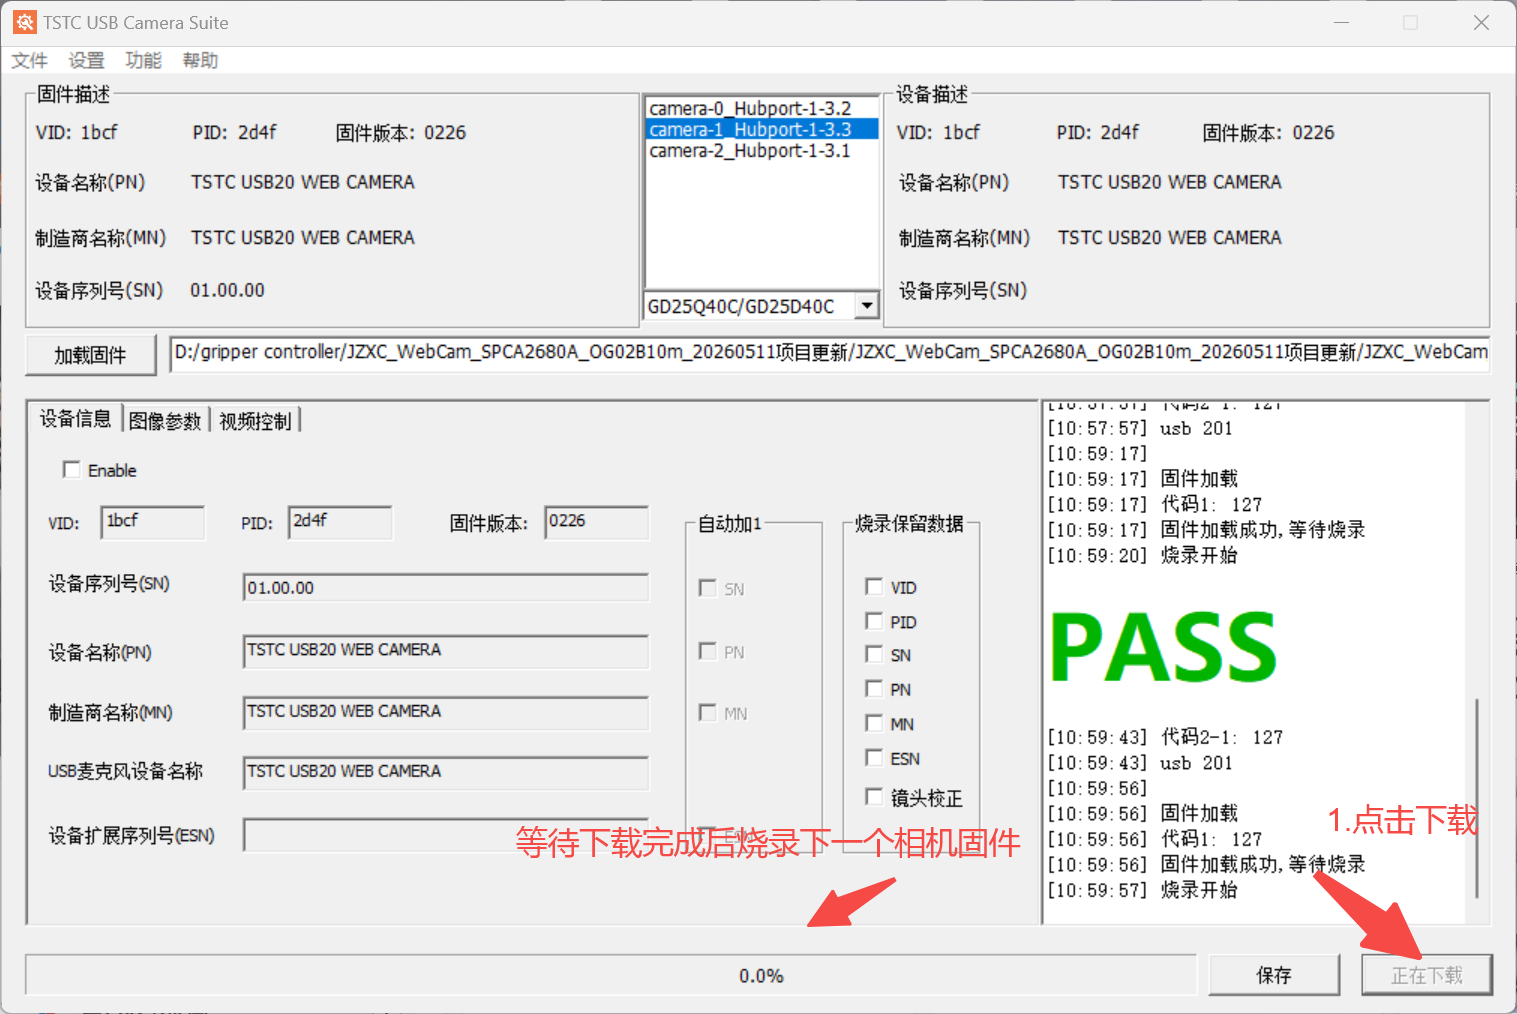
3.5 Flashing Tool Instructions
Use the tool to select the device, firmware file, and start flashing. Click the image to view it at full size.
3.6 Center Camera Firmware Flashing Steps
The center camera is camera0. Select the center-camera firmware file that matches the firmware version you are applying.
3.7 Side Camera Firmware Flashing Steps
The side cameras are camera1 and camera2. Both side cameras use the same side-camera firmware file.
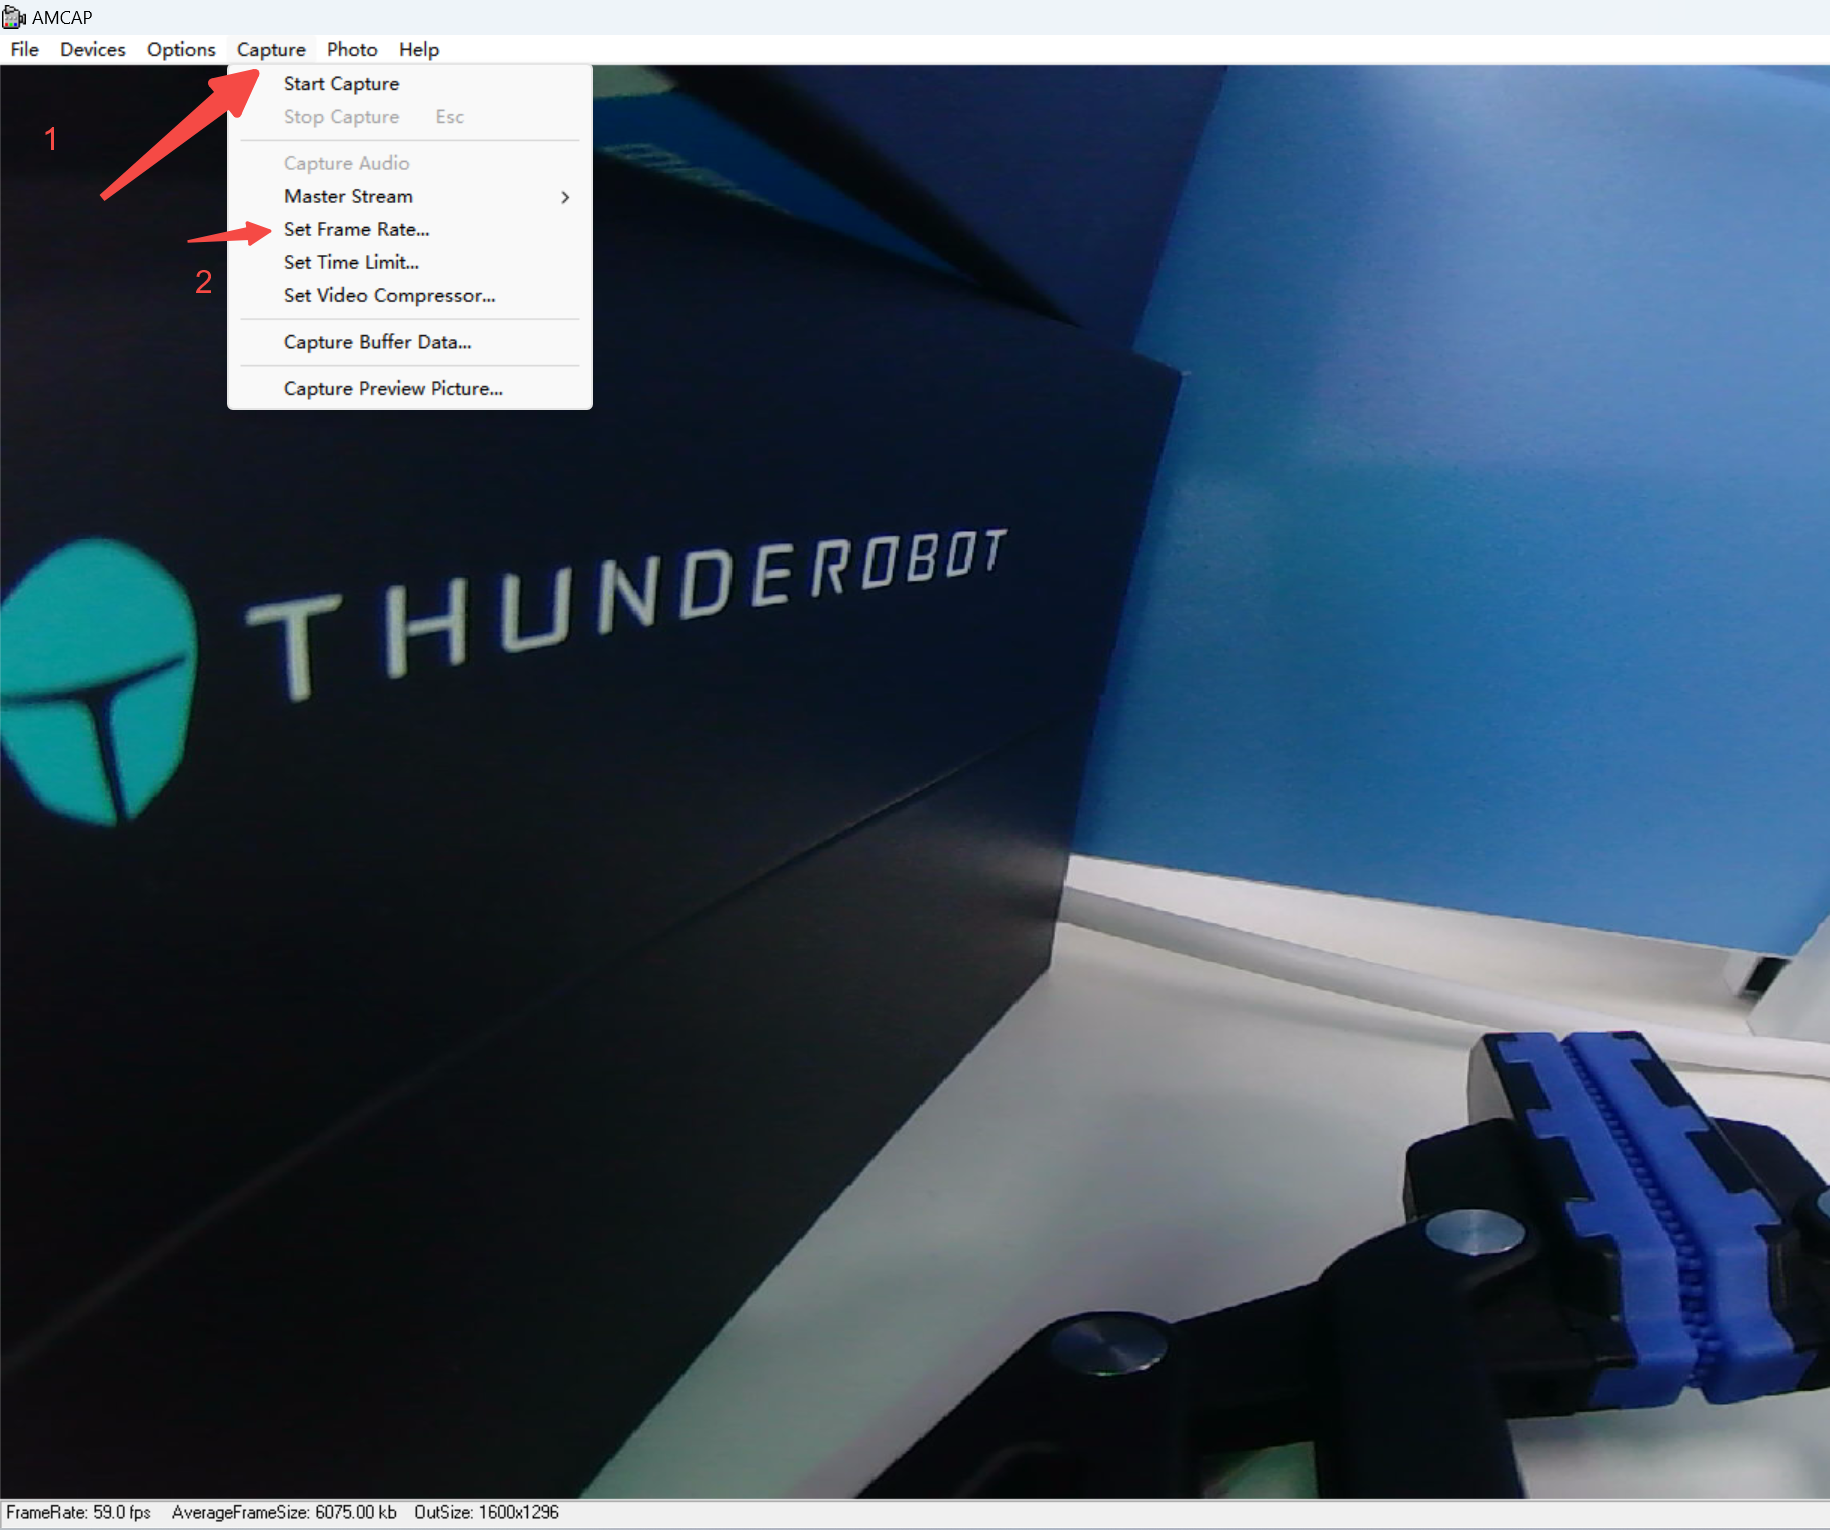
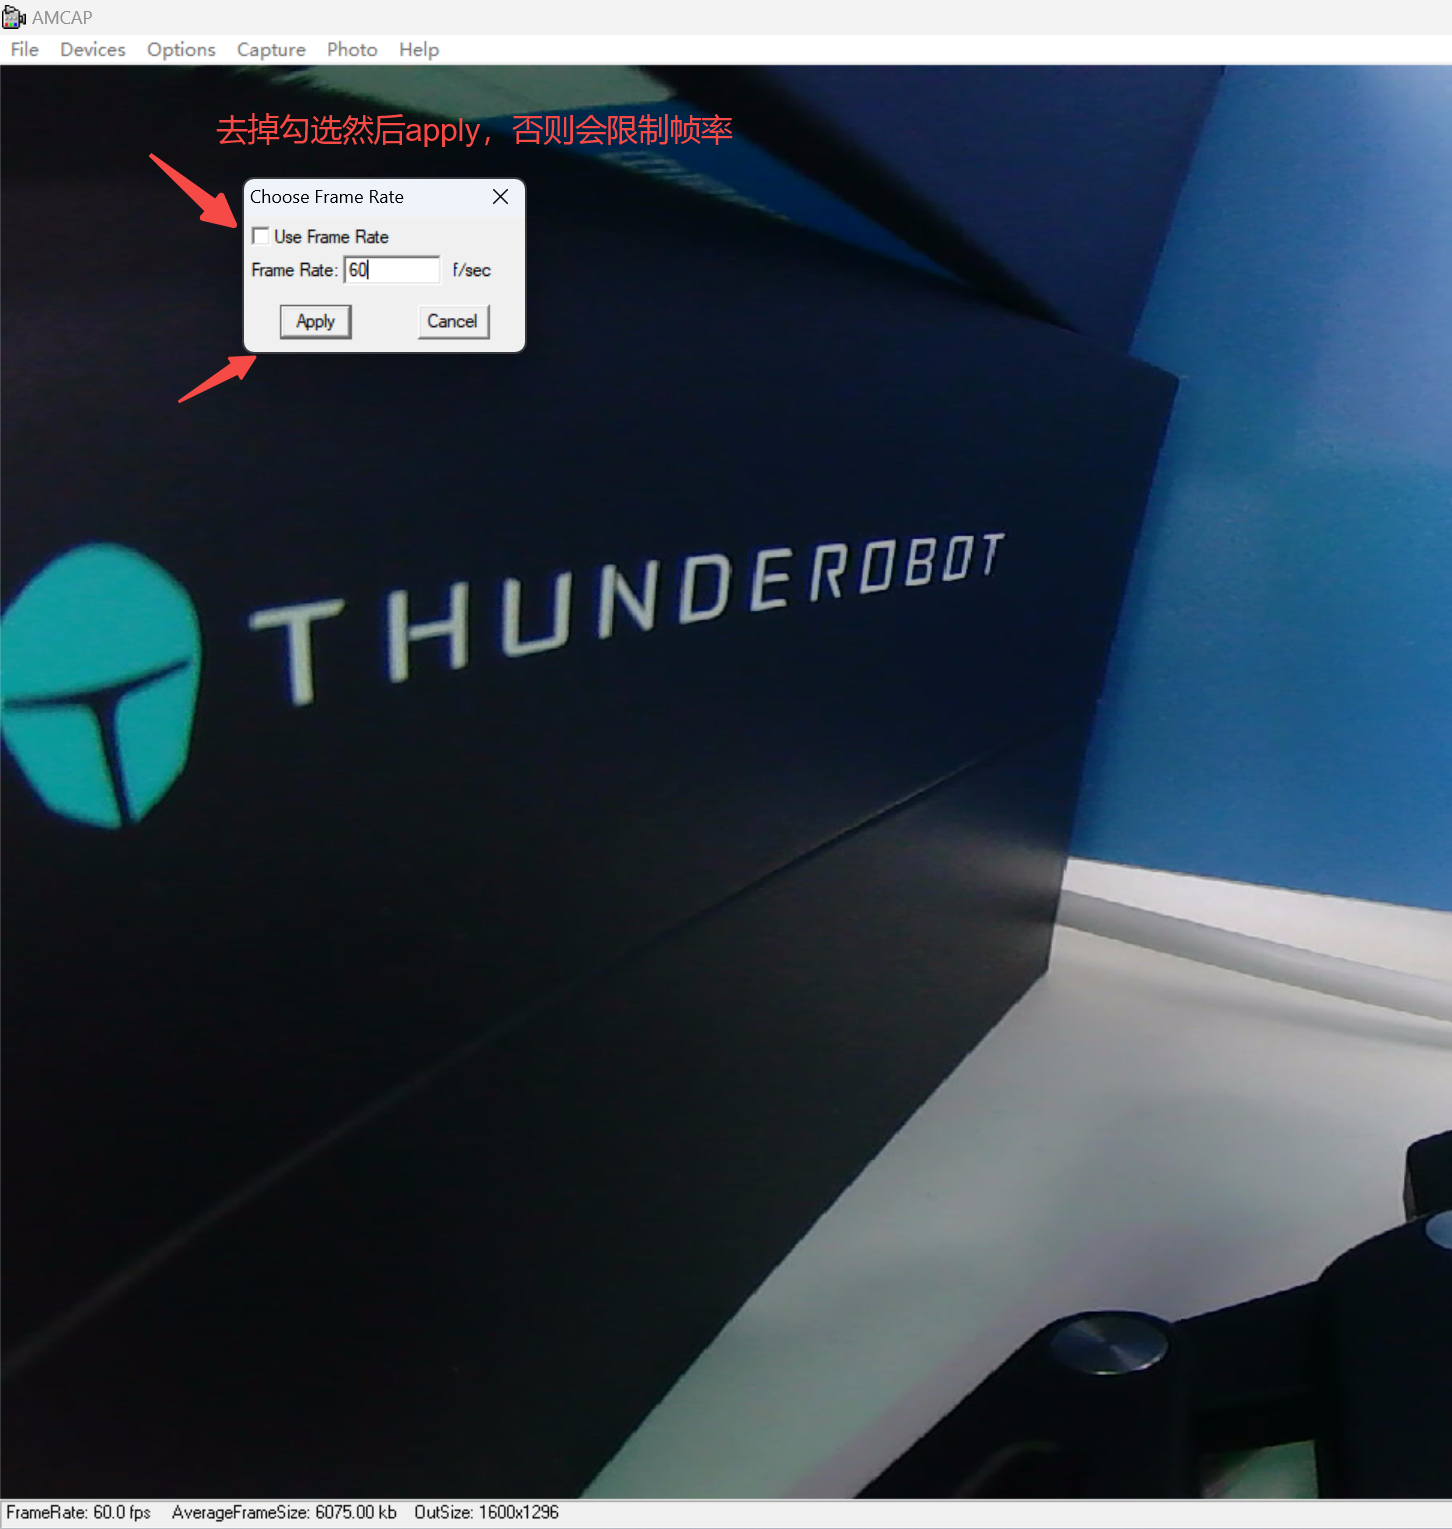
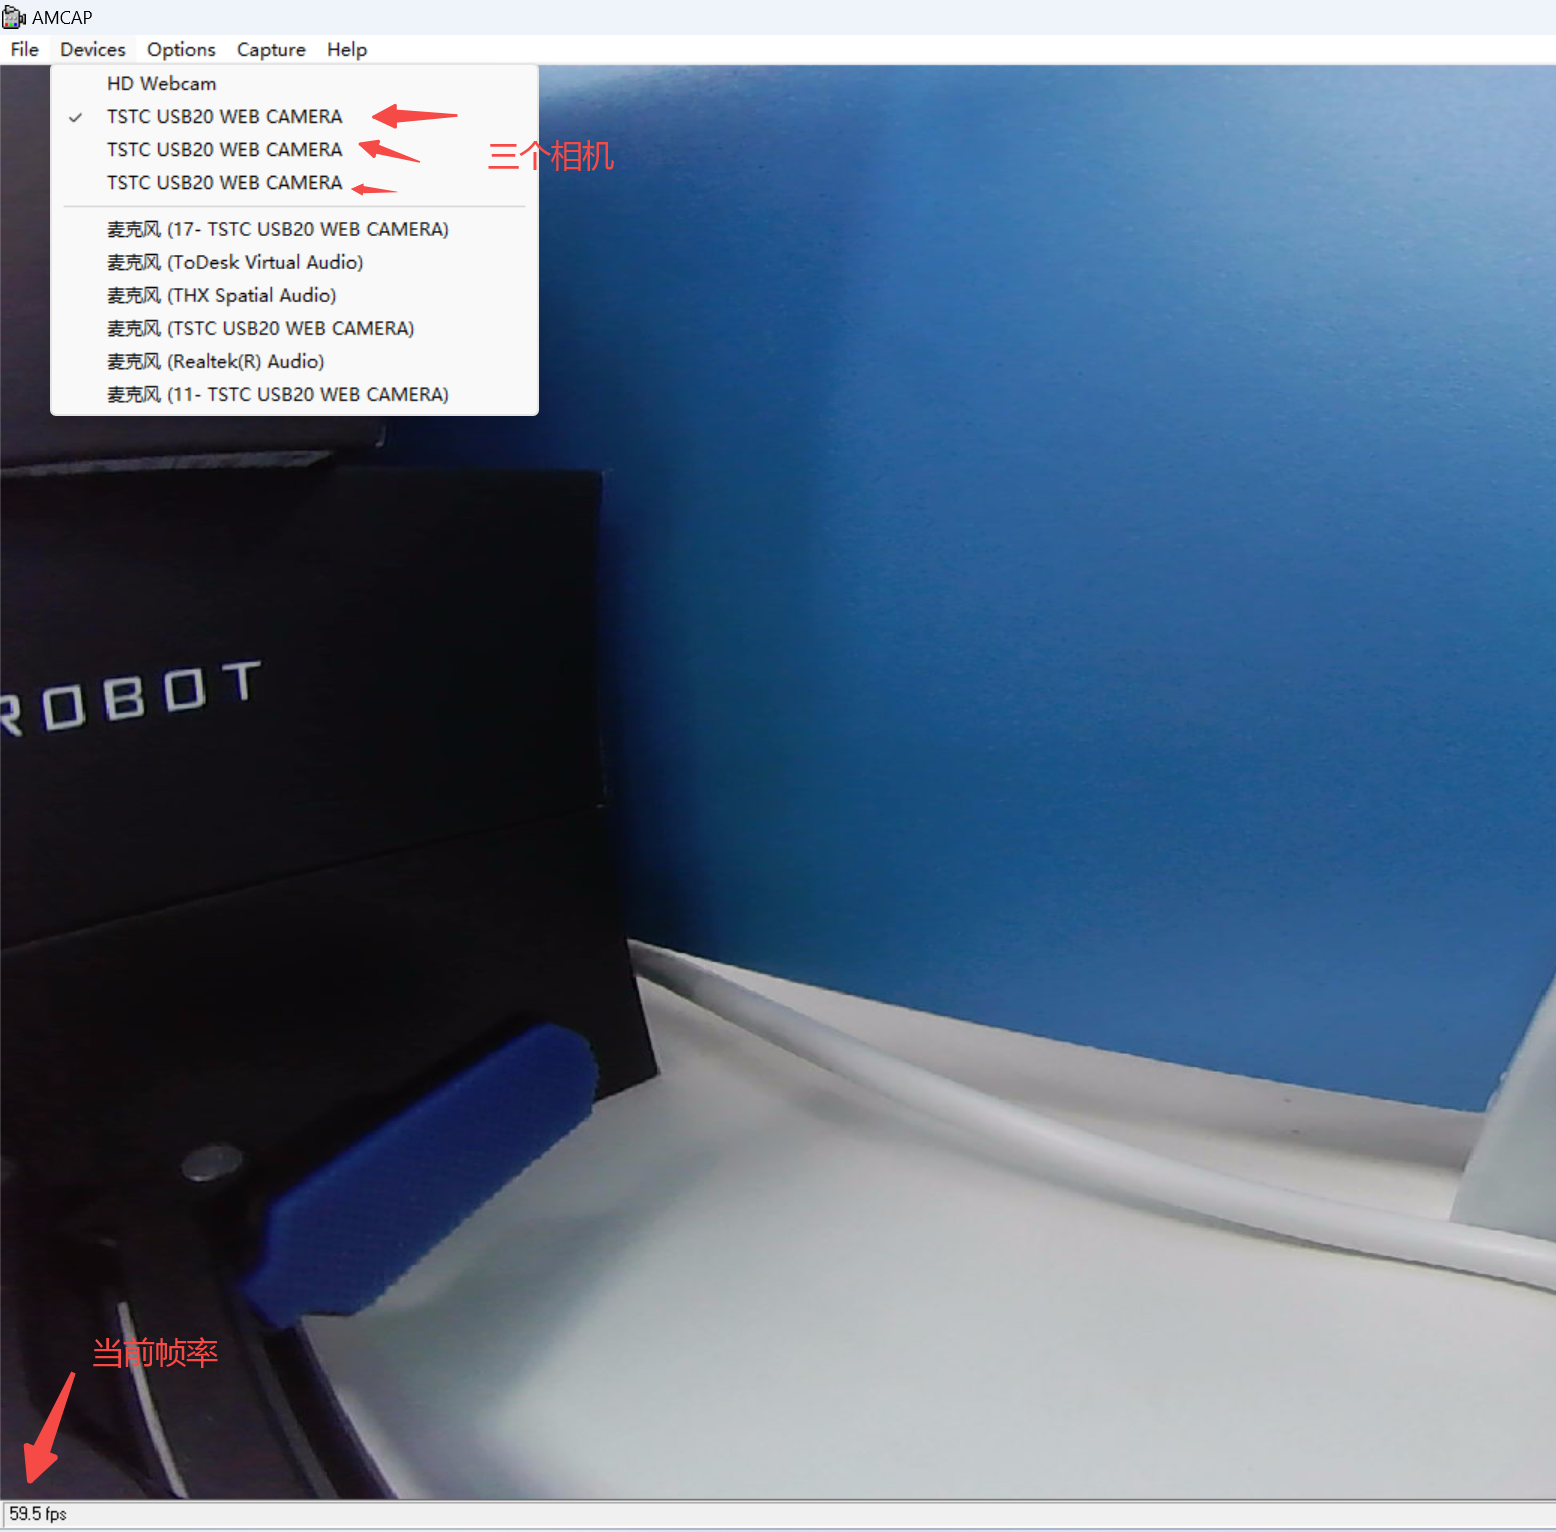
3.8 60 fps Verification
After flashing, disable the frame-rate limit first, then use the frame-rate test tool to verify 60 fps.
4. Still Unresolved?
If the steps above do not resolve your issue, contact support@genrobot.ai and provide:
- Issue number and symptom description
- Reproduction steps
- SDK version used (ROS / Python)
- Related command output or logs