DAS Finger Manual v2.0
简体中文 | English
0. Document Information
- Document version
- v2.0
- Last updated
- 2026-08-04
- Applicable product
- DAS Finger dual-finger multimodal data capture device
1. Safety and Compliance
1.1 Safety Instructions
Please read this section carefully and follow all safety guidelines before first use.
For assistance, contact: support@genrobot.ai
1.1.1 Warning Symbol Meanings
- ⚠️ Danger: May cause serious injury, death, or major property damage.
- ⚠️ Warning: May cause personal injury or equipment damage.
- ⚠️ Caution: May cause equipment failure or data loss.
- 💡 Tip: Helpful suggestions for better operation.
1.2 Liability and Limitations
- Do not modify, alter, or tamper with the device.
- GENROBOT.AI is not responsible for issues caused by misuse, unauthorized modifications, or improper operation.
- By using this device, you agree to all safety terms and assume full responsibility for its operation.
- This product is not intended for users under 18 years old.
1.3 Integrator and User Responsibilities
- Perform a complete hazard and risk assessment before deployment.
- Implement appropriate safety protections based on the assessment results.
- Ensure all hardware and software are installed and configured correctly.
- Do not disable or alter safety measures without authorization.
- Comply with applicable laws, standards, and industry regulations.
1.4 Environmental Requirements
- Operating temperature: 0°C-40°C (optimal 22±2°C)
- Relative humidity: 40% RH-65% RH (no condensation)
- Ingress protection: IP50
- Magnetic flux density: ≤50 mT
- Illuminance ≤500 lux; avoid direct light and highly reflective surfaces
- Stable floor; stay away from motors, VFDs, high-power supplies, and Wi-Fi 6E/5G base stations
- Dust-free, no oil smoke, no corrosive gases
1.5 Usage Warnings
1.5.1 Danger Warnings
- Never modify or tamper with the device.
- Stop using the device if it is damaged or unstable.
- Avoid exposing the device to strong magnetic fields for extended periods.
1.5.2 Operational Warnings
- Implement safety measures based on your risk assessment.
- Keep bystanders away from the device motion area.
- Reassess risk when integrating new components or equipment.
- Read all relevant device manuals before operation.
1.5.3 Maintenance Warnings
- Use only genuine accessories and replacement parts.
- Inspect the device regularly to catch issues early.
- Follow the recommended maintenance schedule.
- Store the device under compliant environmental conditions.
1.6 Data Security and Privacy
1.6.1 Data Protection
- Handle captured data securely; it may contain sensitive information.
- Back up important data regularly.
- Understand the data policies of any connected cloud services.
- Comply with applicable data protection regulations.
1.6.2 Privacy Protection
- Respect others' privacy when operating in public.
- Obtain necessary consent before recording or collecting data.
- Follow local laws on data acquisition.
2. Product Overview
2.1 Key Features
DAS (Data Acquisition System) is a general-purpose embodied multimodal data acquisition system.
Gen DAS Fingers is a dual-finger, body-free data capture device from GenRobot for fine manipulation and precise execution in embodied AI. The lightweight body integrates four sensing modalities: vision, tactile sensing, inertial sensing, and magnetic encoding. It supports millimeter-class tactile resolution and trajectory reconstruction accuracy for dexterous, human-like control with realistic tactile feedback and faithful human behavior data.
2.2 Packing List and Specifications
| Item | Qty | Specification |
|---|---|---|
| Main unit | 1 | 285 g |
| Tactile end effectors | 2 | Left / right tactile ends |
| Screws | 2 | M2*5 Torx countersunk |
| Wrench | 1 | L-shaped Torx wrench |
| Data cable | 1 | USB 3.0 to Type-C, 1 m |
2.3 Device Layout
| Module | Layout / specifications |
|---|---|
| Camera | One ~2 MP wide-angle RGB camera; horizontal FOV ~150°, vertical FOV ~130°, diagonal FOV ~180°; recording at 30 Hz. |
| Battery | Battery parameters: Capacity: 2000 mAh (typical) Charger: 5 V / 2 A or 5 V / 3 A Typical charge time: 2 h Runtime: 1 h 50 min Port: Type-C (charging, USB 3.1 Gen 1 data transfer) |
| IMU | High-accuracy 6-axis sensor in a 2×2 IMU array, calibrated and processed in software; gyro bias stability is about 2.5°/h, and temperature drift is about 0.03°/s from -40°C to 85°C. |
| URDF | Use the Feishu URDF document as the source of truth. |
2.4 Appearance Annotation
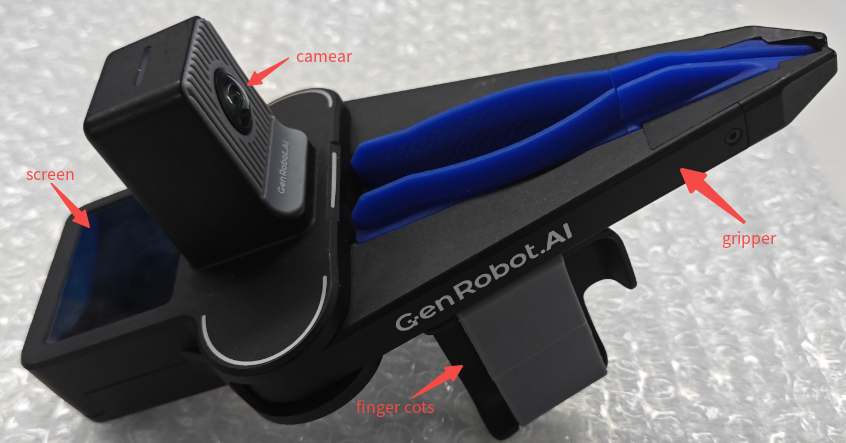
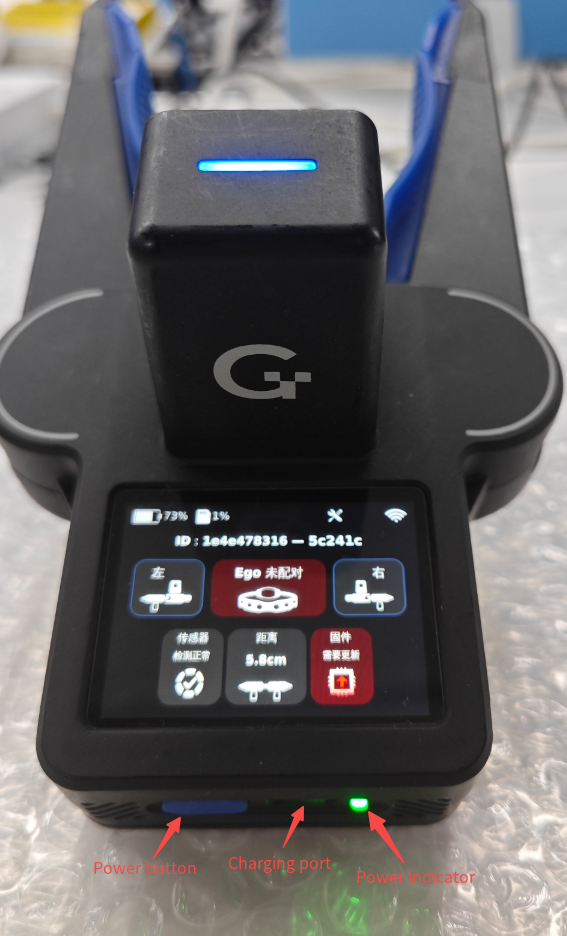
Power on / off
- Short-press the power key: the green LED turns on, indicating power on.
- Long-press the power key: the green LED turns off, indicating power off.
3. Core Concepts
3.1 URDF
- DAS Ego URDF: Feishu document
- DAS Finger URDF: Feishu document
3.2 World Frame
- Ego and both Finger poses are expressed in the world frame built from Ego's pose at capture start.
- For topic-level details, see DAS Ego — Technical Reference.
3.3 Local Frame
3.3.1 Ego
3.3.2 Finger
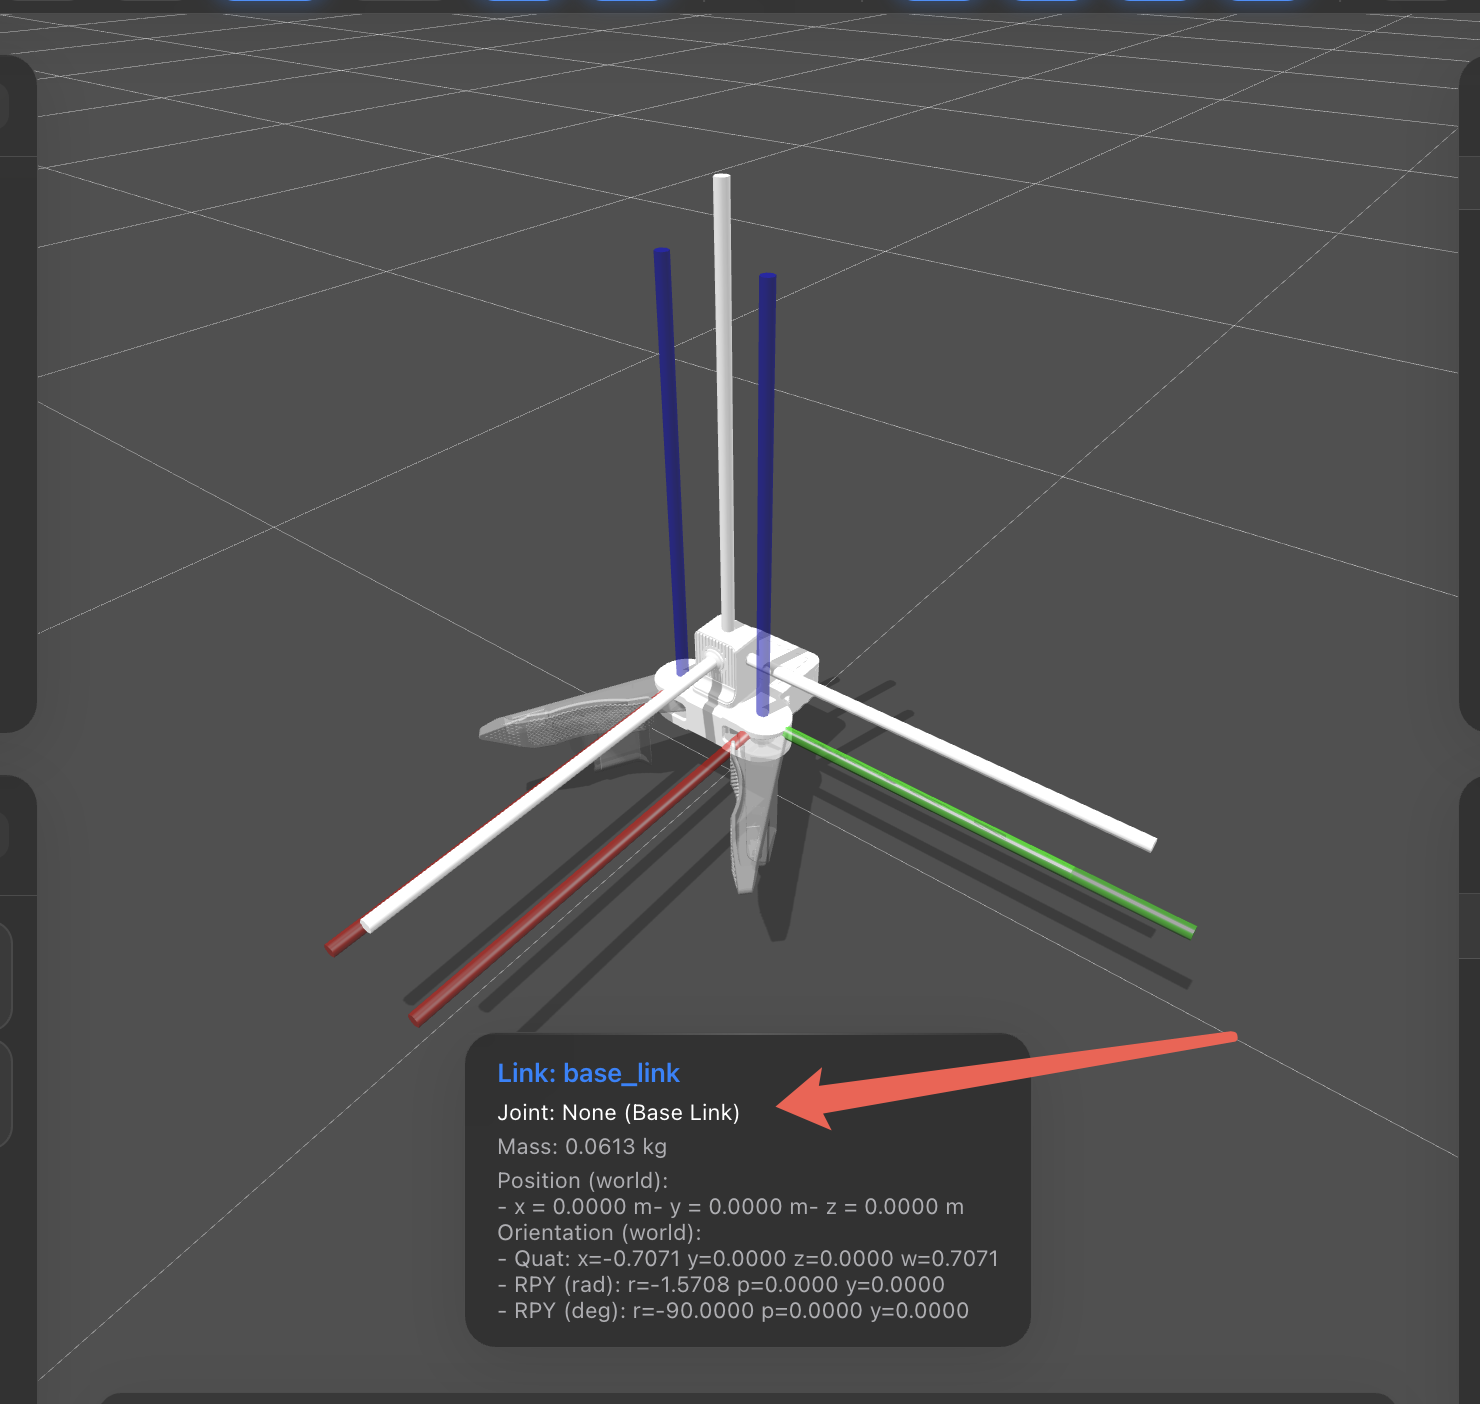
- The origin is at the camera optical center; axes follow a right-handed frame with X forward, Y left, and Z up (aligned with
base_linkin the URDF).
4. Operation Guide
Quick Start
Login, Connection, and Pairing
Start/End Data Collection
- The latest APP version is 1.0.26, EGO is 2.1.26, and FINGER is 4.15.03.
- Update both the devices and the APP to the latest versions before pairing and use.
4.1 Hardware Preparation
Multi-device capture requires one Ego and two Finger units. Follow the steps below to complete pairing and capture preparation.
4.1.1 Finger App Connection
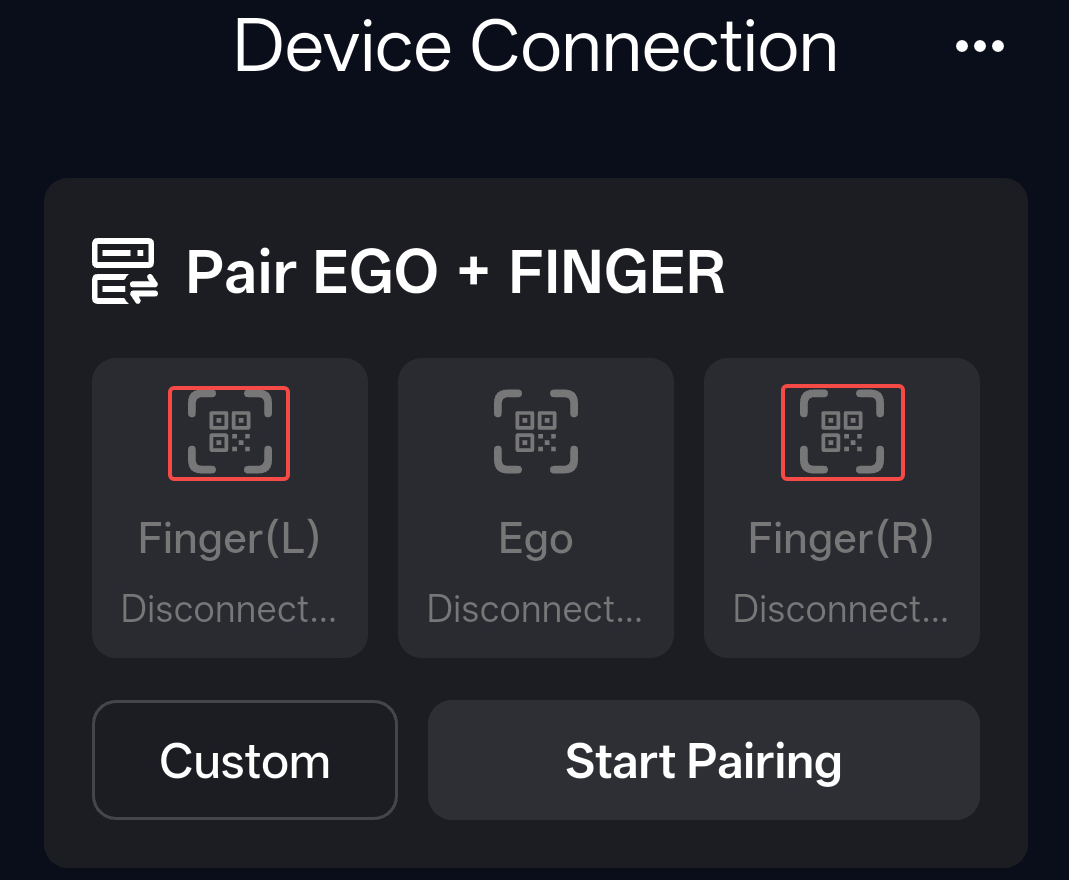
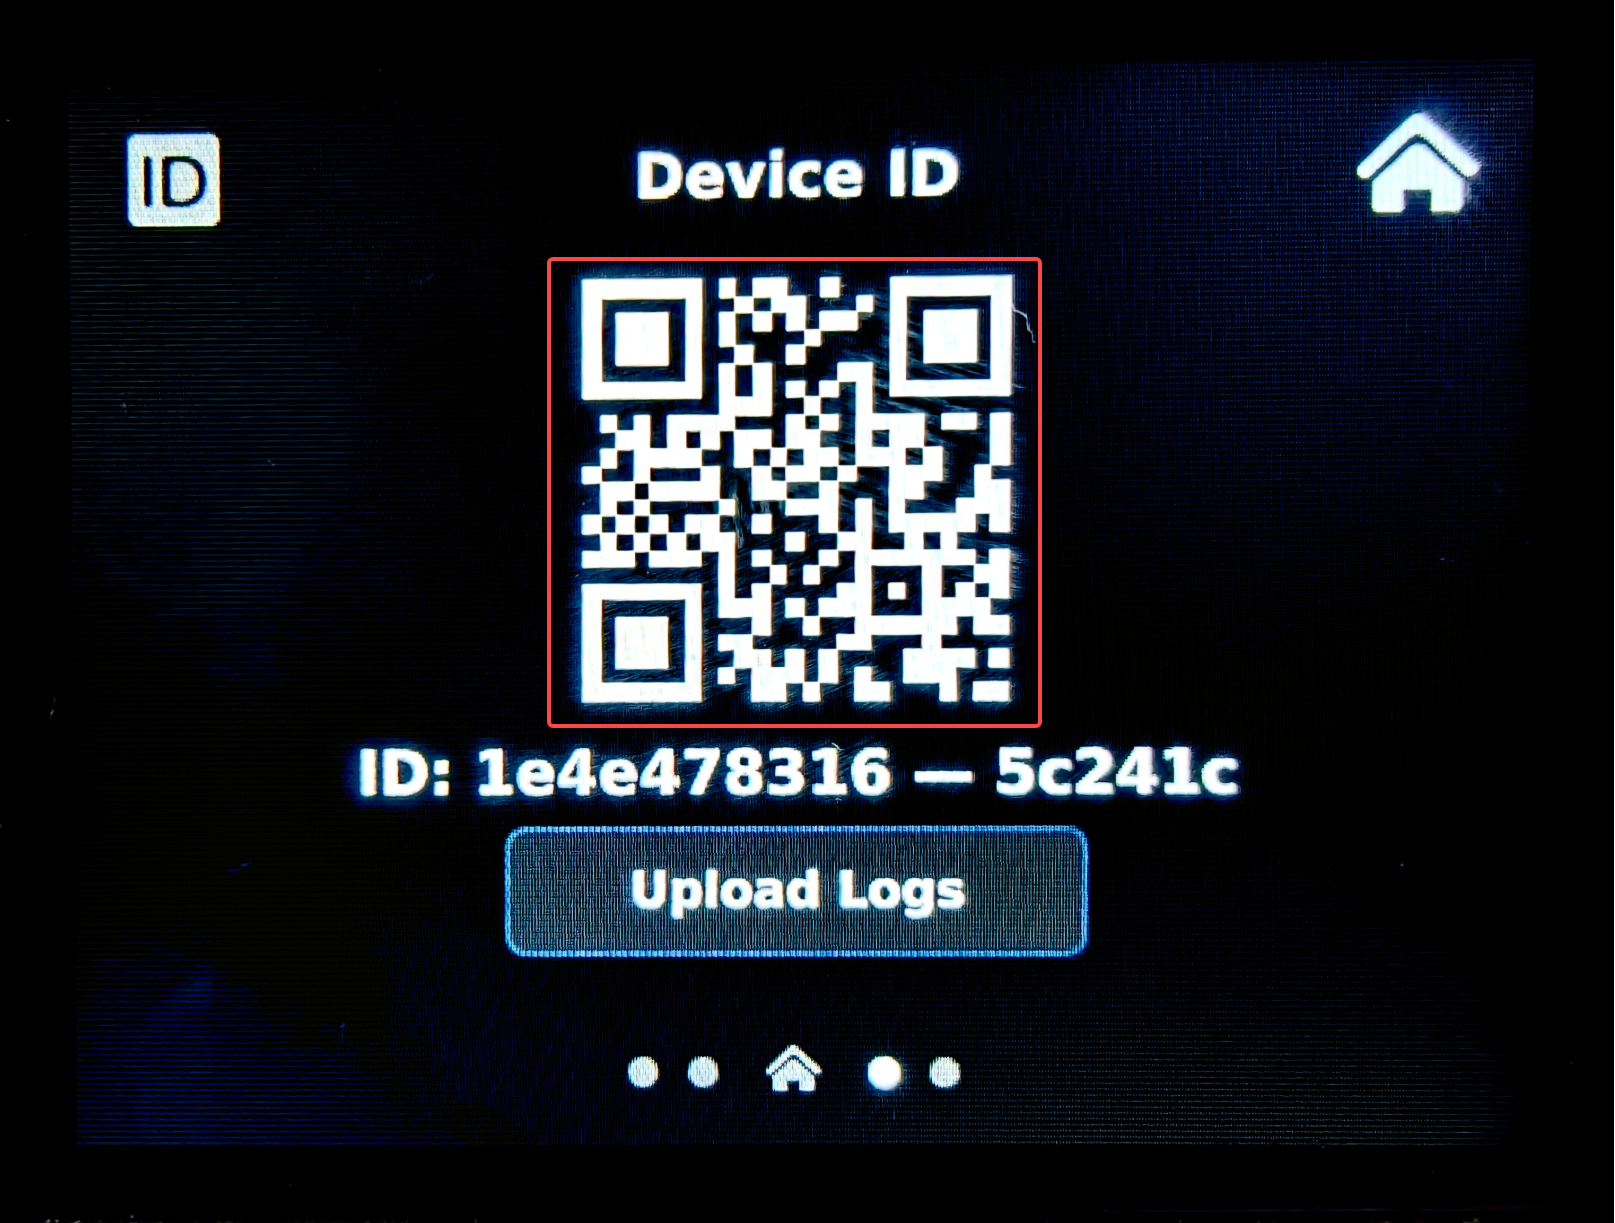
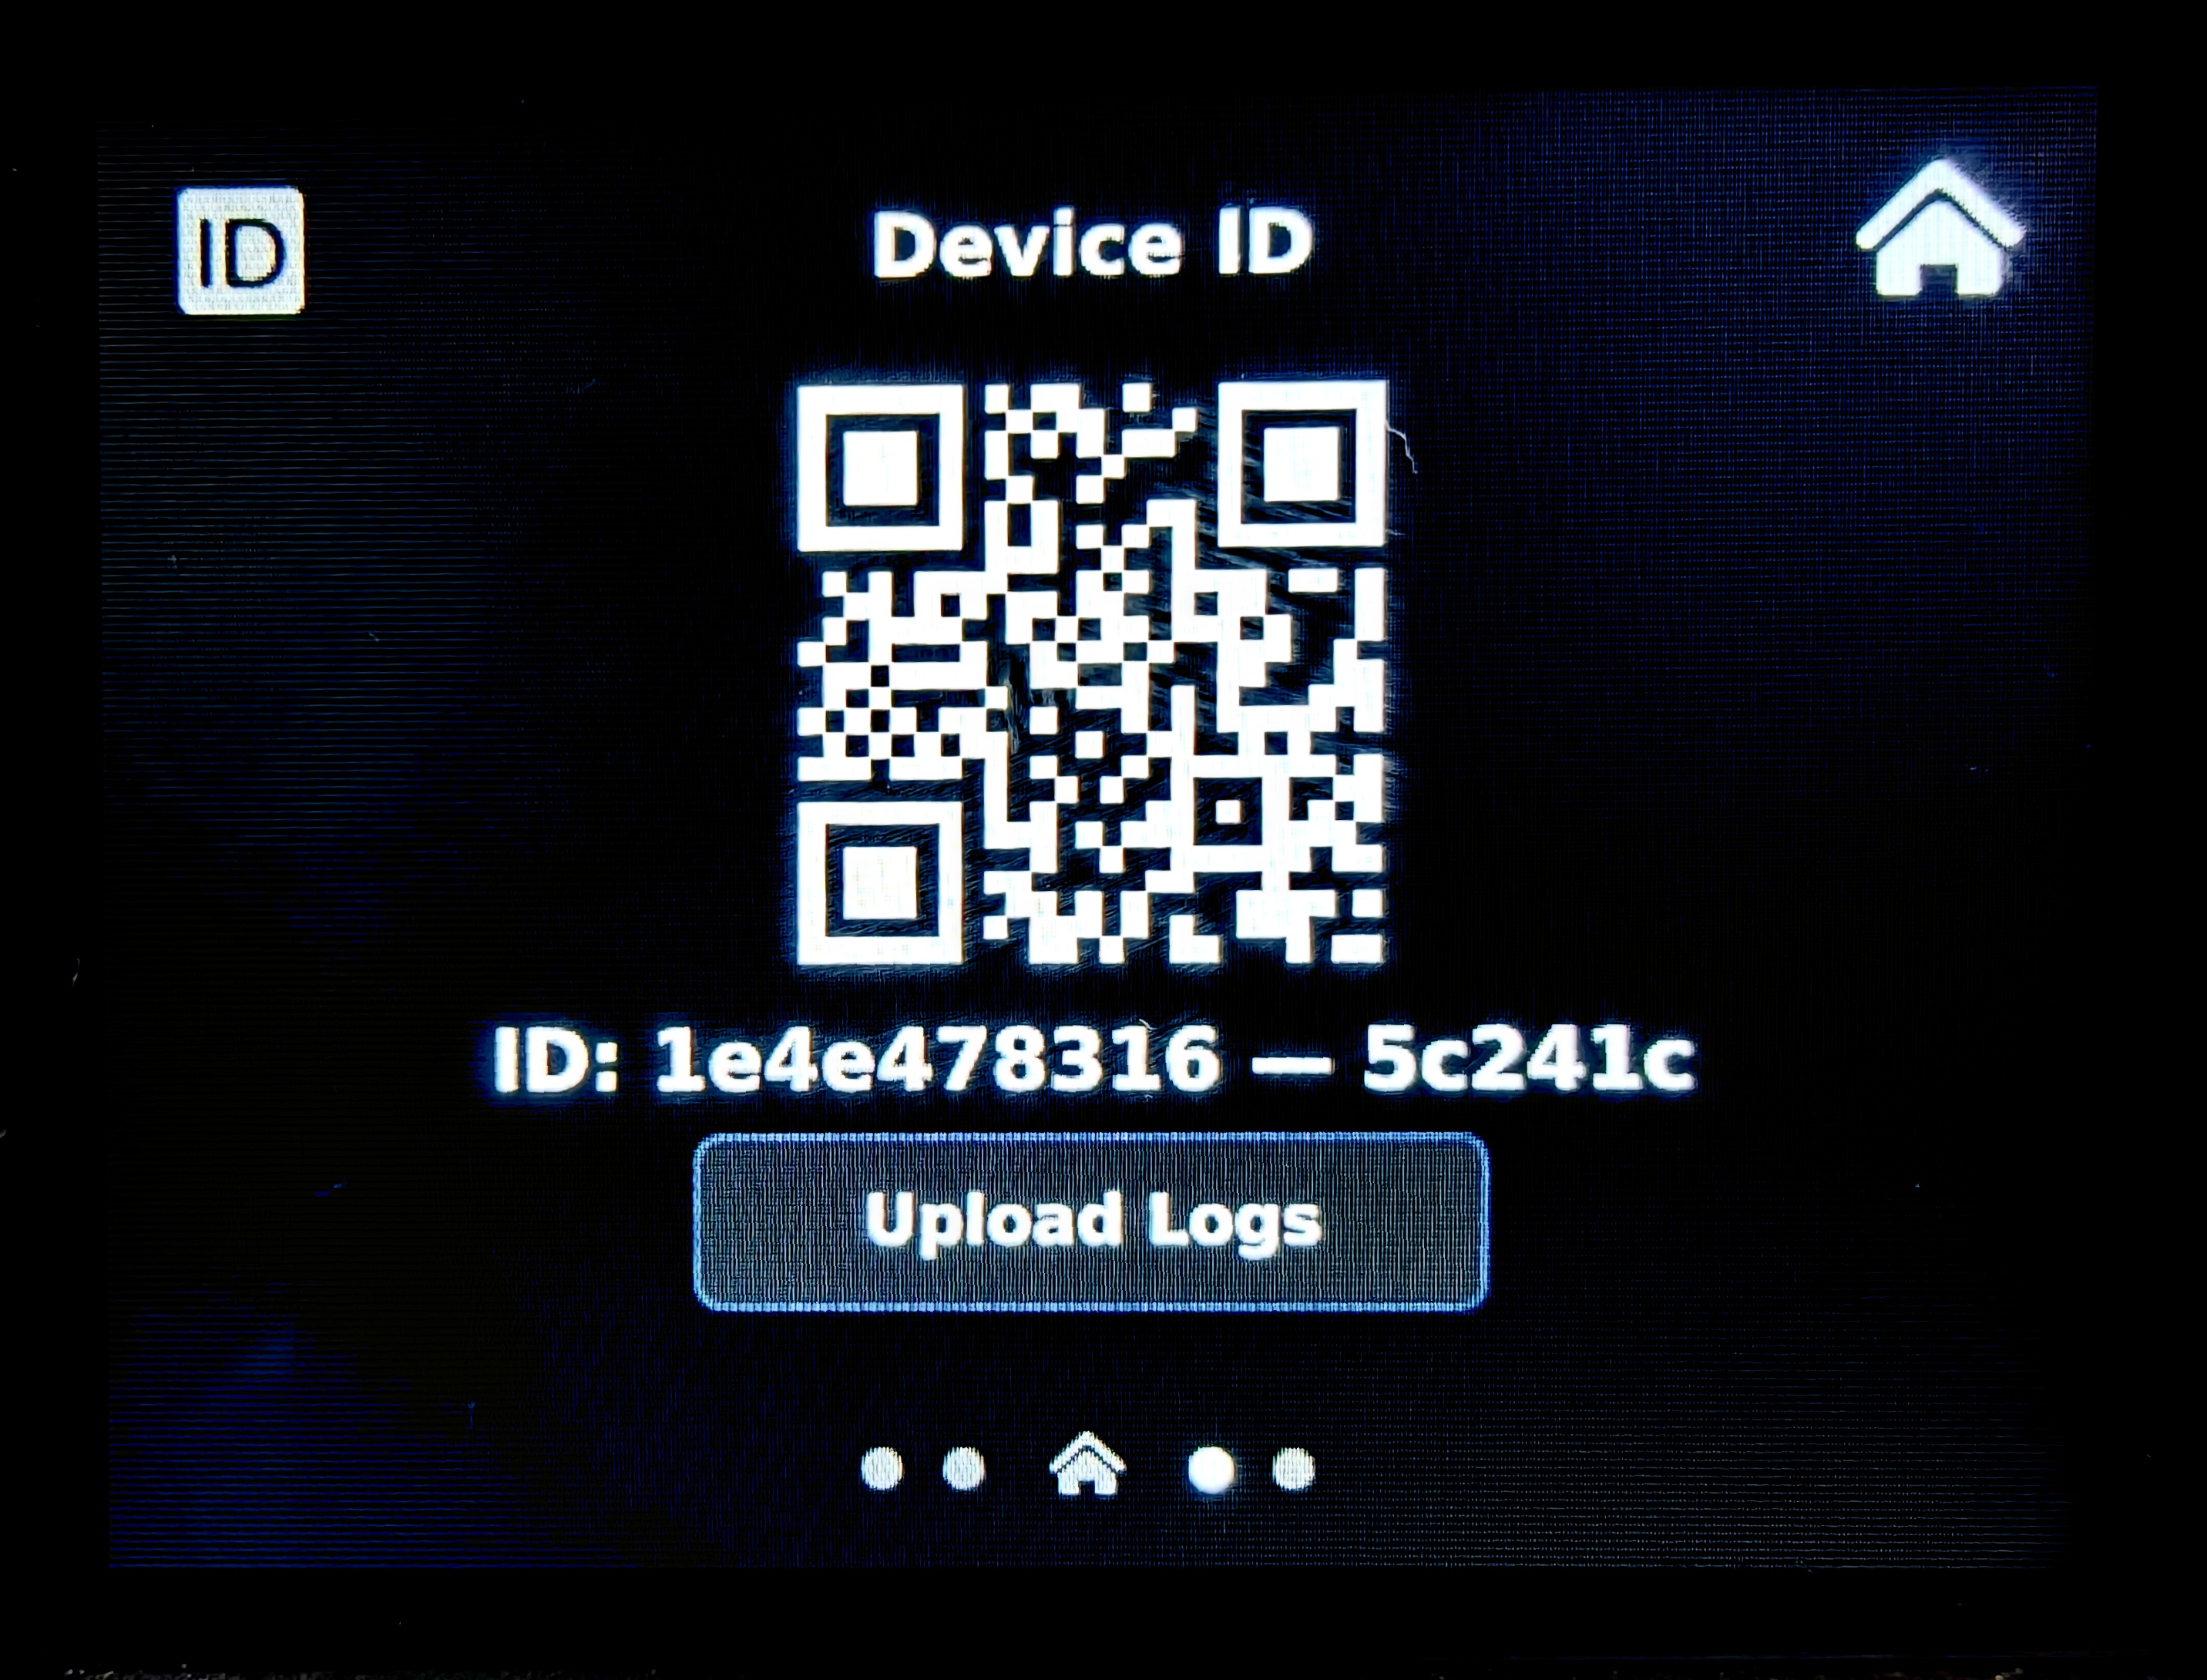
With the device powered on (tap the power key to power on; long-press the power key to power off), tap the Finger scan button on the device connection screen (L corresponds to the left-hand device, R to the right-hand device). Aim the phone camera at the QR code on the Finger device ID screen (from the Finger home screen, swipe left to the first screen on the right to open the device ID page).
4.1.2 DAS App Introduction
WiFi Connection
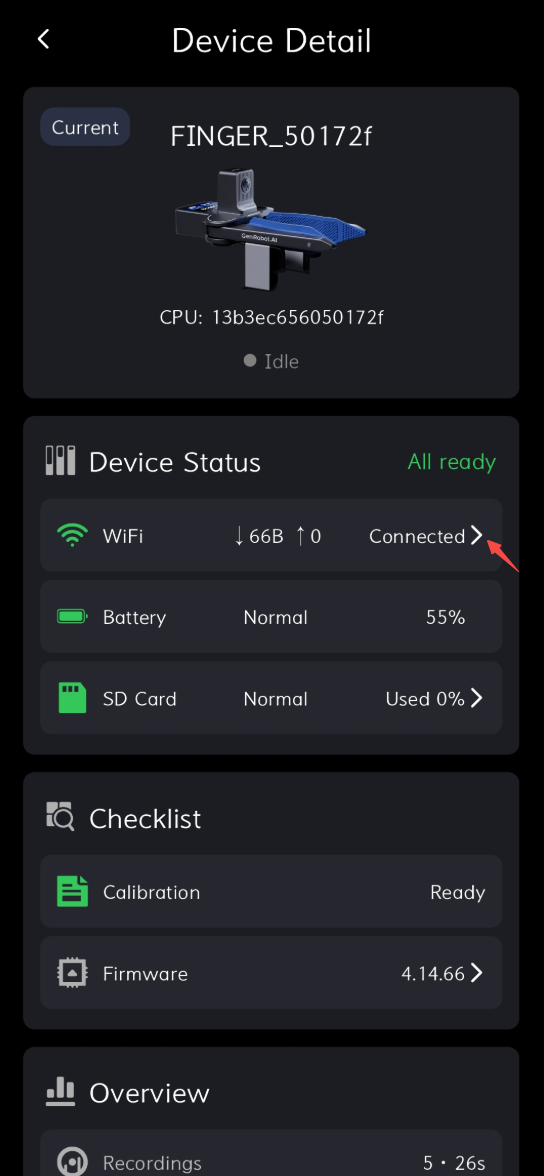
1. After the device is connected, tap the button to enter the device status page.

2. On the Status page, tap the button on the right side of WiFi to enter the WiFi connection page.
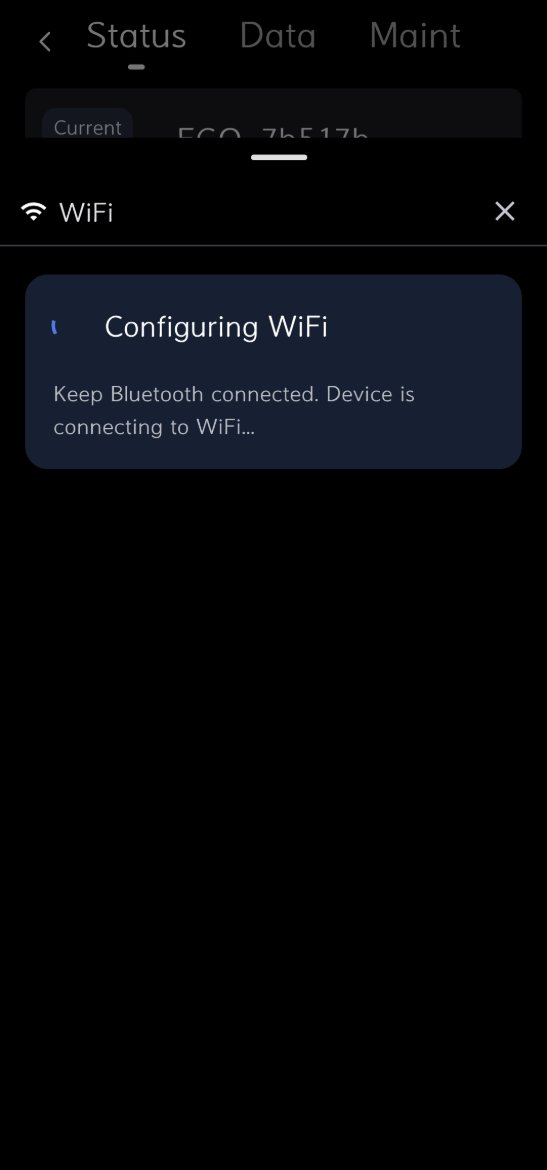
3. Wait for the device to search for nearby WiFi networks.
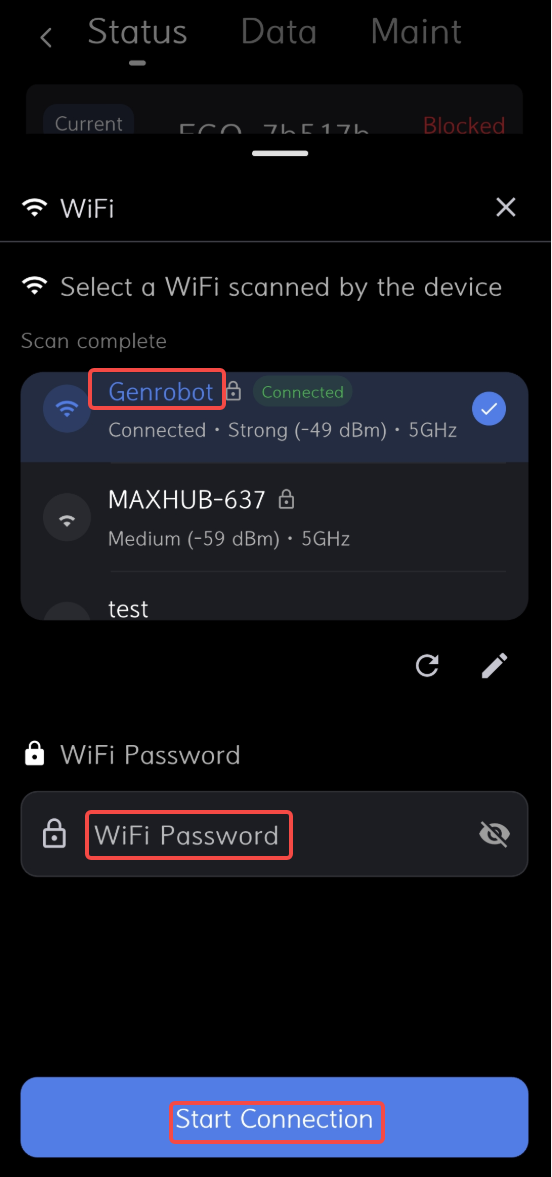
4. Select WiFi, enter the password, and tap Start Connection.
No Matrix Mode
1. Switch the app to the Maintenance page, select No Matrix Mode in the bottom navigation, and configure direct storage credentials.
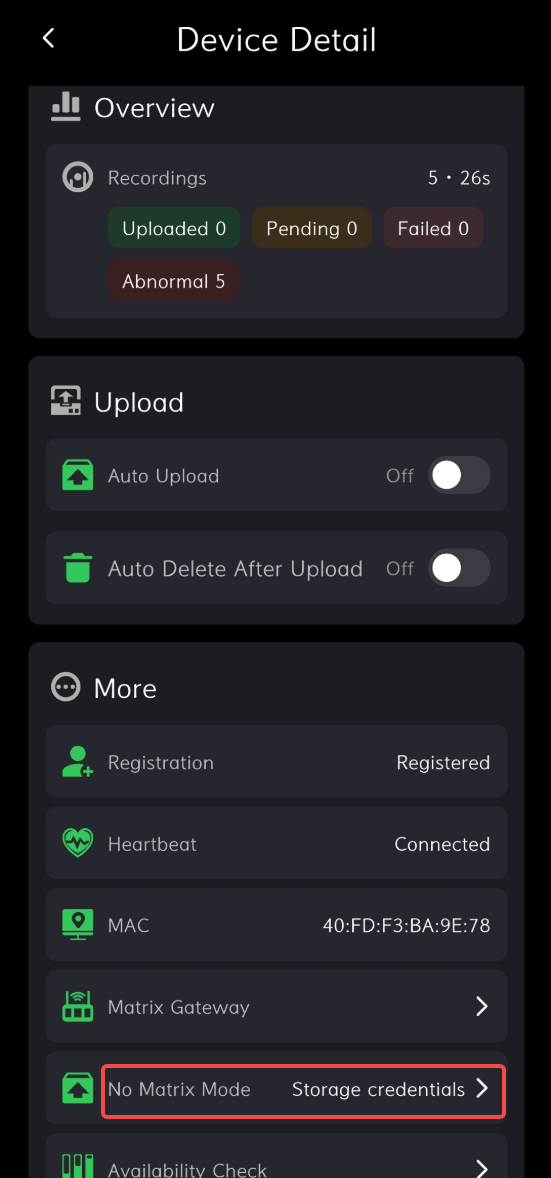
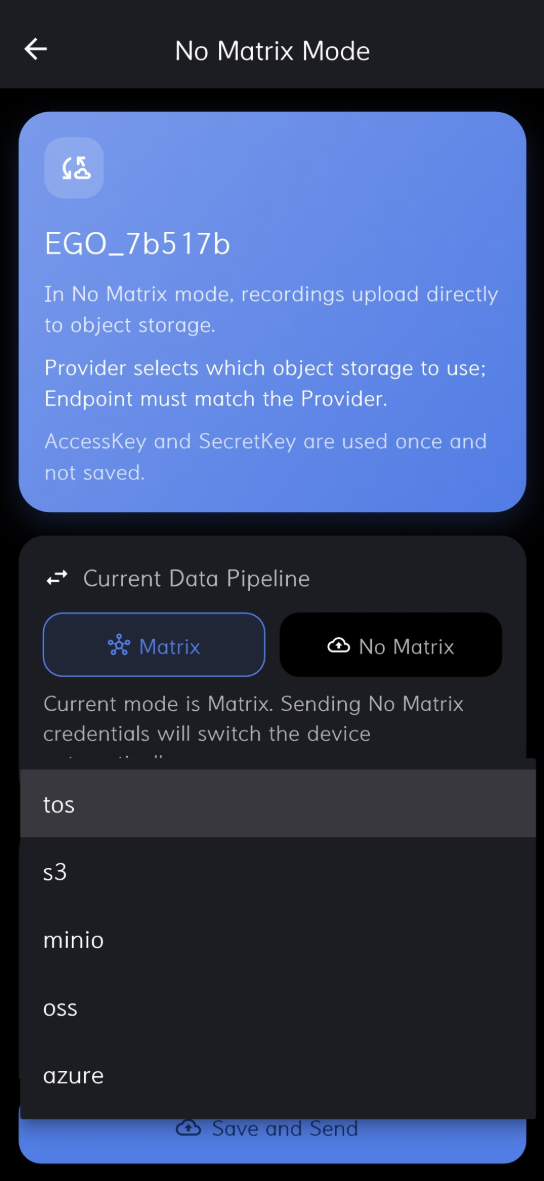
2. Open the No Matrix Mode configuration page, select the storage type, and fill in the required storage information.
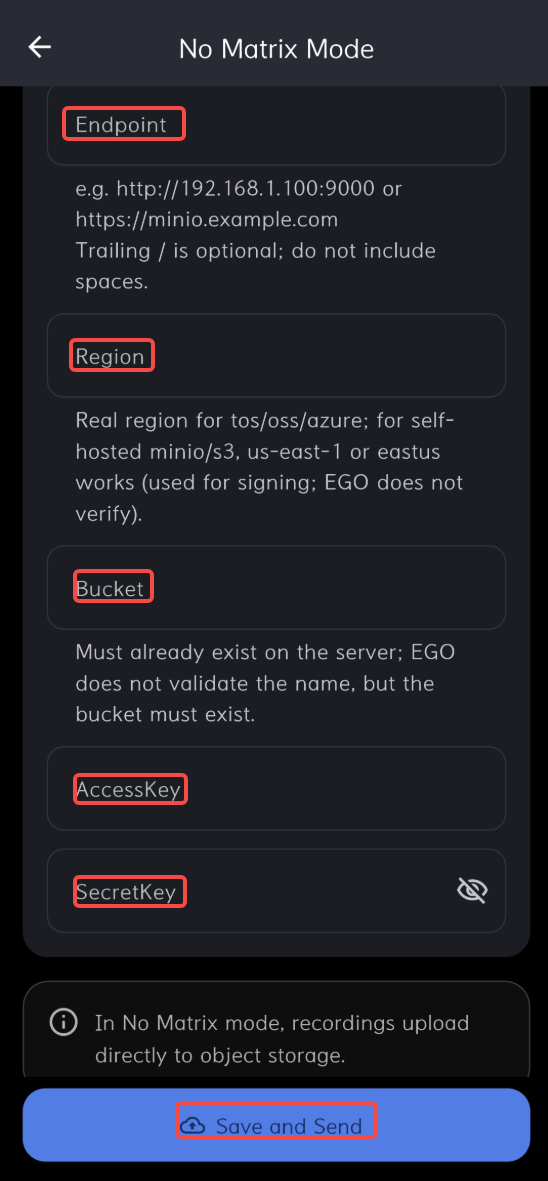
3. Confirm that all information is complete and correct, then tap Save and Send. The page automatically switches to No Matrix Mode.
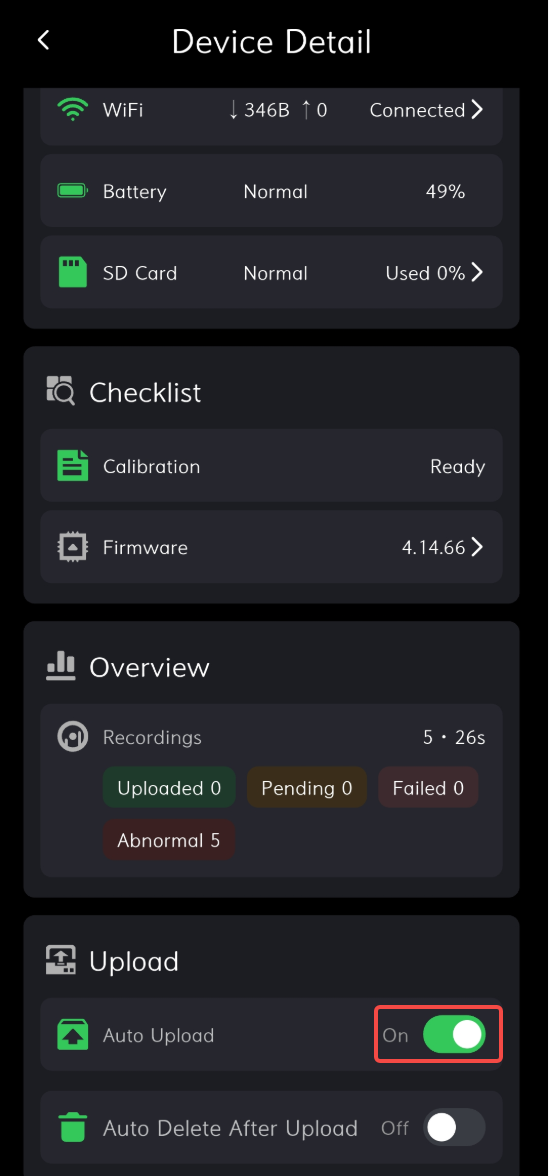
4. After configuration succeeds, return to the Data page. Enable automatic upload or manual upload to send recorded data to the configured object storage.
4.1.3 Ego App Connection
- For Ego App connection and configuration, see the App section in the DAS Ego manual.
4.1.4 Ego-Finger Pairing
After Ego and Finger are connected, pair Ego with Finger:
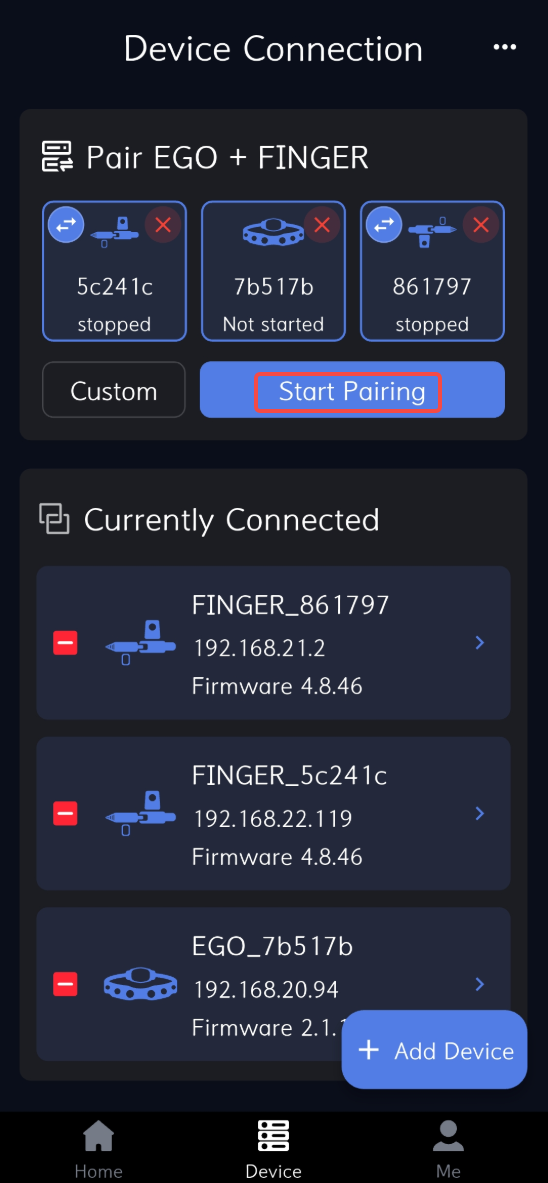
- Tap Quick Pairing.
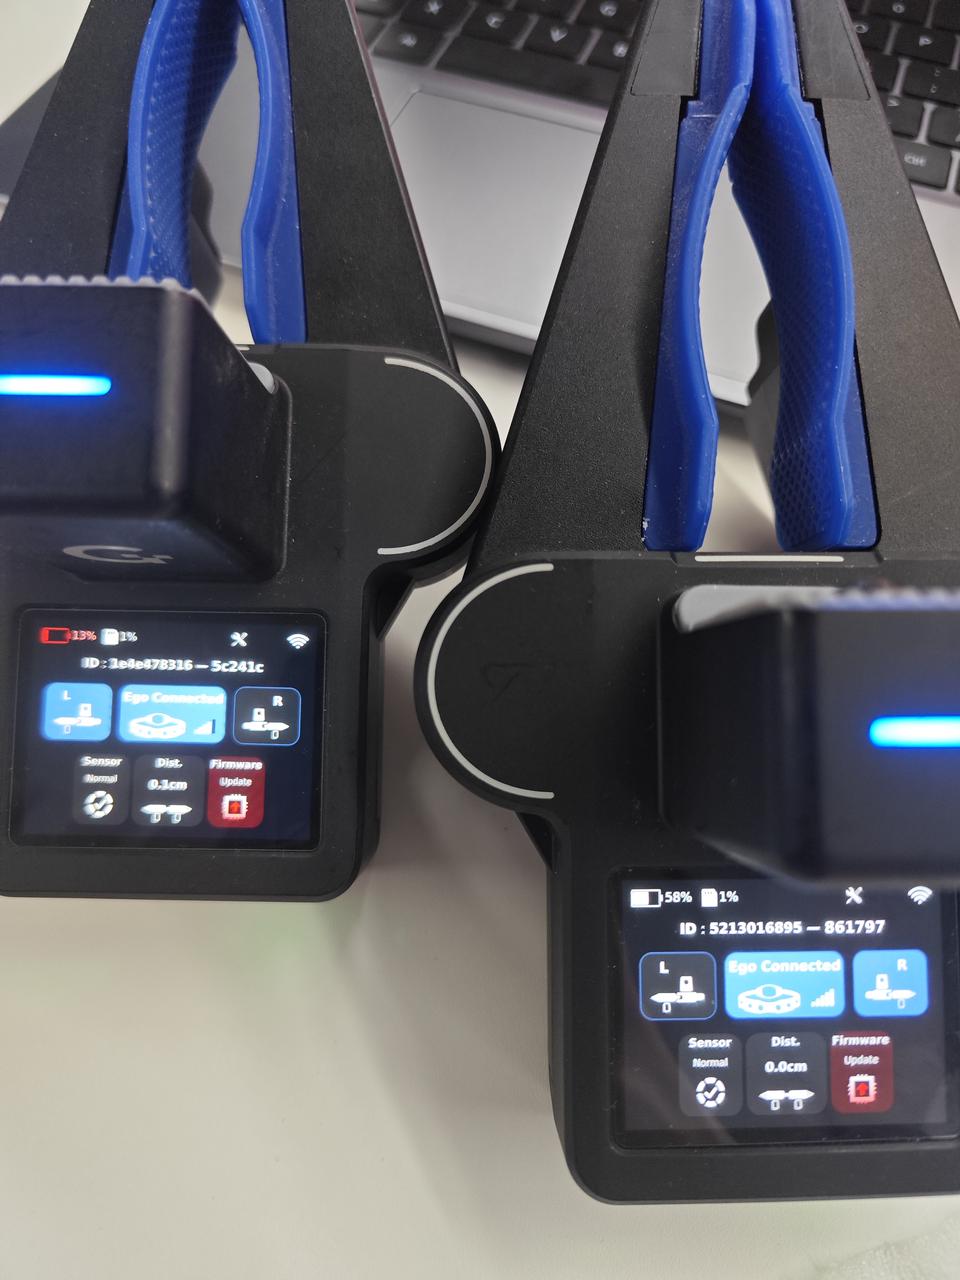
- After pairing succeeds, the Ego and Finger icons on the device turn blue and show signal bars.
1. After the Ego and Finger devices are connected, tap Quick Pairing.
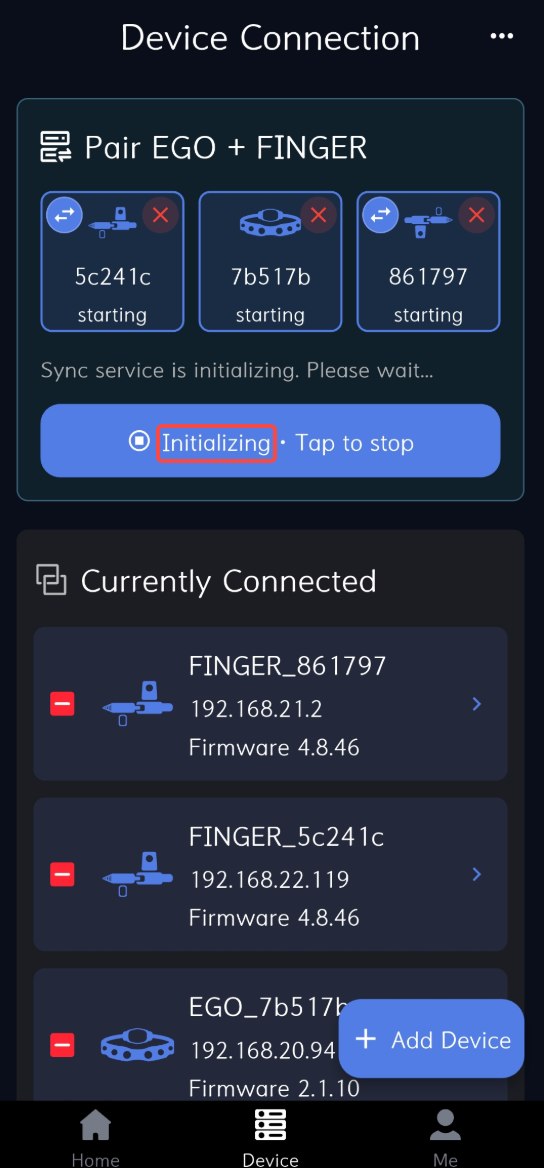
2. During pairing, the page shows "Initializing".
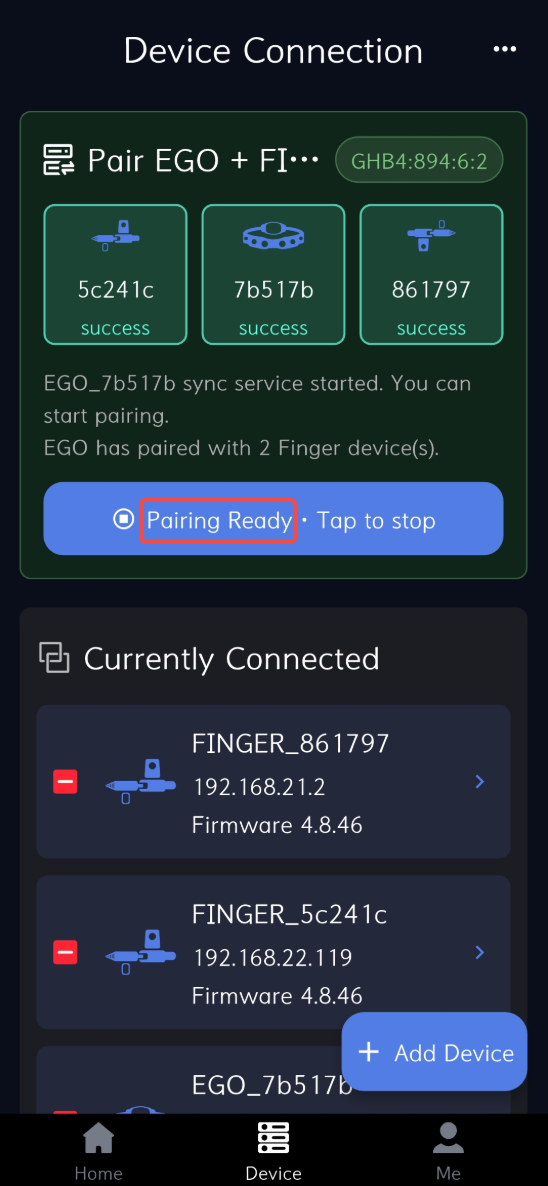
3. After pairing succeeds, the page shows "Device pairing ready".
4. After pairing succeeds, the Ego connection icon on the home screen turns blue and shows signal strength, and the left / right icons turn blue.
4.1.5 Pairing Troubleshooting
If pairing fails, see 6.1 Pairing Troubleshooting.
4.2 System Configuration
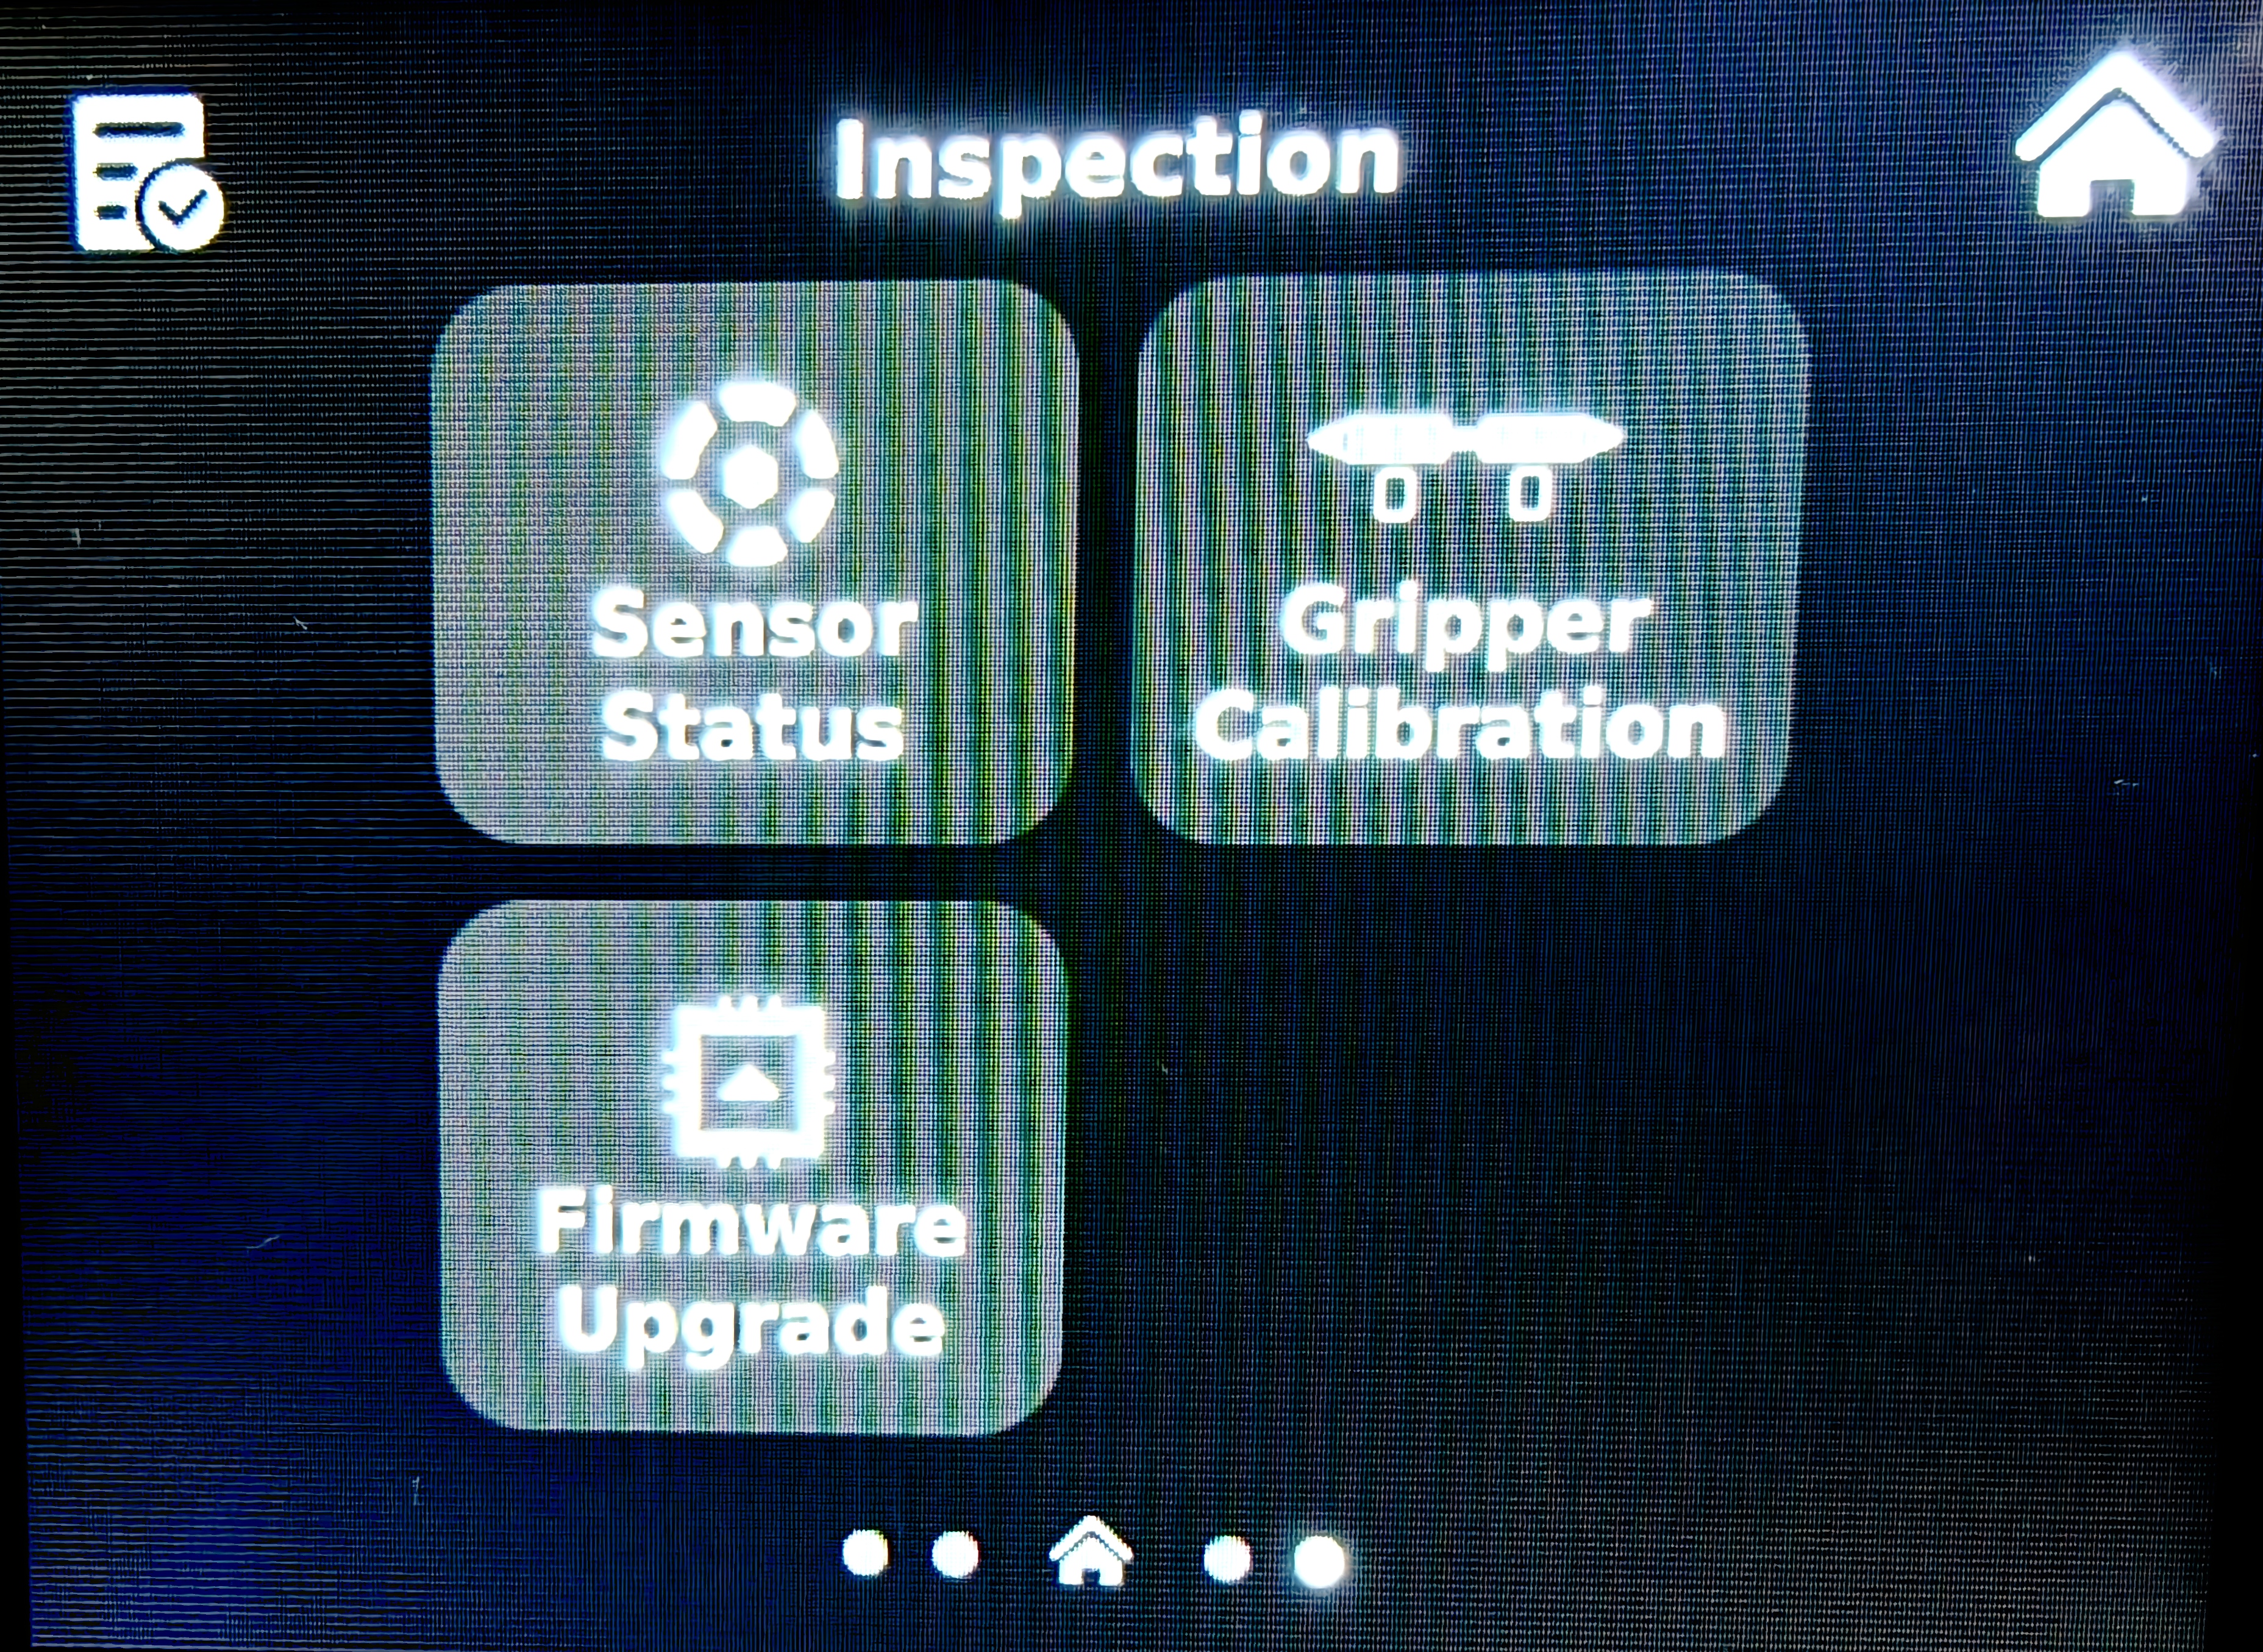
4.2.1 Swipe Left from Home - Right 1: Device ID Page; Right 2: Check Page
4.2.2 Swipe Right from Home - Left 1: Data Page; Left 2: Data Detail Page
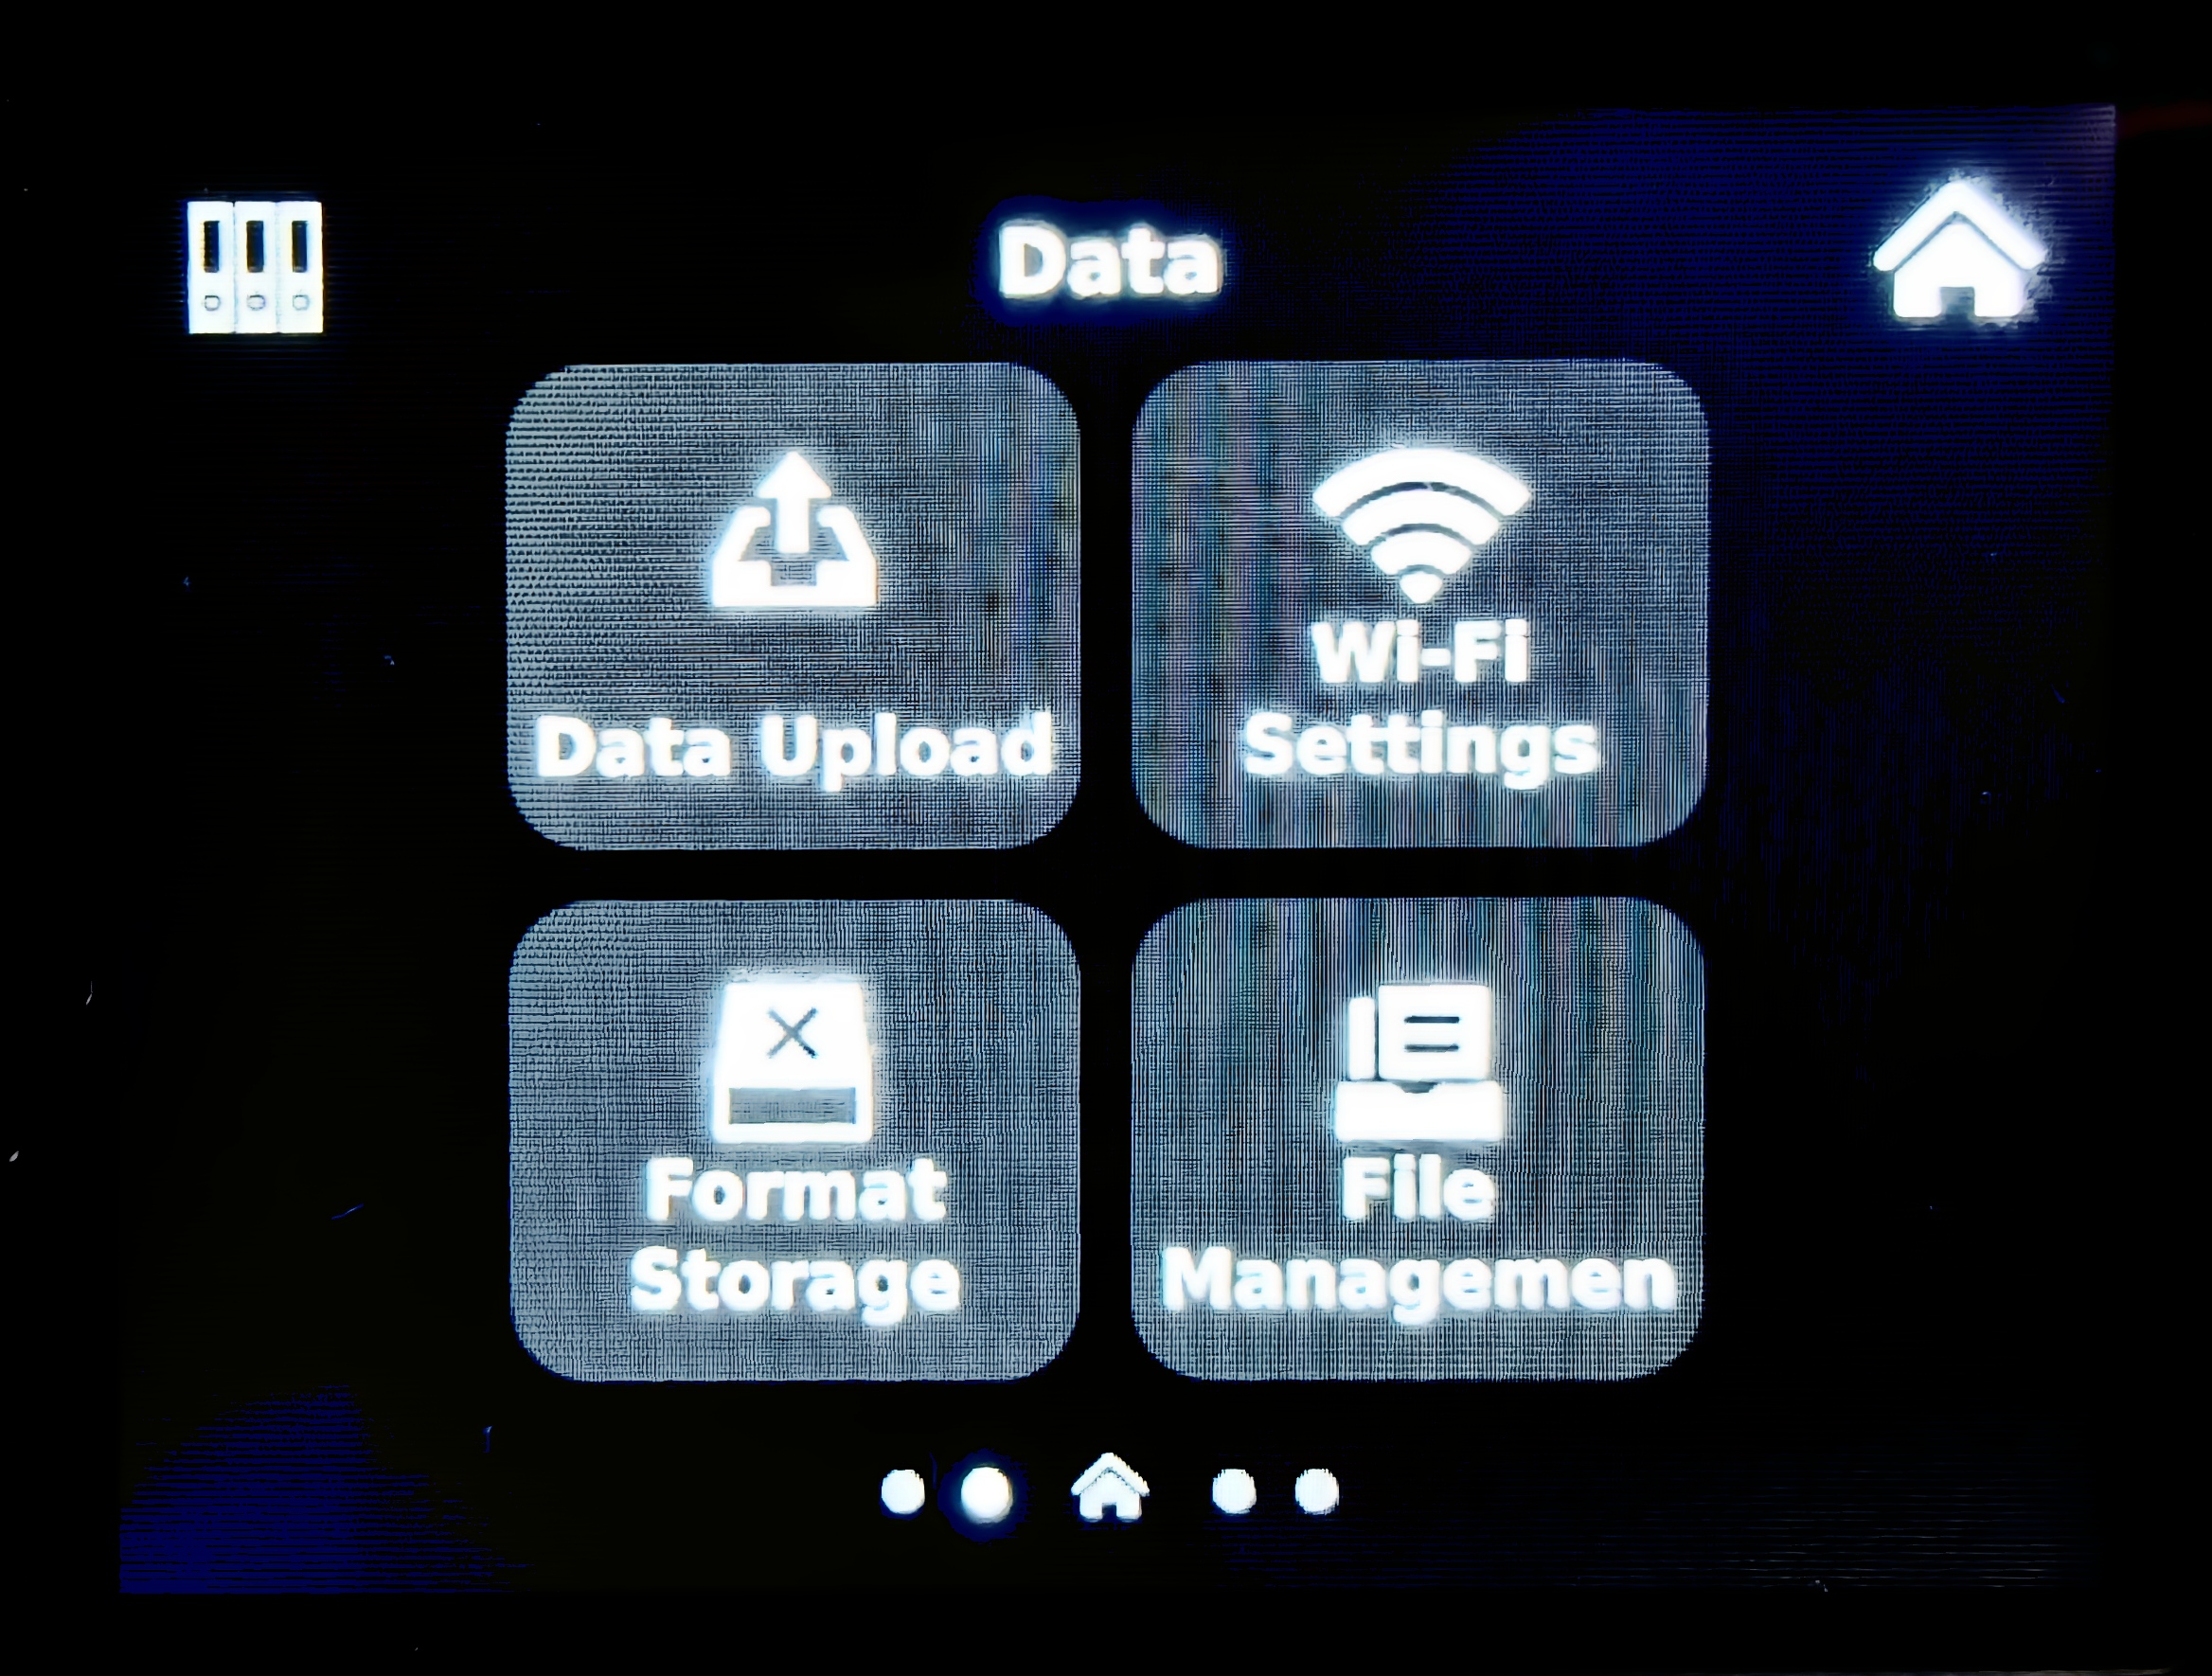
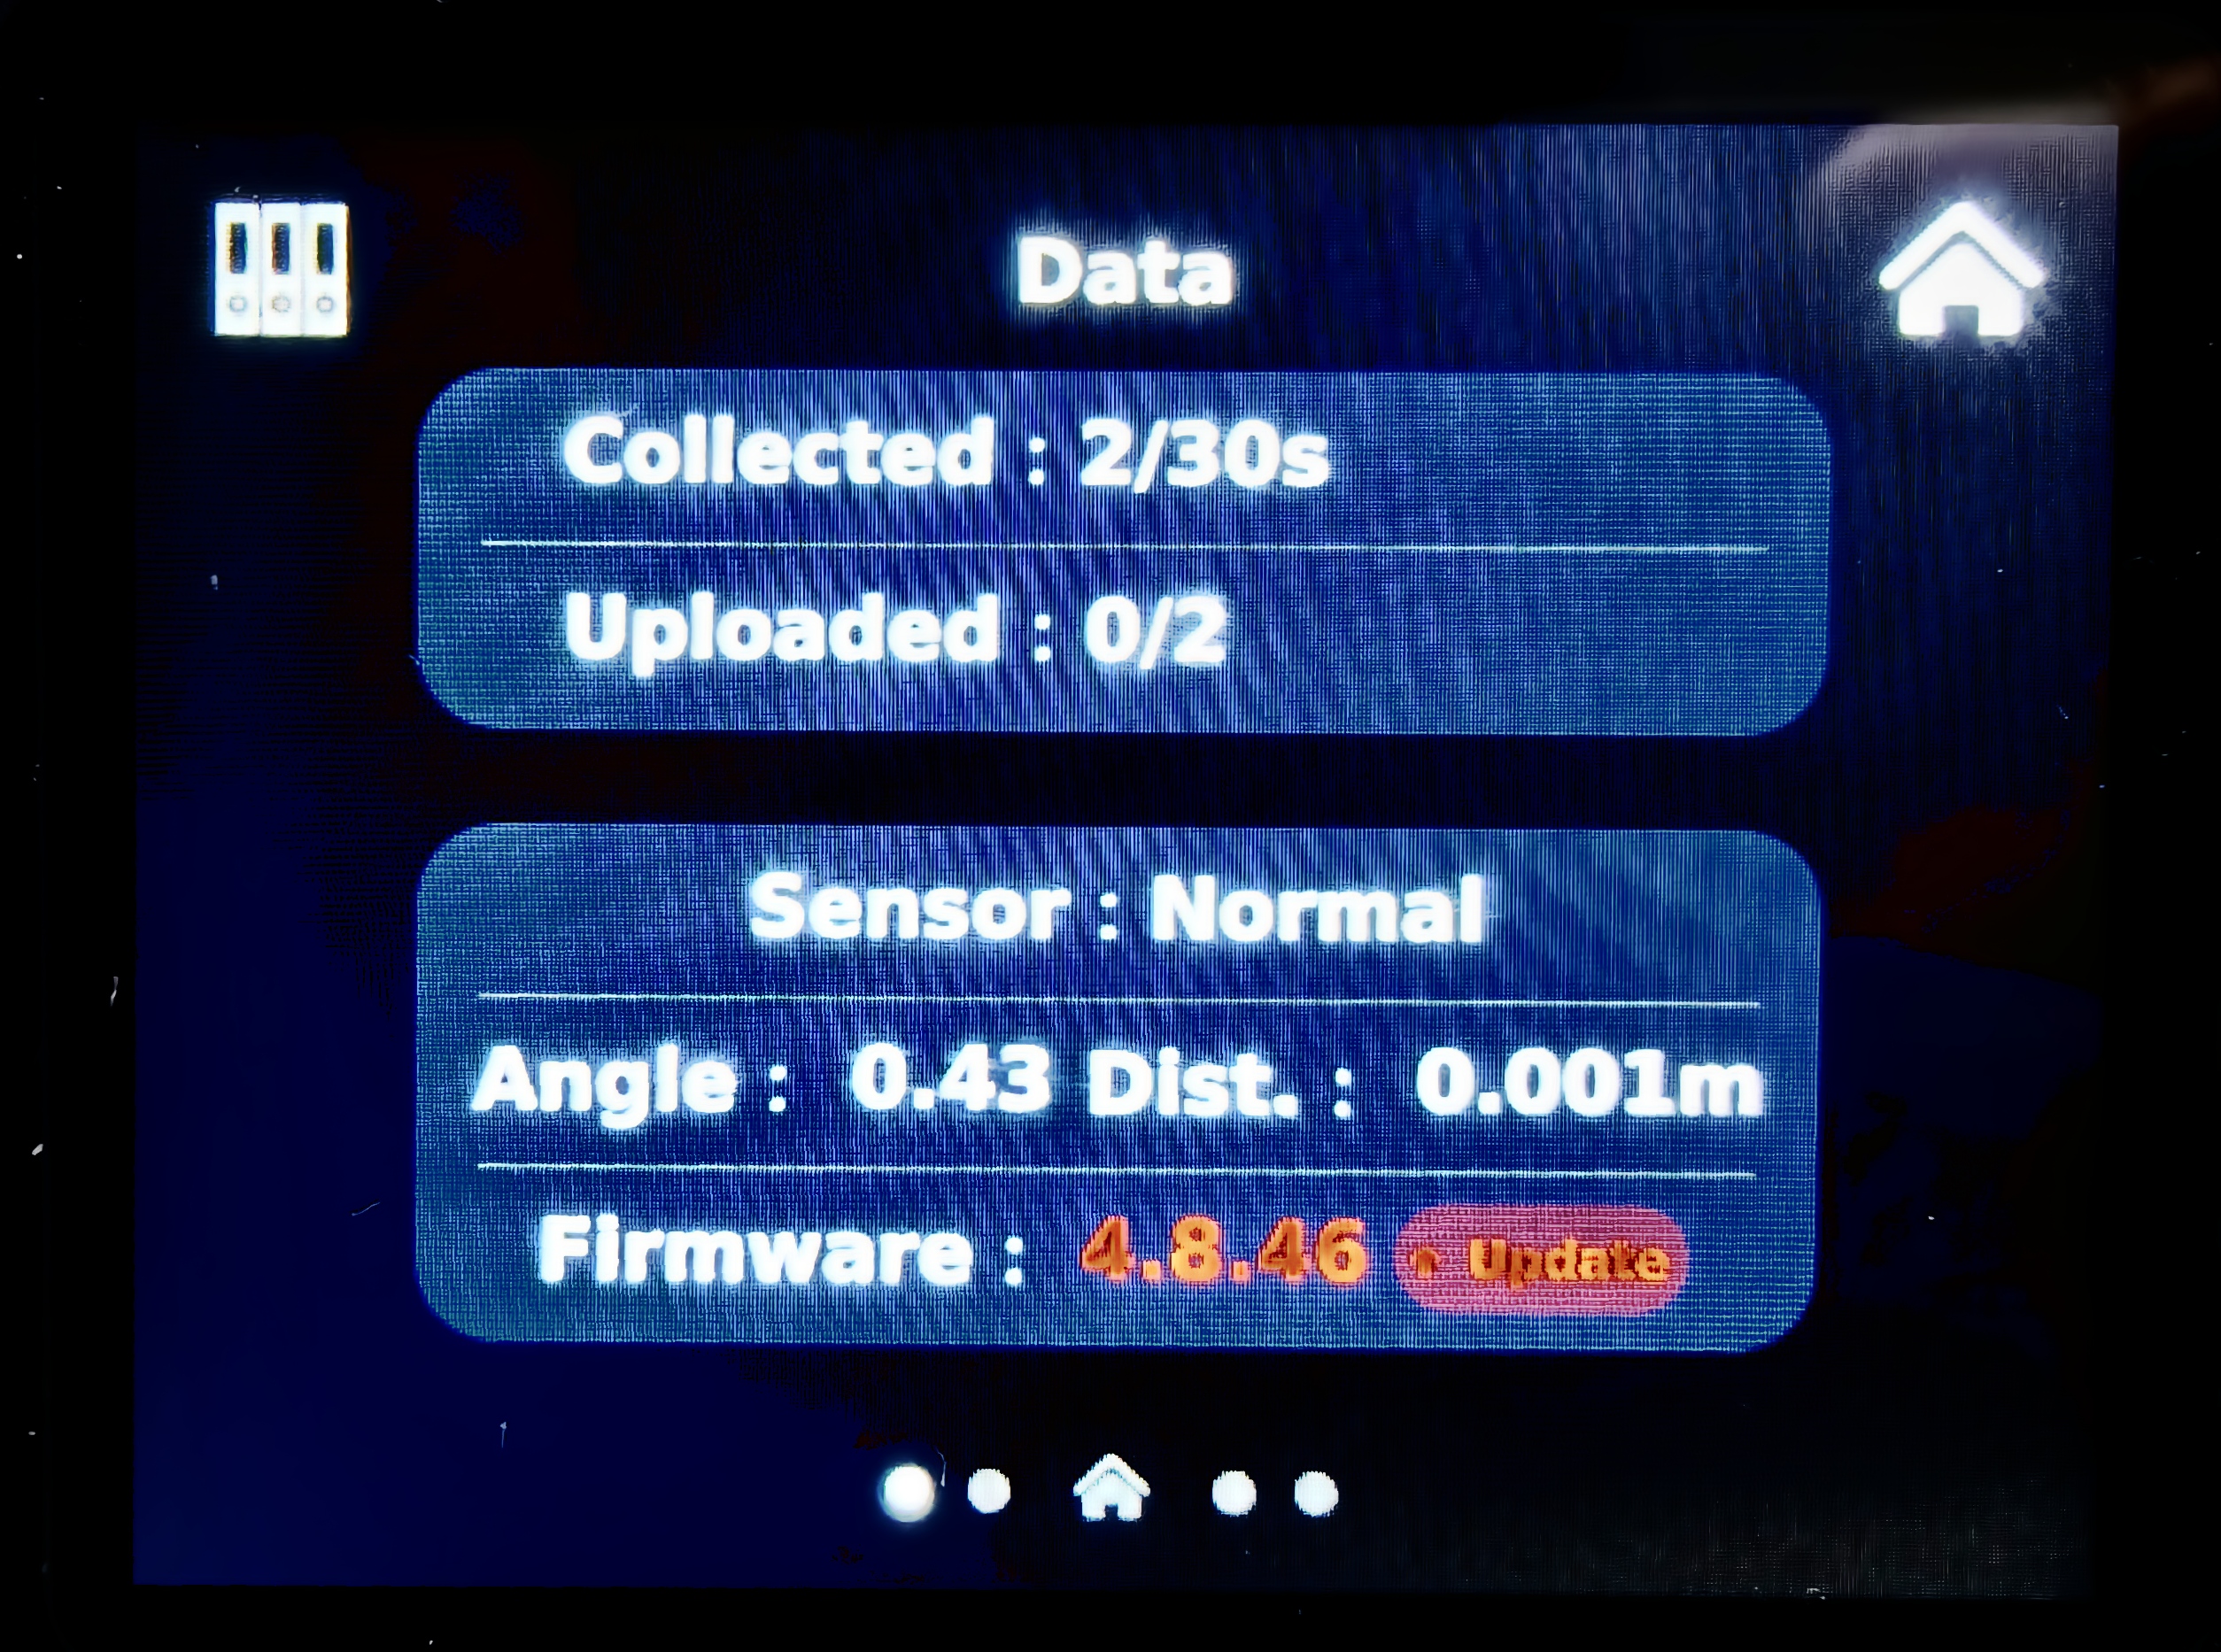
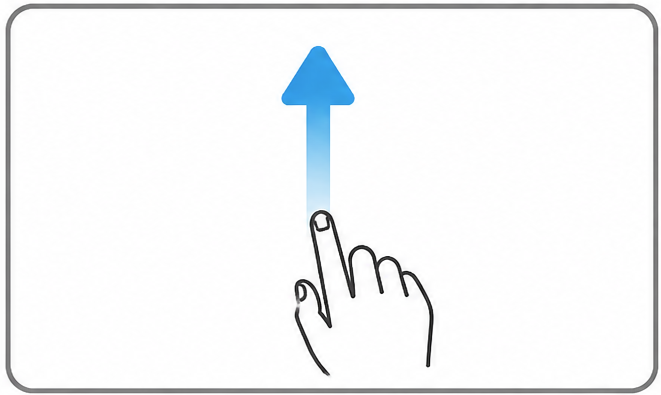
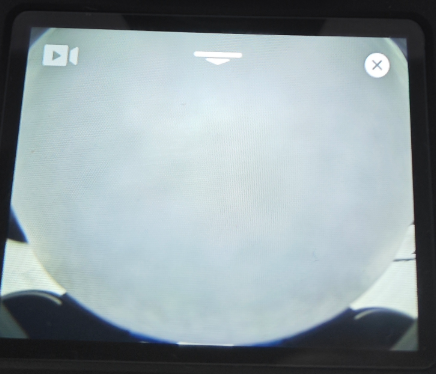
4.2.3 Swipe Up from Home - Camera Preview Page
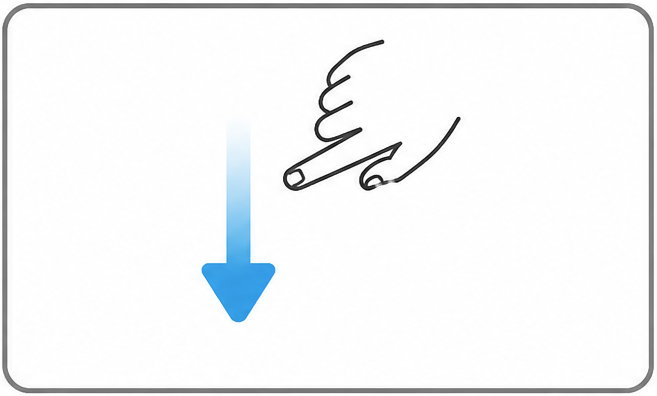
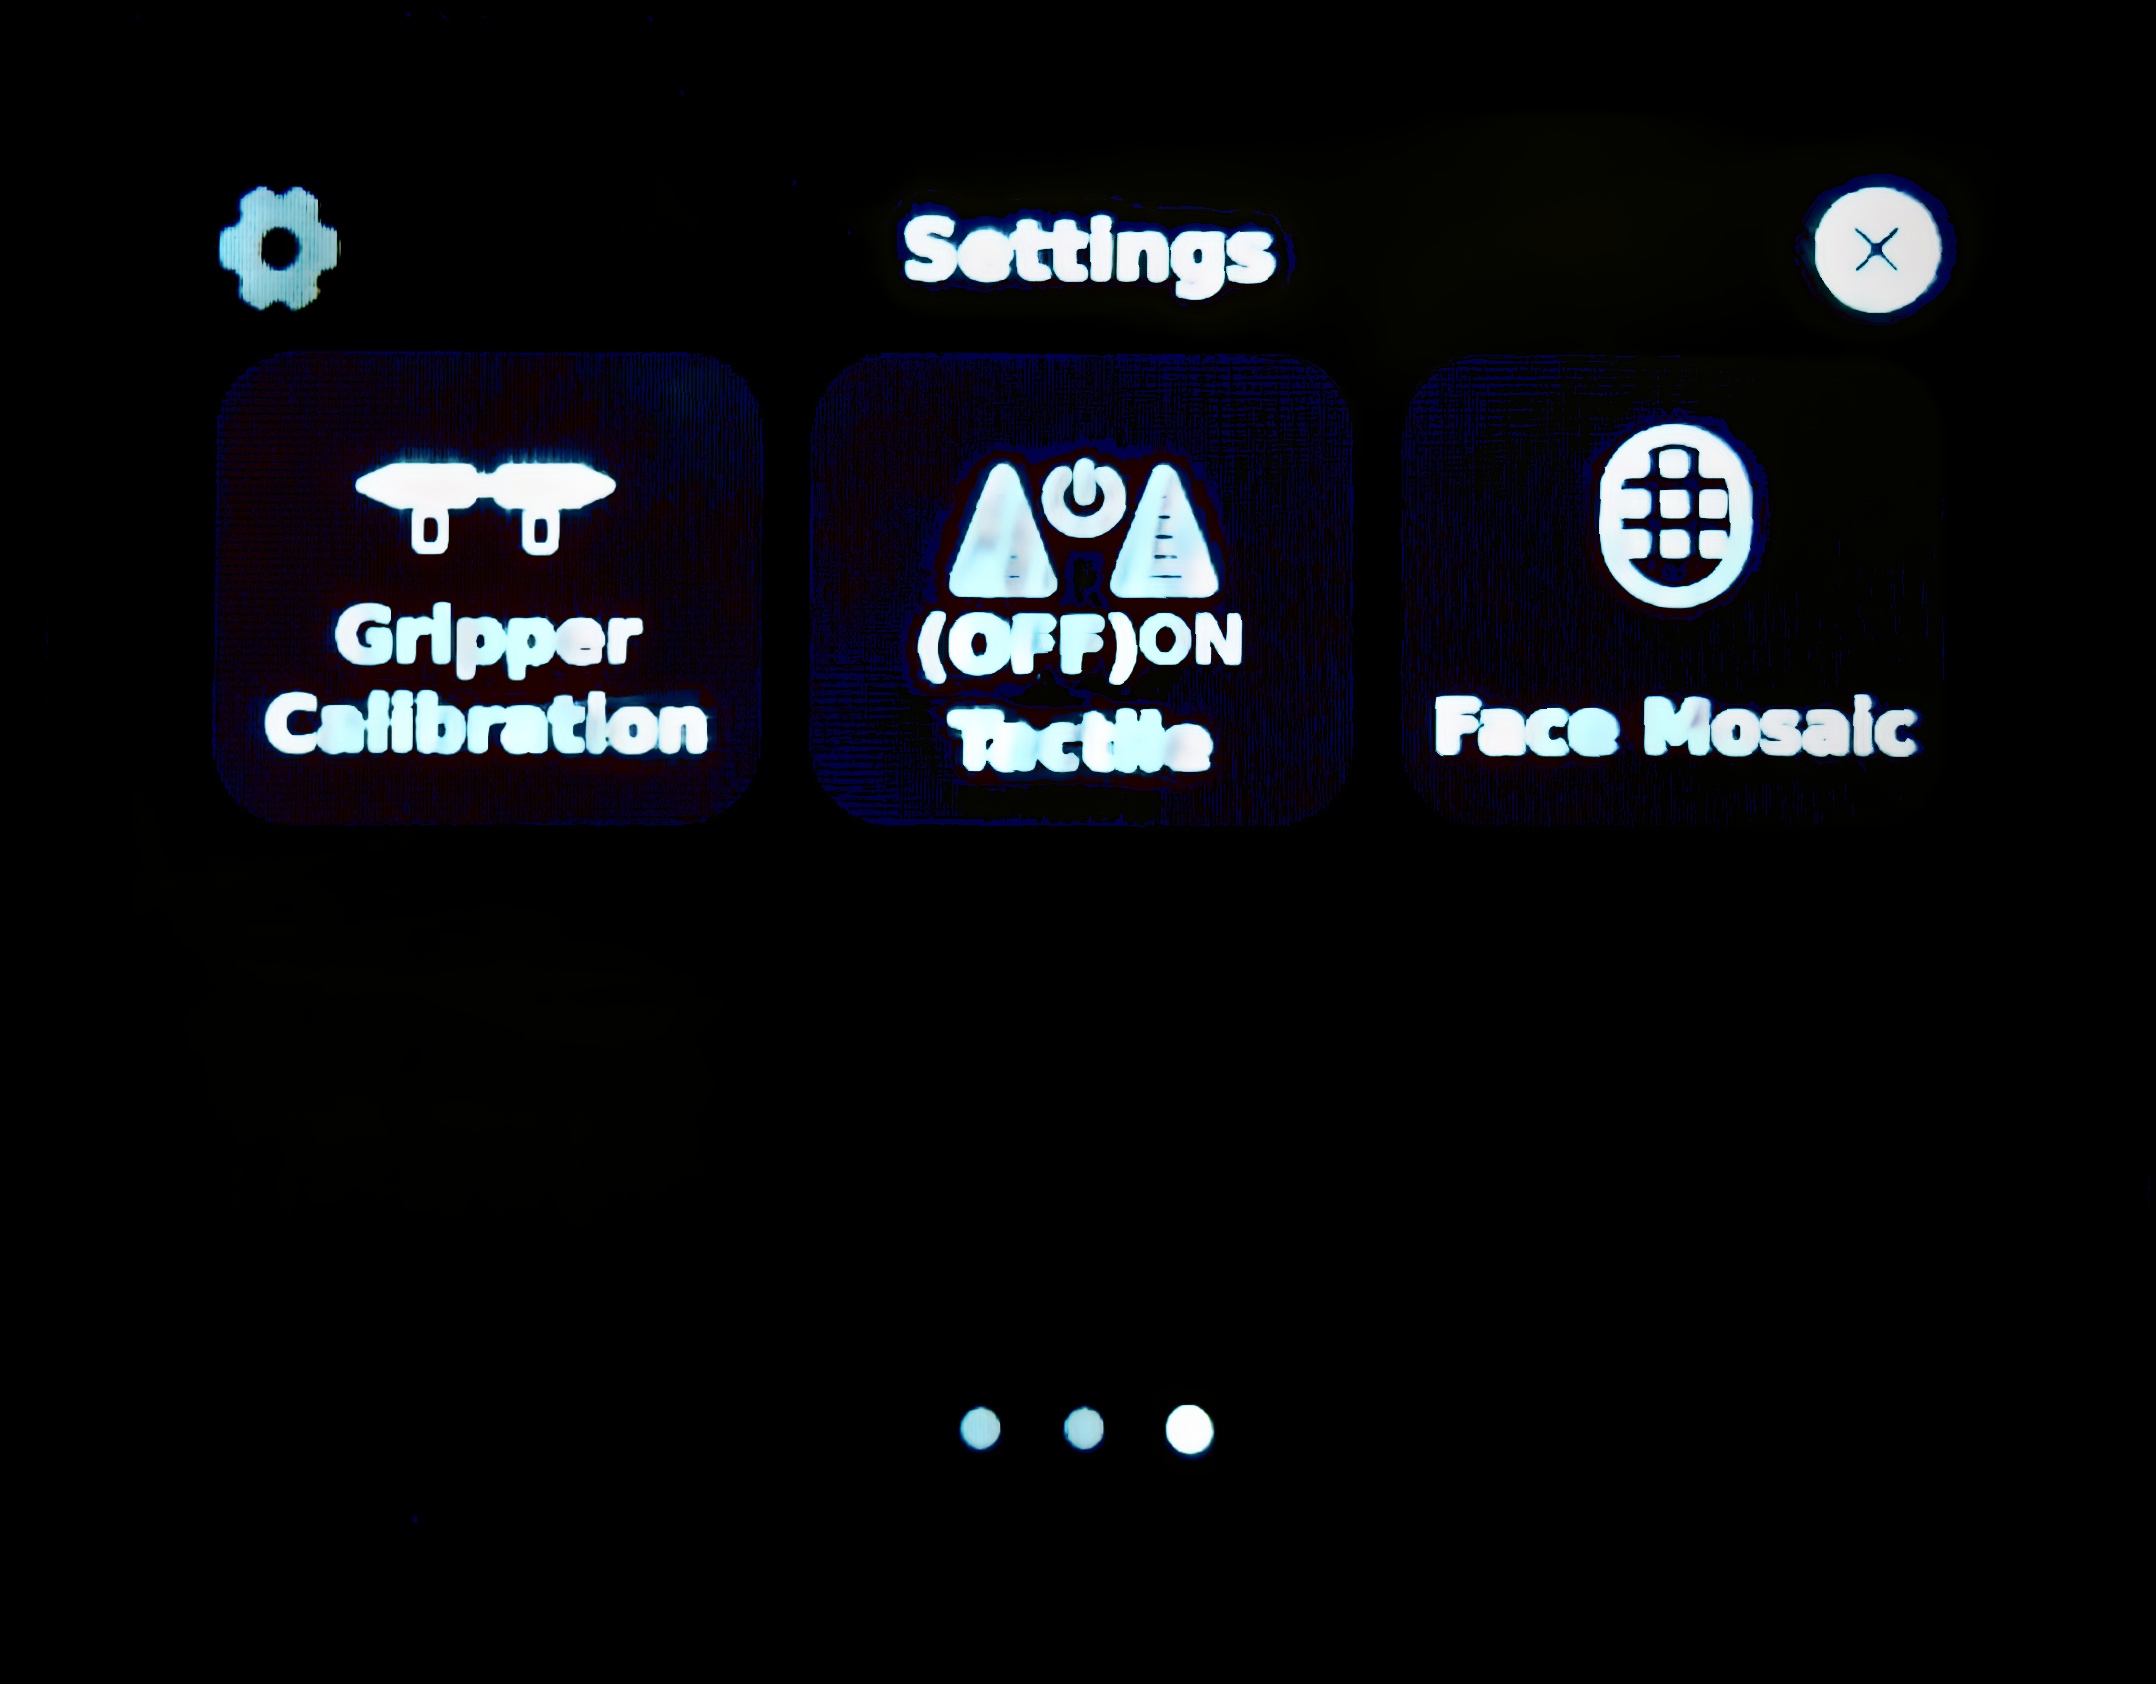
4.2.4 Swipe Down from Home - Settings Detail Page
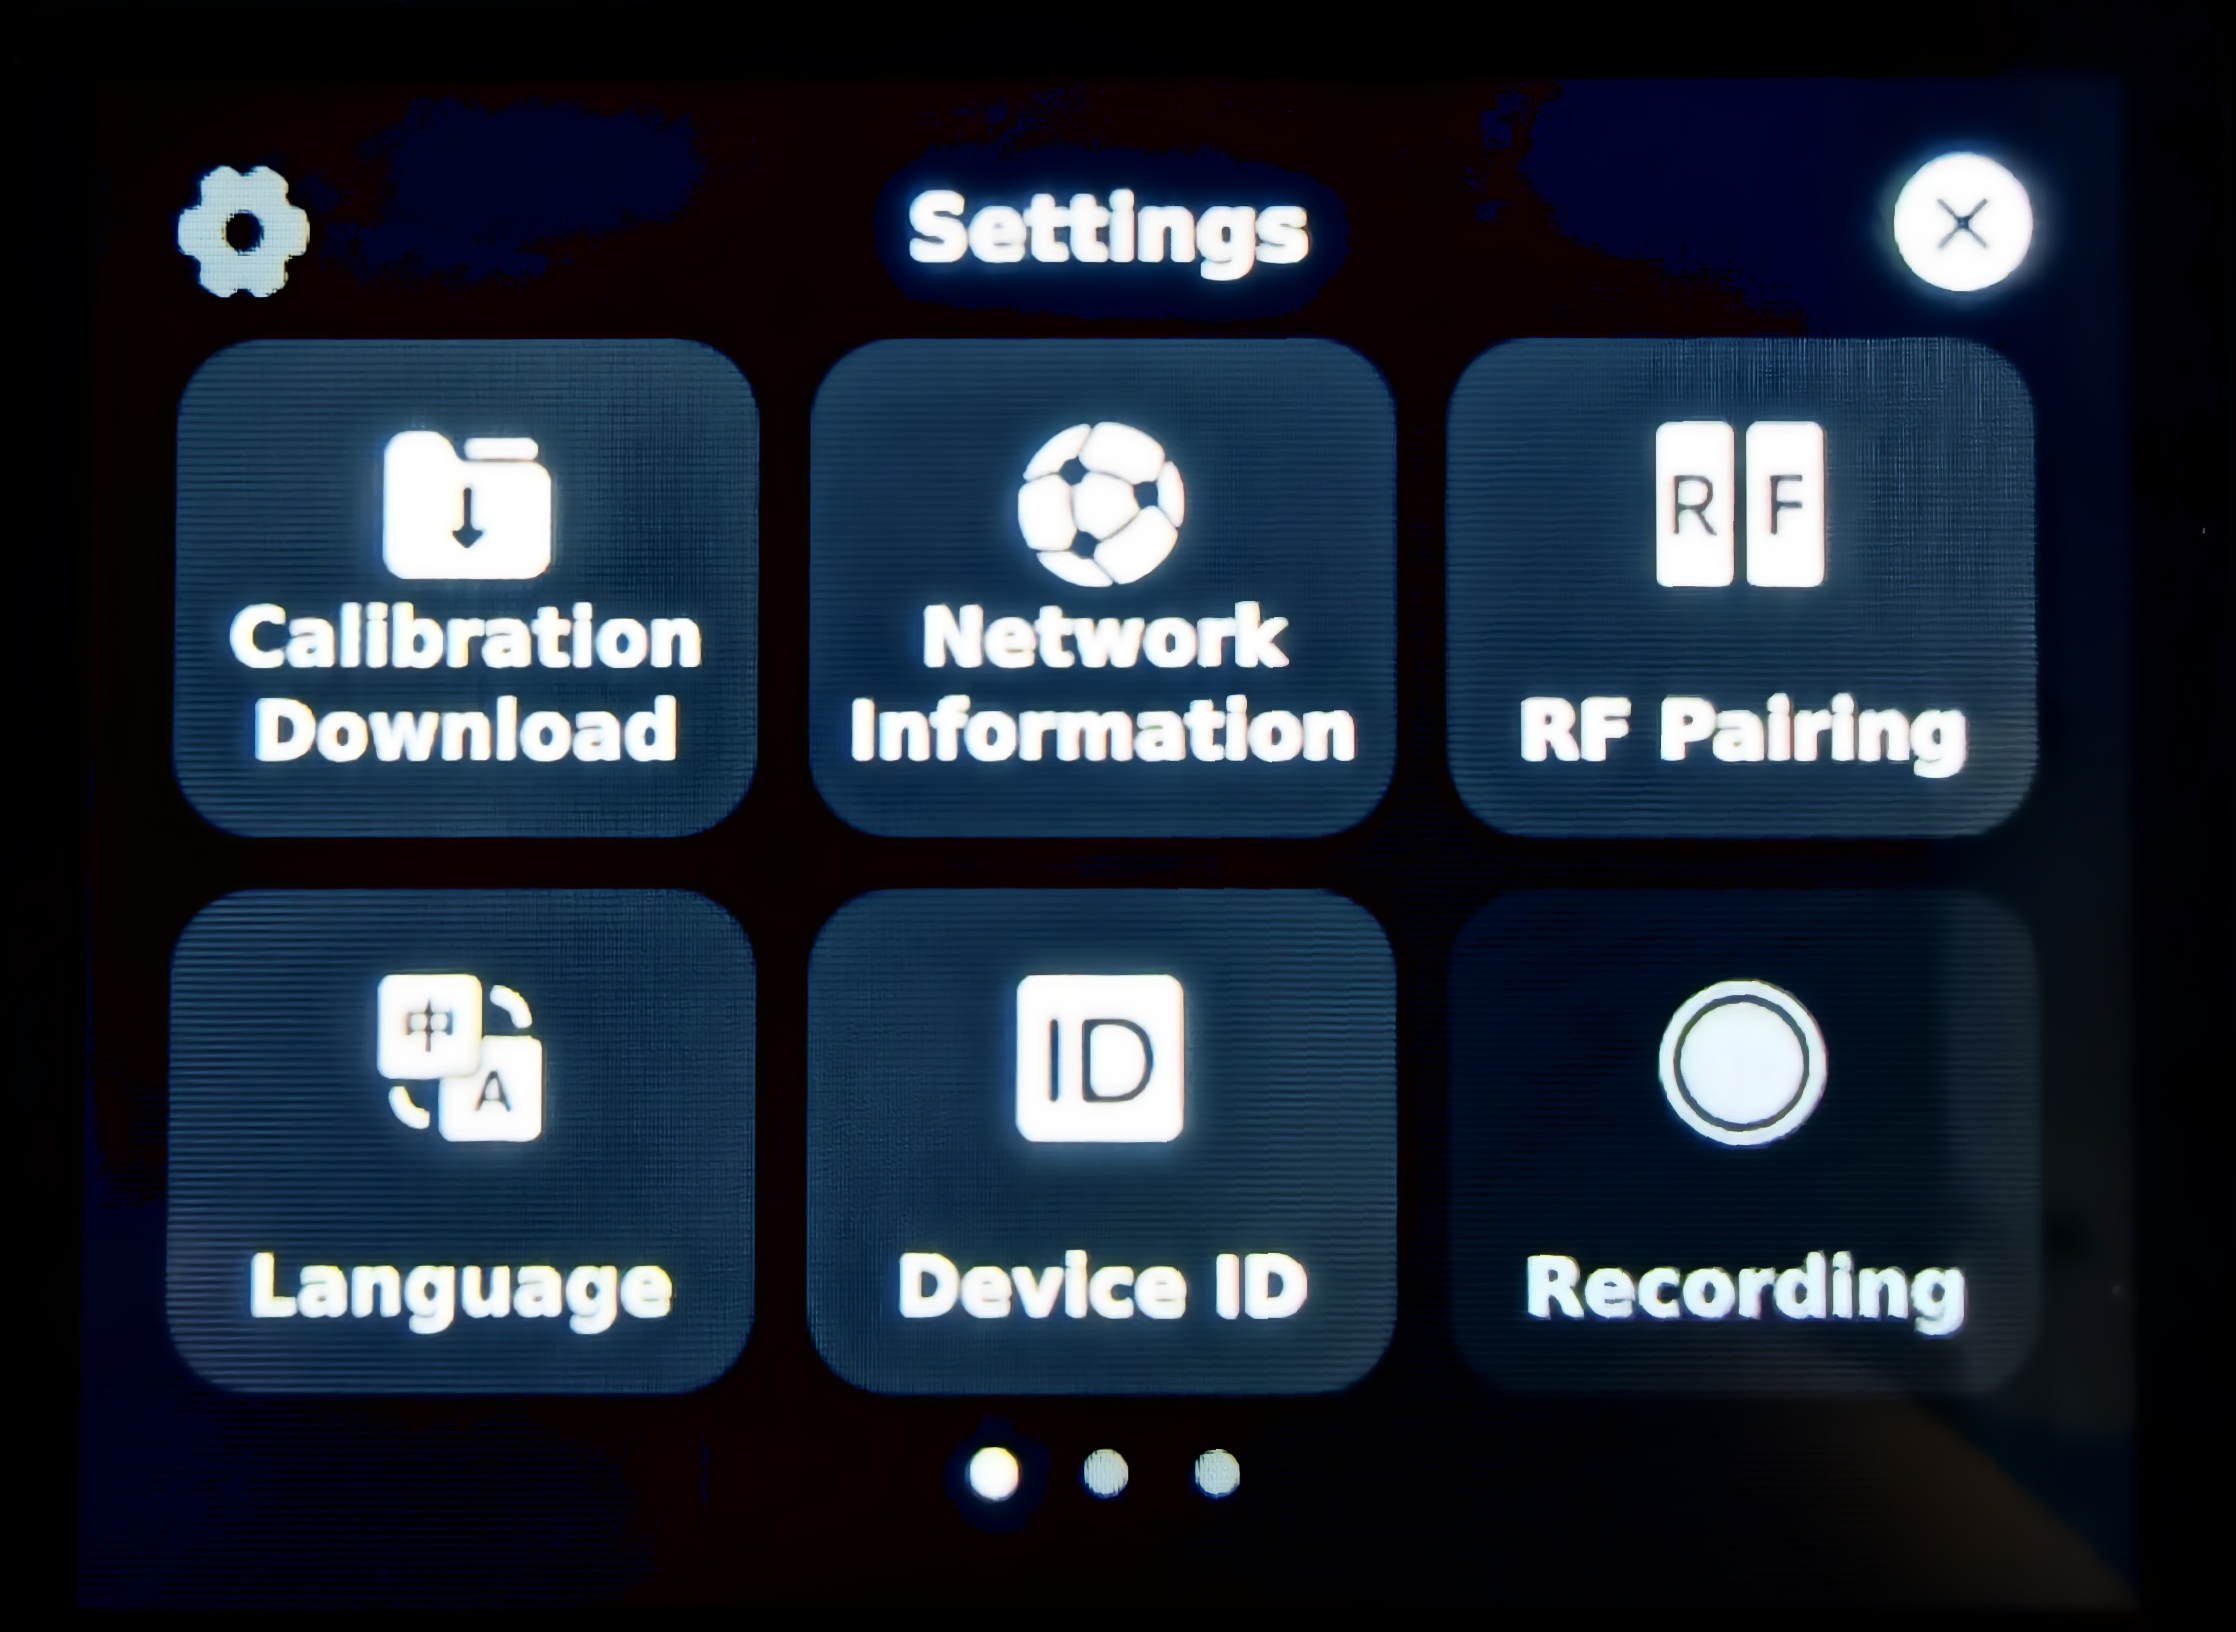
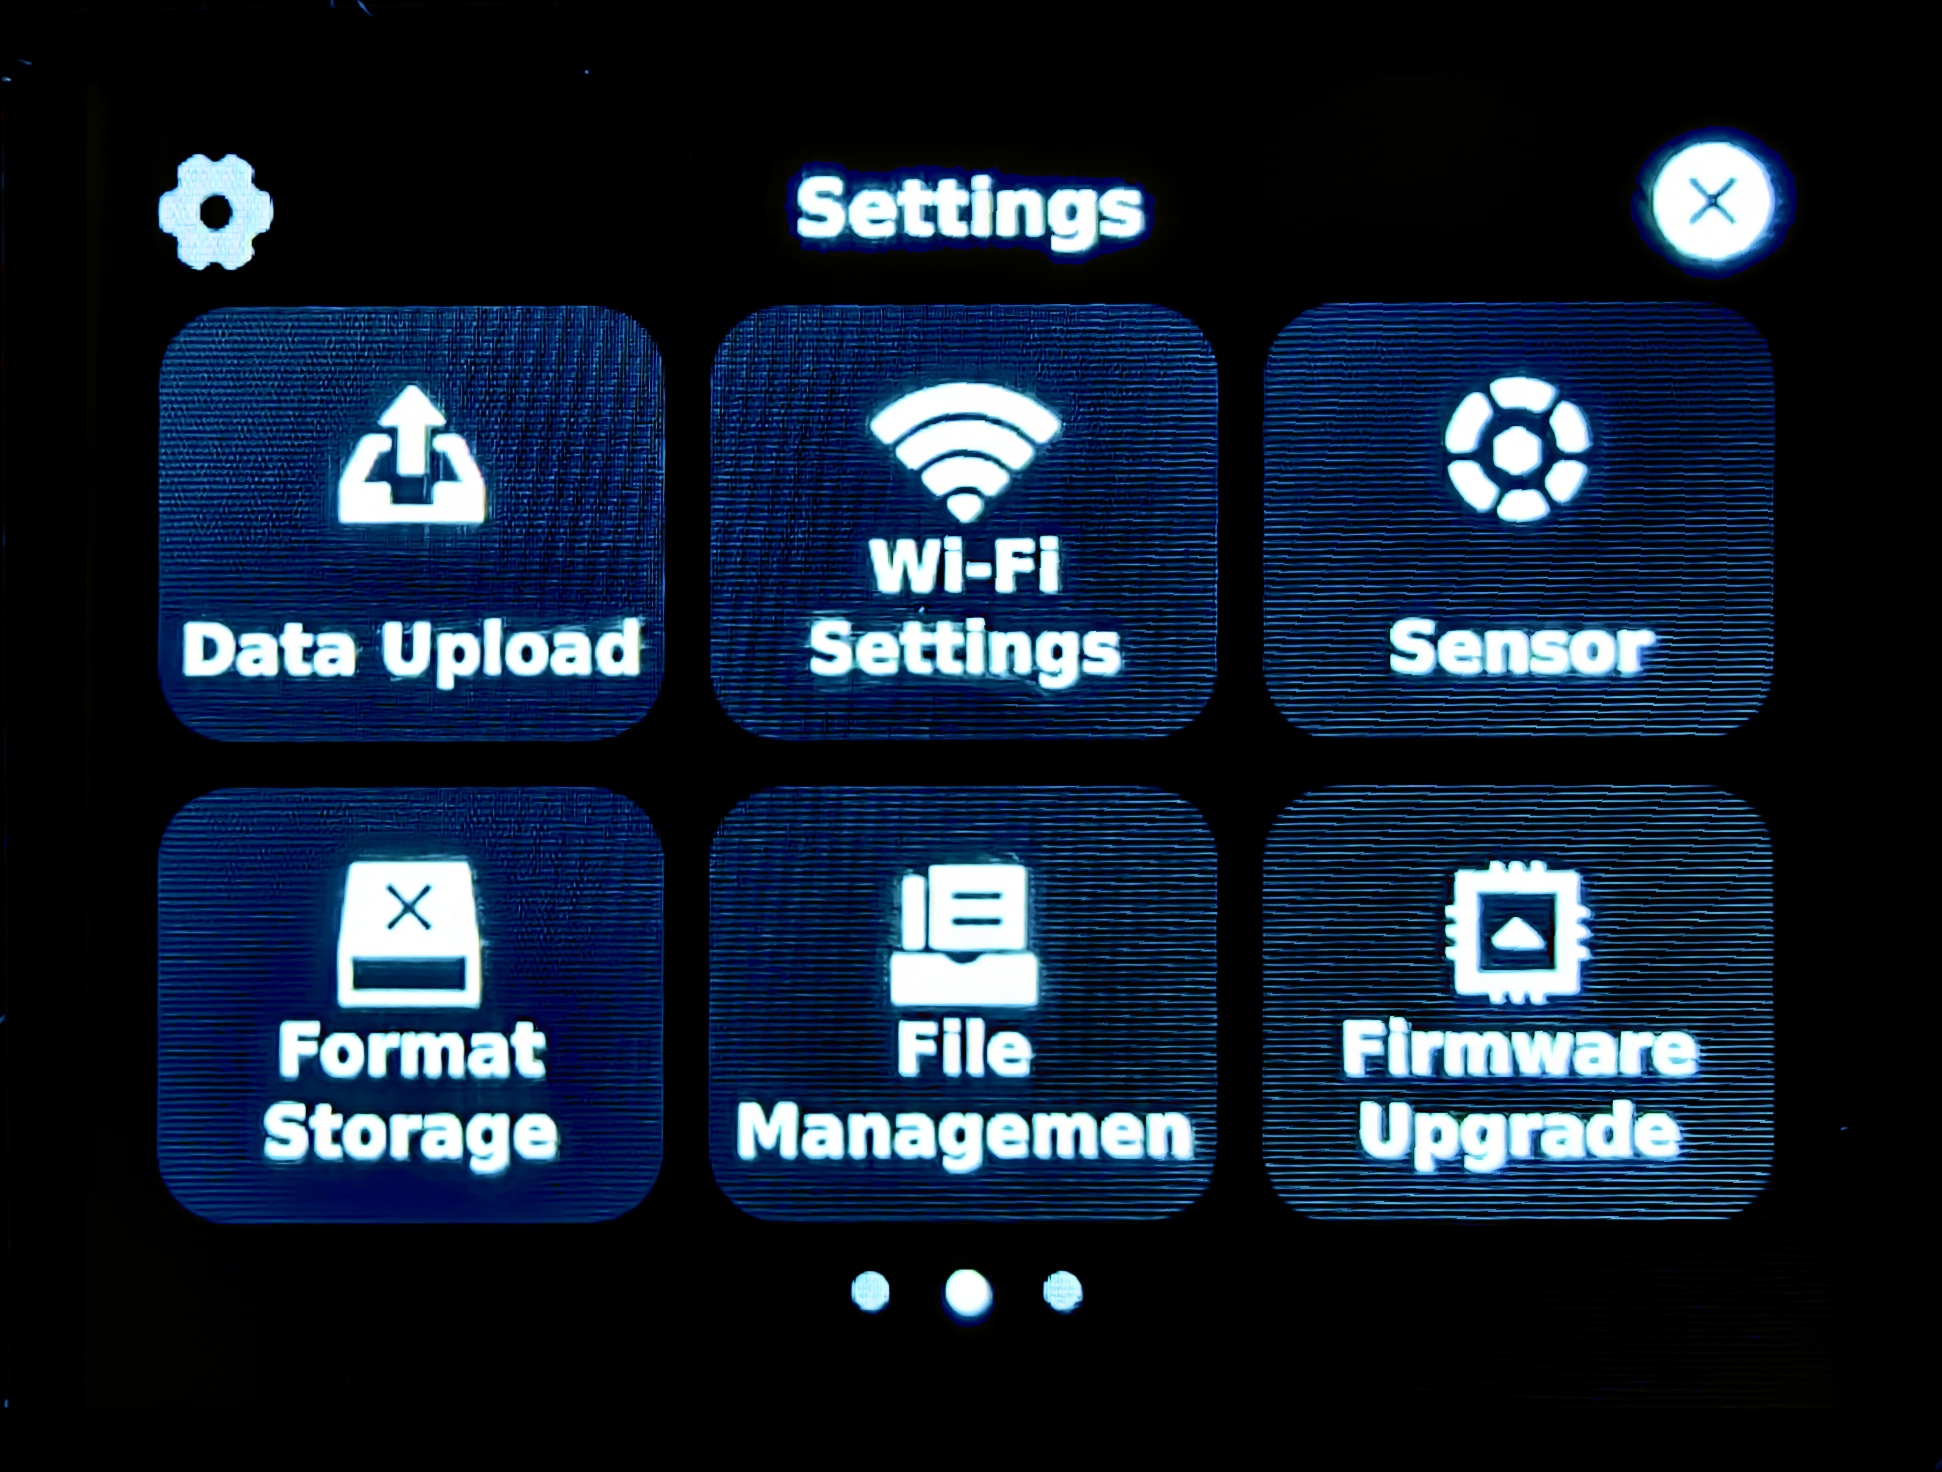
| RF pairing | Pair with Ego through an identification code. App QR-code scanning is recommended first. |
| Upload logs | When the device is connected to the network, open the device ID page and tap Upload Logs to upload device logs to the cloud in real time for debugging. |
| Recording | Control the device to start and stop recording. |
| Data upload | Upload recorded data to the cloud. Note: tapping Data Upload also uploads data to GenRobot's internal cloud. Currently, users should copy data via the SD card. |
| Wi-Fi settings | Open Wi-Fi settings, view nearby Wi-Fi networks, select the target Wi-Fi, and enter the correct password. The indicator turns blue when connected. |
| Sensor status | View each sensor's working status. Note: if the tactile jaw has not been replaced, missing tactile sensor information is expected. |
| File management | Show the list of files collected by the current device. You can manually select and delete unnecessary data. |
| Firmware update | When the device is connected to the network, it automatically checks the latest version and can perform an OTA firmware update. |
| Open/close calibration | Magnetic encoder calibration. Close the gripper, then tap Zero Calibration / Zero calibration to complete calibration. |
| Tactile display switch | Control whether tactile display is shown on the home page. |
| Language settings | Switch the display language. |
4.3 Data Collection
4.3.1 Finger Sensor Status Check
- On the home screen, tap the sensor icon, then open Sensor Status and check each item (if the tactile jaw has not been replaced, missing tactile information is expected).
- On the home screen, tap the gripper icon, then open Encoder Calibration: when the gripper is fully closed, the angle should be near 0° (or 360°); recalibrate if the deviation is large.
4.3.2 Ego SD Card
Confirm that an SD card is inserted in Ego and that the App recognizes it normally. You can check the storage status in the App.
4.3.3 Communication and Connection
Confirm that 2x Finger + 1x Ego are paired and communicating normally.
4.3.4 Wearing the Devices
- Ego: Wear the headset as instructed. See DAS Ego manual · 4.1.1 Wearing the Device.
- Finger: Wear both Finger units correctly on your hands.
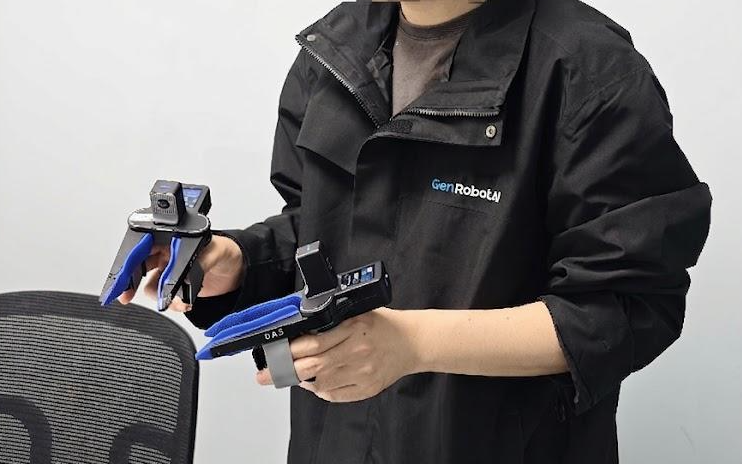
4.3.5 Start / Stop Recording
- Start recording: within about 0.5 s, rapidly and fully close the gripper 3 times. Finger switches from the bright screen to the dim screen and only shows the recording timer and signal strength; Ego announces Start recording /
start recording. - Stop recording: again rapidly and fully close the gripper 3 times within about 0.5 s. Finger switches from the dim screen back to the bright screen; Ego announces End recording /
end recording. - Because Ego has multiple cameras, after the stop gesture please wait about 2 s until End recording /
end recordingfinishes before moving the device, so the cameras can stop cleanly.
4.3.6 Finger Data Export
Connect Finger to a computer with Type-C and export the data (supported on Windows and Linux).
4.4 Data Processing
4.4.1 Raw Data (Local Storage)
Raw captures from the same session share the same recording start timestamp and use a unique group_uuid for grouping.
Example filenames:
| Device | Example |
|---|---|
| Ego | DAS-Ego_20260507180344_master_center_814084_59214a9e.mcap |
| Left Finger | DAS-Finger_20260507180344_sub_left_81709d_59214a9e.mcap |
| Right Finger | DAS-Finger_20260507180344_sub_right_3e6d0c_59214a9e.mcap |
Here 59214a9e is the UUID fragment for this data group.
Raw data export:
Ego
Remove the recording SD card and use the included card reader to copy the recorded mcap files to your computer.Finger
Connect Finger to your computer with a Type-C ↔ USB cable and copy the data from the device.
4.4.2 Ego-Finger Data Post-processing
This section explains how to post-process Ego + dual Finger capture data with das-ego-stack.
The current data post-processing workflow runs:
qc → merge → vio → vio_check
After processing, the output directory contains merged_output_ego_vio.mcap.
Requirements
Common (required)
- Linux x86_64 (Ubuntu 20.04 / 22.04 or Debian 11 / 12)
- Recommended: CPU ≥ 16 cores, RAM ≥ 32 GB
- Python ≥ 3.9 with
pipandvenv - Docker CLI installed and runnable by the current user (or user in the
dockergroup) - Sufficient disk space (check the Docker root with
docker info | grep "Docker Root Dir", then rundf -h) - For AWS ECR images outside China, install AWS CLI v2 and configure credentials with ECR read permission
Get the toolkit
- Clone the repository:
git clone https://github.com/genrobot-ai/das-ego-stack.git
cd das-ego-stack
The repository includes:
delivery_pipeline-1.0.4-py3-none-any.whl— host-side orchestratorsample_input/— a completemaster + sub_left + sub_rightsample group for smoke testing
Install the wheel (create a virtual environment and install):
python3 -m venv ~/.venv/delivery
~/.venv/delivery/bin/pip install delivery_pipeline-1.0.4-py3-none-any.whl
After installation, use the CLI command delivery-pipeline (host orchestrator; each algorithm step still runs in its own Docker container).
Pull images
Choose an image registry according to your network environment.
Option A — China mainland (recommended)
Images are hosted at imagepublic.genrobotai.com/genrobot/. No login required:
REG=imagepublic.genrobotai.com/genrobot/genimage
VER=v1.0.5
for step in qc merge vio vio_check; do
    docker pull ${REG}:${step}-${VER}
done
Option B — Outside China (AWS ECR)
The algorithm images are also hosted on AWS ECR. You need an AWS account with ECR read permission and AWS CLI v2 installed and configured.
# Install AWS CLI v2 (Linux x86_64)
curl "https://awscli.amazonaws.com/awscli-exe-linux-x86_64.zip" -o "awscliv2.zip"
unzip awscliv2.zip
sudo ./aws/install
aws --version
aws configure

# Log in to ECR (the token expires in about 12 hours)
aws ecr get-login-password --region us-east-1 \
  | docker login --username AWS --password-stdin \
      764042516397.dkr.ecr.us-east-1.amazonaws.com

# Pre-pull images
REG=764042516397.dkr.ecr.us-east-1.amazonaws.com/genimage
VER=v1.0.5
for step in qc merge vio vio_check; do
    docker pull ${REG}:${step}-${VER}
done
Note: AWS and Docker credentials are stored per user (~/.aws/, ~/.docker/). Pull images and run delivery-pipeline as the same user to avoid credential lookup issues caused by mixing sudo and non-sudo commands.
Prepare input data
The input directory must contain three mcap files with the same UUID (naming rules in 4.4.1 Raw Data):
| Role | Example filename |
|---|---|
| Ego (master) | DAS-Ego_20260507180344_master_center_814084_59214a9e.mcap |
| Left Finger | DAS-Finger_20260507180344_sub_left_81709d_59214a9e.mcap |
| Right Finger | DAS-Finger_20260507180344_sub_right_3e6d0c_59214a9e.mcap |
The trailing 8-hex UUID (for example 59214a9e) must match across all three files. Groups missing any role are skipped (logged as SKIP).
Directory example:
das-ego-stack/
├── sample_input/          # bundled sample, or replace with your own data
│   ├── DAS-Ego_..._master_..._59214a9e.mcap
│   ├── DAS-Finger_..._sub_left_..._59214a9e.mcap
│   └── DAS-Finger_..._sub_right_..._59214a9e.mcap
└── output/                # create before running; stores results
Set directory permissions before running (algo containers run as non-root and need read access to input and write access to output):
export INPUT_DIR=$(realpath ./sample_input)   # replace with your input directory
export OUTPUT_DIR=$(realpath -m ./output)
mkdir -p "$OUTPUT_DIR"
chmod -R a+rX  "$INPUT_DIR"
chmod -R a+rwX "$OUTPUT_DIR"
Run processing
Run from the das-ego-stack directory (input and output paths must be absolute):
cd /path/to/das-ego-stack

export INPUT_DIR=$(realpath ./sample_input)   # replace with your input directory
export OUTPUT_DIR=$(realpath -m ./output)
mkdir -p "$OUTPUT_DIR"
chmod -R a+rX  "$INPUT_DIR"
chmod -R a+rwX "$OUTPUT_DIR"

# China mainland registry
REG=imagepublic.genrobotai.com/genrobot/genimage
VER=v1.0.5
export ALGO_QC_IMAGE=${REG}:qc-${VER}
export ALGO_MERGE_IMAGE=${REG}:merge-${VER}
export ALGO_VIO_IMAGE=${REG}:vio-${VER}
export ALGO_VIO_CHECK_IMAGE=${REG}:vio_check-${VER}

~/.venv/delivery/bin/delivery-pipeline --steps qc,merge,vio,vio_check \
    --input-dir "$INPUT_DIR" --output-dir "$OUTPUT_DIR" \
    --continue-on-error
For AWS ECR outside China, replace the image variables above with:
REG=764042516397.dkr.ecr.us-east-1.amazonaws.com/genimage
VER=v1.0.5
export ALGO_QC_IMAGE=${REG}:qc-${VER}
export ALGO_MERGE_IMAGE=${REG}:merge-${VER}
export ALGO_VIO_IMAGE=${REG}:vio-${VER}
export ALGO_VIO_CHECK_IMAGE=${REG}:vio_check-${VER}
Success indicator: the terminal ends with something like summary: 1/1 groups succeeded.
Optional: Override images
To test locally built images, point each ALGO_*_IMAGE environment variable to the local tag:
export ALGO_QC_IMAGE=delivery_qc:compile-dev
export ALGO_MERGE_IMAGE=delivery_merge:compile-dev
export ALGO_VIO_IMAGE=delivery_vio:compile-dev
export ALGO_VIO_CHECK_IMAGE=delivery_vio_check:compile-dev

~/.venv/delivery/bin/delivery-pipeline --steps qc,merge,vio,vio_check \
    --input-dir "$INPUT_DIR" --output-dir "$OUTPUT_DIR" \
    --continue-on-error
Common flags
| Flag | Description |
|---|---|
--steps | Comma-separated step list; each step must have the corresponding ALGO_*_IMAGE set |
--input-dir | Directory containing the .mcap groups to process |
--output-dir | Per-group result root |
--continue-on-error | Continue to the next group if one group fails; remove it when debugging to fail fast |
Output
Output per group:
$OUTPUT_DIR/<group-uuid>/
├── result.json                 # per-step status; check first on failure
├── merged_output_ego_vio.mcap  # final artifact (VIO output)
└── debug/                      # intermediates; safe to delete after audit
    └── work/
        ├── step_outputs/       # per-step stdout/result
        └── qc/ merge/ vio/ vio_check/
A top-level summary is logged at the end of the run, for example:
summary: 3/4 groups succeeded
  FAIL ab12cd34 at vio
Visualize the generated mcap at monitor.genrobot.com.
Common issues (brief)
| Symptom | Suggested fix |
|---|---|
permission denied connecting to Docker | Add the user to the docker group and log in again |
ECR reports no permission for GetAuthorizationToken | Confirm that the AWS user or role has ECR read permission, such as AmazonEC2ContainerRegistryReadOnly |
| Container exits with code 1 but stderr is empty | Often mcap permission issue; rerun chmod -R a+rX "$INPUT_DIR" |
| Input path is invalid or files are not found in the container | --input-dir and --output-dir must use absolute paths |
| A group fails at a step | Check $OUTPUT_DIR/<uuid>/result.json and $OUTPUT_DIR/<uuid>/debug/work/step_outputs/<step>.json |
More troubleshooting: Repository README §7 Troubleshooting.
5. Technical Reference
5.1 Data Parsing Tools
- Data parsing SDK: github.com/genrobot-ai/das-datakit
- Data visualization tool: https://monitor.genrobot.com/#/index
5.2 Robot Indices in the Merged Data Package
(Current convention; subject to change later.)
| Index | Device |
|---|---|
robot0 | DAS Ego |
robot1 | DAS Finger (left) |
robot2 | DAS Finger (right) |
5.3 Main Topics in the Merged Package (robot0 / robot1 / robot2)
| Robot | Topic | Schema | Rate | Description |
|---|---|---|---|---|
robot0 | /robot0/sensor/camera0/compressed … /robot0/sensor/camera5/compressed | CompressedImage | 30 Hz | Six RGB compressed video streams (H.264), left to right |
robot0 | /robot0/sensor/camera0/camera_info … /robot0/sensor/camera5/camera_info | CameraCalibration | Single frame | Intrinsic and extrinsic calibration for six RGB cameras, left to right |
robot0 | /robot0/sensor/camera2/camera_info_resize/robot0/sensor/camera3/camera_info_resize | CameraCalibration | Single frame | Calibration for the two lower-resolution center cameras |
robot0 | /robot0/sensor/imu | IMUMeasurement | 200 Hz | IMU data |
robot0 | /robot0/vio/eef_pose | PoseInFrame | 30 Hz | Ego 6D pose in the world frame; for the frame definition, see DAS Ego — Technical Reference |
robot0 | /robot0/vio/relative_eef_pose | PoseInFrame | 30 Hz | Uses the Ego pose at t=0 as the world origin and records relative pose changes |
robot0 | /robot0/sensor/audio | AudioData | 30 Hz | Audio |
robot0 | /robot0/system/info | SystemInfo | 1 Hz | System information |
robot1robot2 | /robot1/sensor/camera0/compressed/robot2/sensor/camera0/compressed | CompressedImage | 30 Hz | Left / right Finger camera images |
robot1robot2 | /robot1/sensor/camera0/camera_info/robot2/sensor/camera0/camera_info | CameraCalibration | Single frame | Left / right Finger camera calibration |
robot1robot2 | /robot1/sensor/imu/robot2/sensor/imu | IMUMeasurement | 200 Hz | Left / right Finger IMU |
robot1robot2 | /robot1/sensor/magnetic_encoder/robot2/sensor/magnetic_encoder | MagneticEncoderMeasurement | 50 Hz | Left / right Finger magnetic encoder gripper opening (m) |
robot1robot2 | /robot1/vio/eef_pose/robot2/vio/eef_pose | PoseInFrame | 30 Hz | Left / right Finger 6D poses in the world frame (same world frame as Ego) |
Raw data does not include streams such as /robot0/vio/eef_pose, /robot1/vio/eef_pose, and /robot2/vio/eef_pose. These streams are generated after algorithmic processing.
6. Troubleshooting and Maintenance
6.1 Pairing Troubleshooting
If pairing fails, confirm that the Ego App, Ego firmware, and Finger firmware are all up to date. You can view release notes in the following documents:
- DAS Ego & DAS App: Version and update notes
- DAS Finger: Finger document
For detailed pairing steps, see 4.1 Hardware Preparation.
6.2 Notes
Do not replace the battery during recording, otherwise data may be corrupted.
The current SD card format is FAT32 and does not support a single recording larger than 4 GB. If you need to record data for more than 20 min, use the included software (DiskGenius) to convert the SD card to exFAT format.