DAS Ego Manual v2.0
简体中文 | English
0. Document Information
- Document version
- v2.0
- Last updated
- 2026-06-04
- Applicable product
- DAS Ego head-mounted multimodal data acquisition device
1. Safety and Compliance
1.1 Safety Instructions
Please read this section carefully and follow all safety guidelines before first use.
For assistance, contact: support@genrobot.ai
1.1.1 Warning Symbol Meanings
- ⚠️ Danger: May cause serious injury, death, or major property damage.
- ⚠️ Warning: May cause personal injury or equipment damage.
- ⚠️ Caution: May cause equipment failure or data loss.
- 💡 Tip: Helpful suggestions for better operation.
1.2 Liability and Limitations
- Do not modify, alter, or tamper with the device.
- GENROBOT.AI is not responsible for issues caused by misuse, unauthorized modifications, or improper operation.
- By using this device, you agree to all safety terms and assume full responsibility for its operation.
- This product is not intended for users under 18 years old.
1.3 Integrator and User Responsibilities
- Perform a complete hazard and risk assessment before deployment.
- Implement appropriate safety protections based on the assessment results.
- Ensure all hardware and software are installed and configured correctly.
- Do not disable or change safety measures without authorization.
- Comply with applicable laws, standards, and industry regulations.
1.4 Environmental Requirements
- Operating temperature: 0°C to 40°C (optimal 22±2°C)
- Relative humidity: 40%RH to 65%RH (non-condensing)
- Protection rating: IP50
- Magnetic field strength: ≤50 mT
- Illumination: ≤500 lux, with no direct light or reflective surfaces
- The ground should be vibration-free and away from motors, frequency converters, high-power supplies, and WiFi 6E/5G base stations
- The environment should be dust-free, smoke-free, and free of corrosive gases
1.5 Usage Warnings
1.5.1 Danger Warnings
- Do not modify or tamper with the device.
- Stop using the device immediately if it is damaged or unstable.
- Avoid exposing the device to strong magnetic fields for extended periods.
1.5.2 Operational Warnings
- Implement safety measures according to the risk assessment.
- Ensure bystanders stay away from the device's operating range.
- Reassess risks when integrating new components or equipment.
- Read all related equipment manuals before operation.
1.5.3 Maintenance Warnings
- Use only original accessories and replacement parts.
- Inspect the device regularly to identify potential issues early.
- Follow the recommended maintenance schedule.
- Store the device under compliant environmental conditions.
1.6 Data Security and Privacy
1.6.1 Data Protection
- Handle collected data securely, as it may contain sensitive information.
- Back up important data regularly.
- Understand the data policies of any connected cloud services.
- Comply with applicable data protection regulations.
1.6.2 Privacy Protection
- Respect the privacy of others when operating in public spaces.
- Obtain necessary permissions before recording or collecting data.
- Follow local laws regarding data collection.
2. Product Overview
2.1 Key Features
DAS (Data Acquisition System) is a general-purpose embodied AI multimodal data acquisition system.
DAS Ego is a first-person, head-mounted multimodal data acquisition device in the DAS product family and serves as an entry point for ego-centric data collection. It integrates six high-resolution cameras, a high-precision IMU, microphone audio, and multiple sensors to provide ultra-wide visual coverage and millimeter-level trajectory reconstruction for high-quality data capture. It also supports multi-device spatiotemporal alignment, making it suitable for long-duration collection tasks.
2.2 Packing List and Specifications
| Item | Quantity | Specification |
|---|---|---|
| Ego main unit | 1 | 269 g |
| Battery pack | 2 | 4000 mAh, 3.7 V, 100 g each |
| TF card | 1 | 128 GB |
| Card reader | 1 | USB 3.0, dual-slot |
| Charging cable | 1 | USB to Type-C, 1 m |
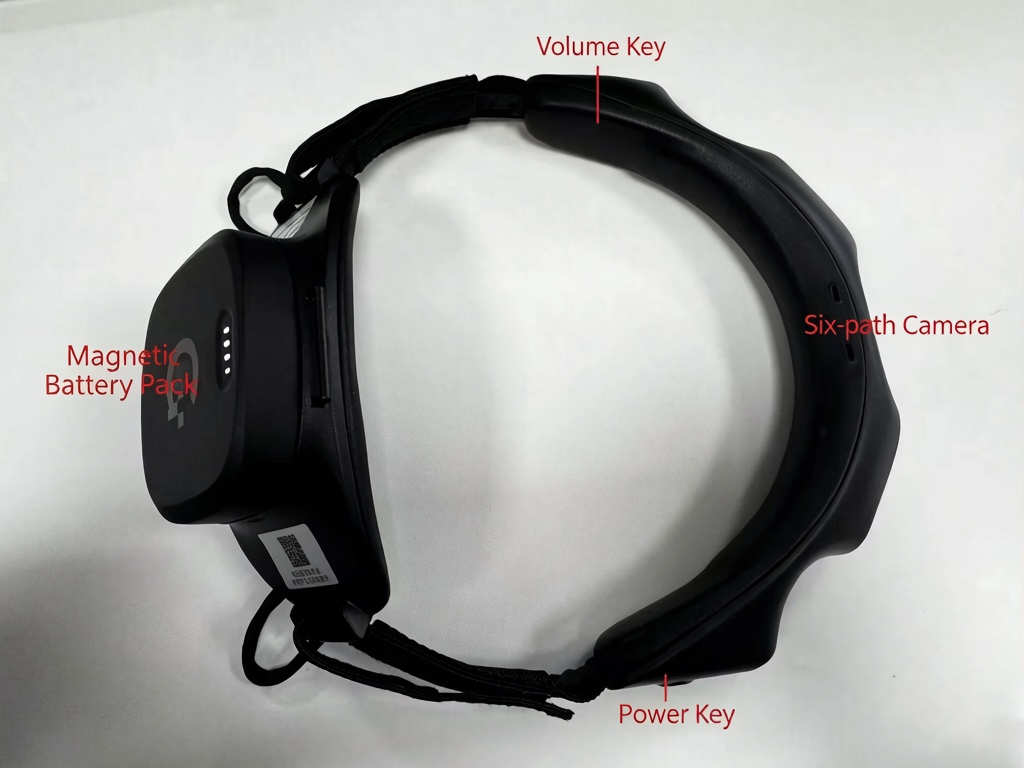
2.3 Device Layout
| Module | Layout / Specification |
|---|---|
| Cameras | Six wide-angle RGB cameras with approximately 2 MP each; horizontal FOV about 270°, vertical FOV about 150°; recording at 30 Hz. |
| Battery | Magnetically attached to the DAS Ego main unit; 4000 mAh per pack, about 2 hours of runtime; batteries can be swapped without powering off. |
| IMU | High-precision 6-axis sensor with a 2×2 IMU array; after calibration and algorithm processing, gyro bias stability is about 2.5°/h, and drift over −40°C to 85°C is about 0.03°/s. |
| URDF | URDF follows the Feishu URDF document. |
2.4 Device Overview
3. Core Concepts
3.1 World Frame
- Origin: the IMU position at the initial collection moment.
- Z axis (blue): opposite to gravity and pointing upward.
- X axis (red): the forward projection of the IMU orientation on the horizontal plane after successful initialization.
- Y axis (green): orthogonal to X and Z, determined by the right-hand rule.

3.2 Local Frame
- Origin: the geometric center of the IMU.
- X axis (red): the device forward direction, pointing forward along the normal of the IMU mounting plane.
- Y axis (green): the device left direction, orthogonal to the X axis and defined by the right-hand coordinate convention.
- Z axis (blue): the device upward direction, orthogonal to both X and Y and uniquely determined by the right-hand rule.

4. Operation Guide
Quick Start
Login, Connection, and Pairing
Start/End Data Collection
- The latest APP version is 1.0.16, EGO is 2.1.7, and FINGER is 4.5.37.
- Update both the devices and the APP to the latest versions before pairing and use.
4.1 Hardware Preparation
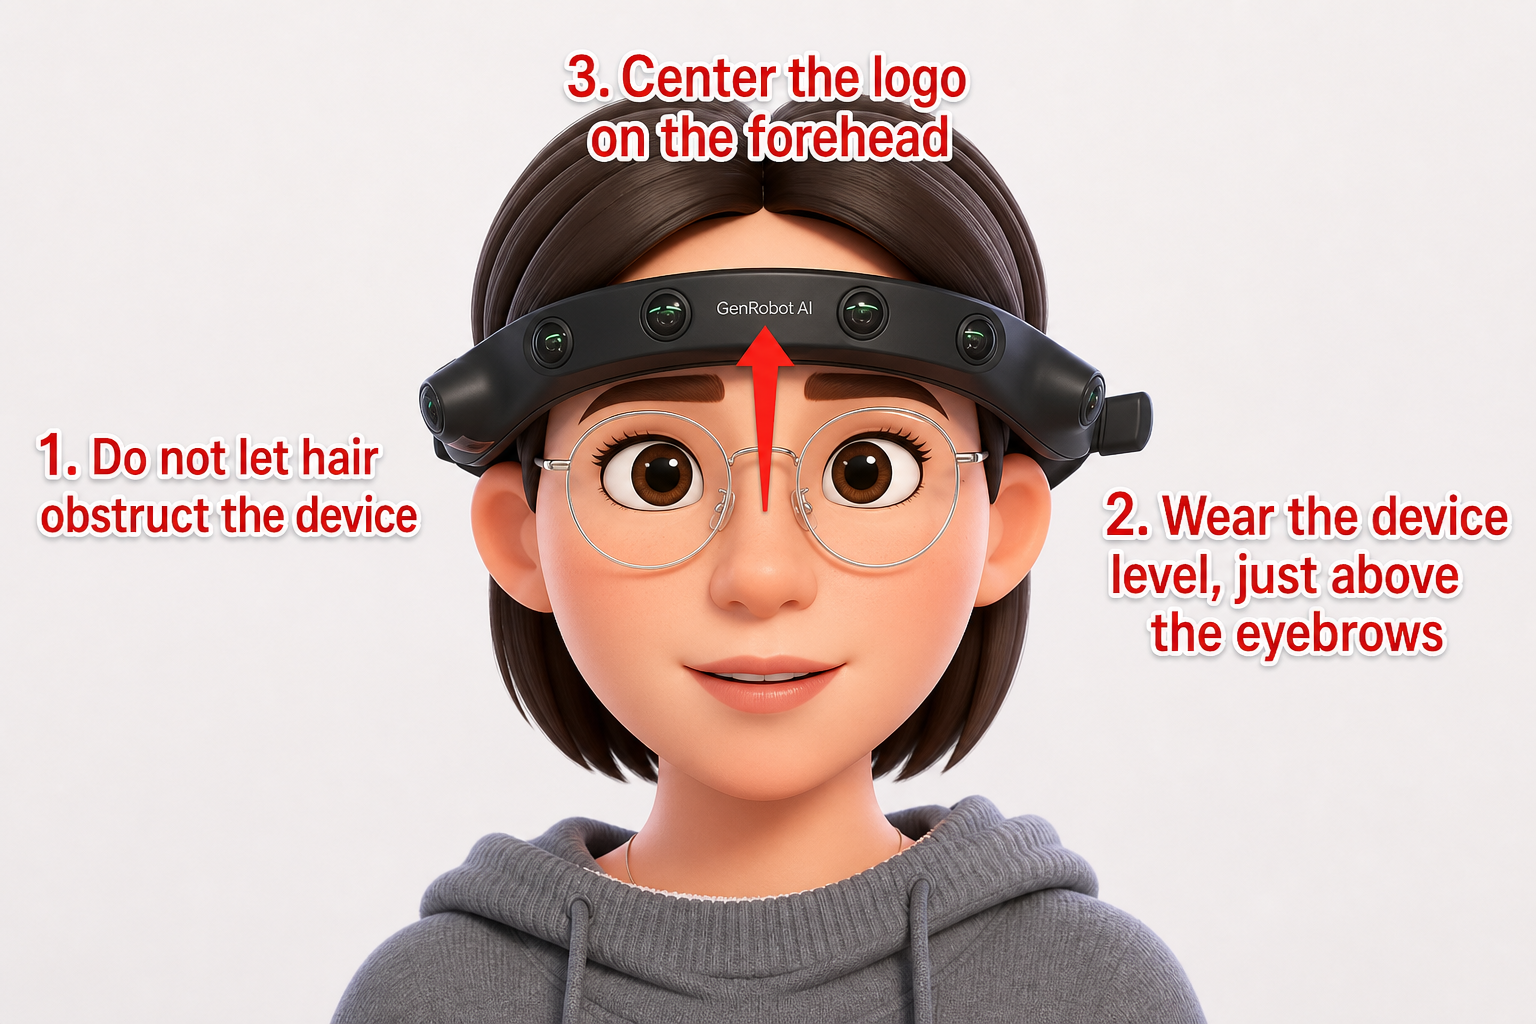
4.1.1 Wearing the Device
- All hair must be fixed upward with a headband or hair clip to avoid blocking any camera lens.
- Clean the device lenses and keep the image clear.
- Wear the device as specified: keep it level and close to the eyebrows, with the letter logo centered on the forehead.
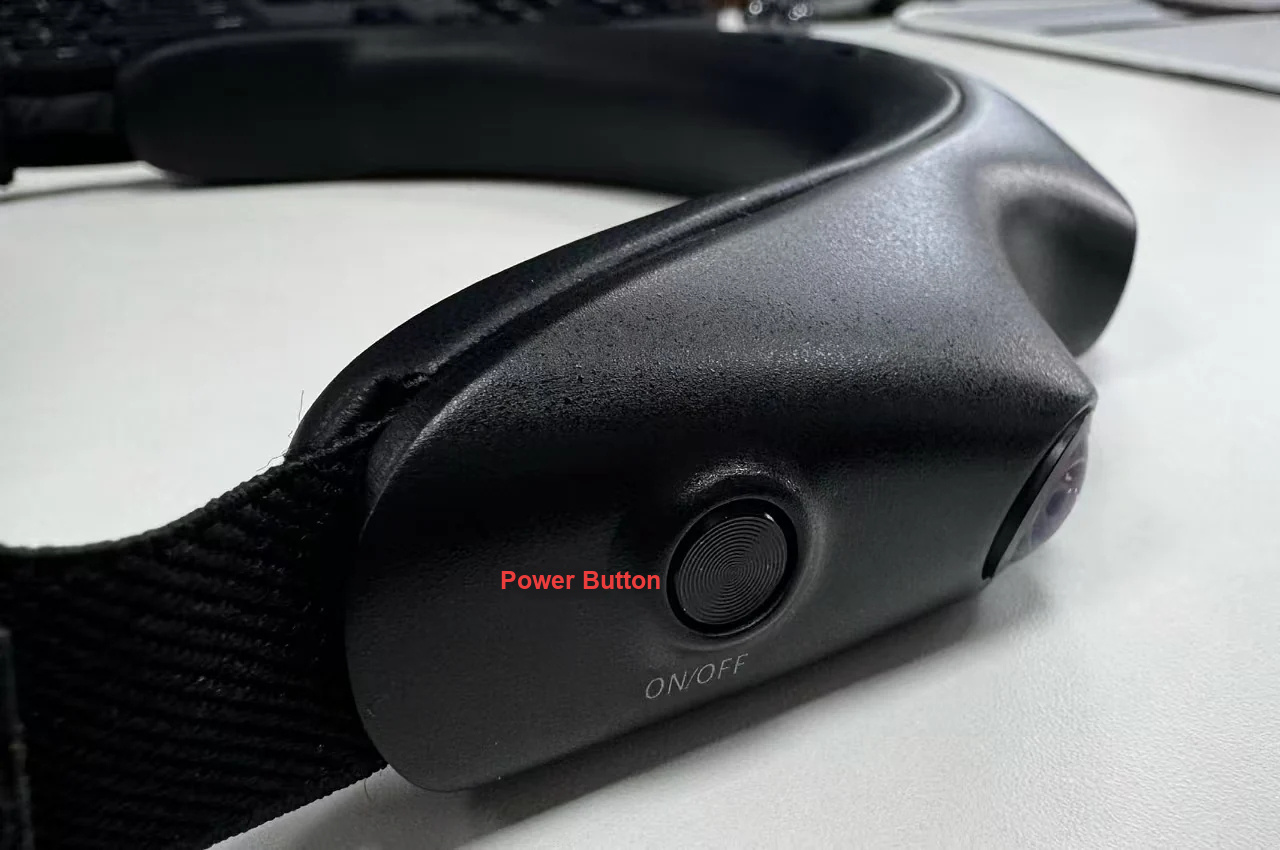
4.1.2 Power On and Power Off
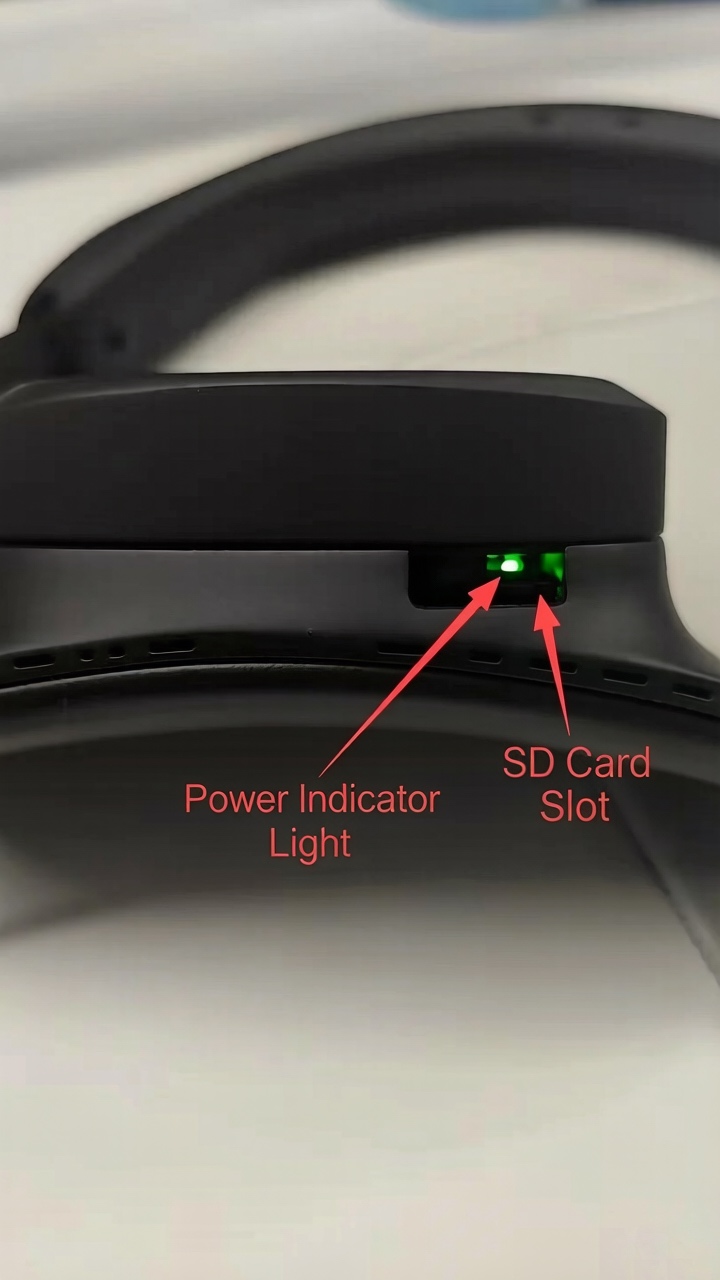
- Short-press the power button -> after hearing the voice prompt "Power on" (English) or "开机" (Chinese), the power indicator turns green and the device is powered on.
- Press and hold the power button -> after hearing the voice prompt "Power off" (English) or "关机" (Chinese), the device is powered off.
The voice prompt language depends on the language setting in the app: English -> English prompts; Simplified Chinese -> Chinese prompts.

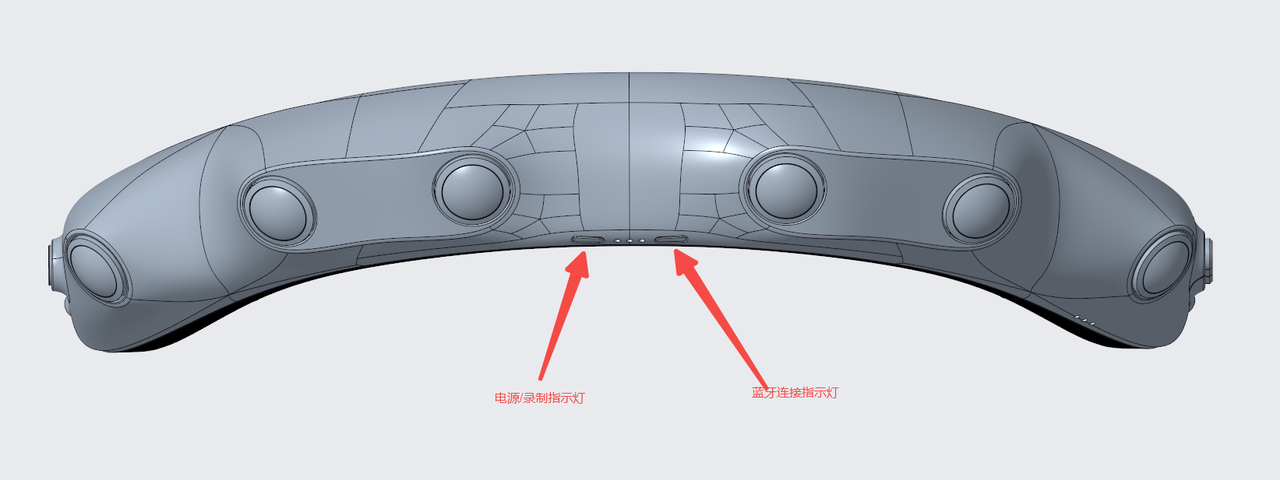
4.1.3 Ego Indicator Light Guide
| Indicator | Function | Light Pattern |
|---|---|---|
| Power indicator (left) | Power-on process | Blue light steady on |
| Standby after startup | Blue light blinking | |
| Recording | Blue light steady on | |
| Connection indicator (right) | Power-on process | Blue light steady on |
| Bluetooth not connected | Blue light blinking at low frequency (0.5 Hz) | |
| Bluetooth connected | Blue light steady on |
4.2 System Configuration
4.2.1 DAS App Introduction
This app is the dedicated companion application for the Ego head-mounted data acquisition device. It supports both Android and iOS. The app is the core terminal for data capture, device management, and data upload, enabling efficient and accurate data collection with a convenient workflow suitable for a variety of collection scenarios.
DAS App Installation Guide
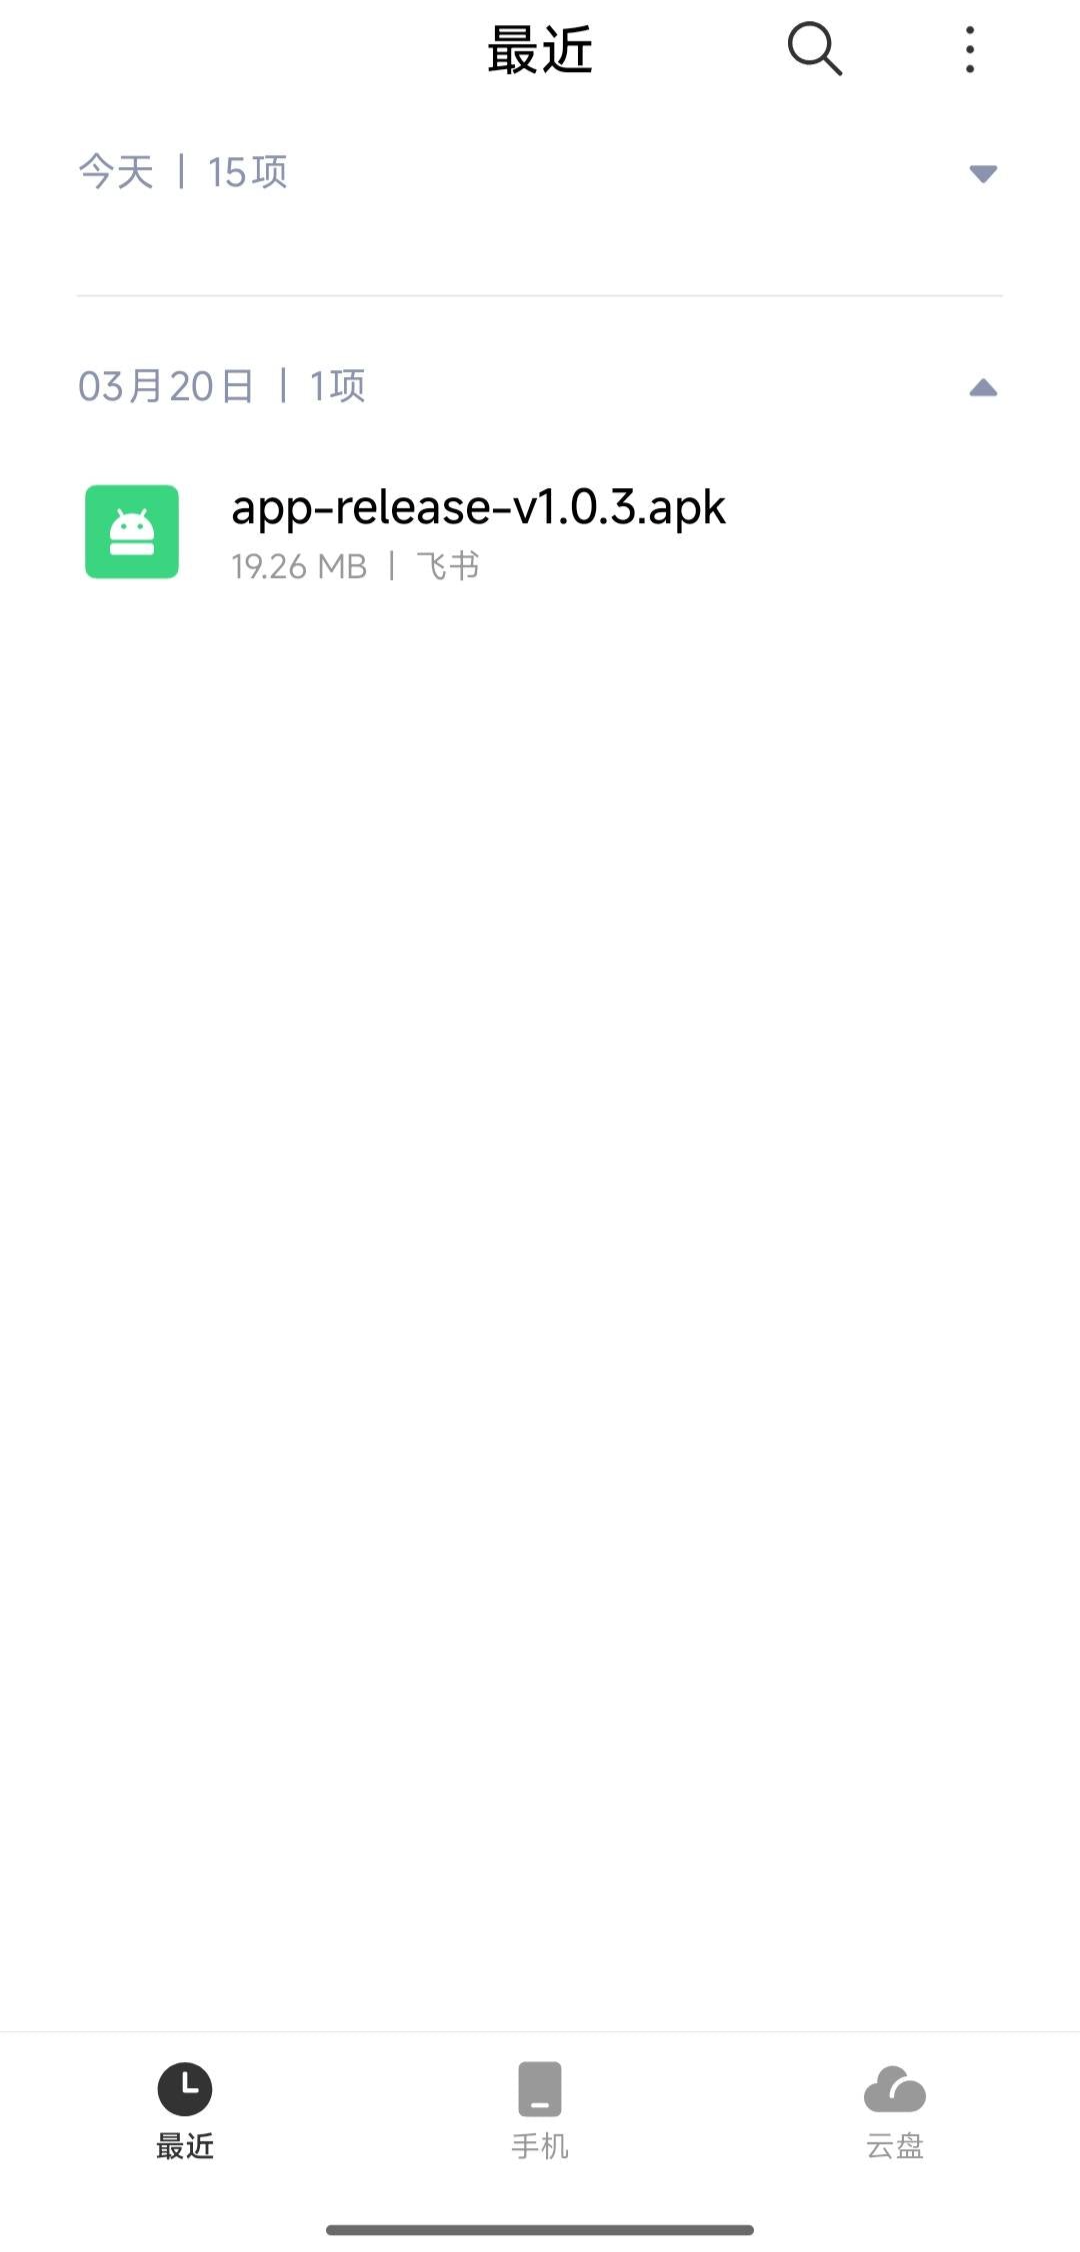
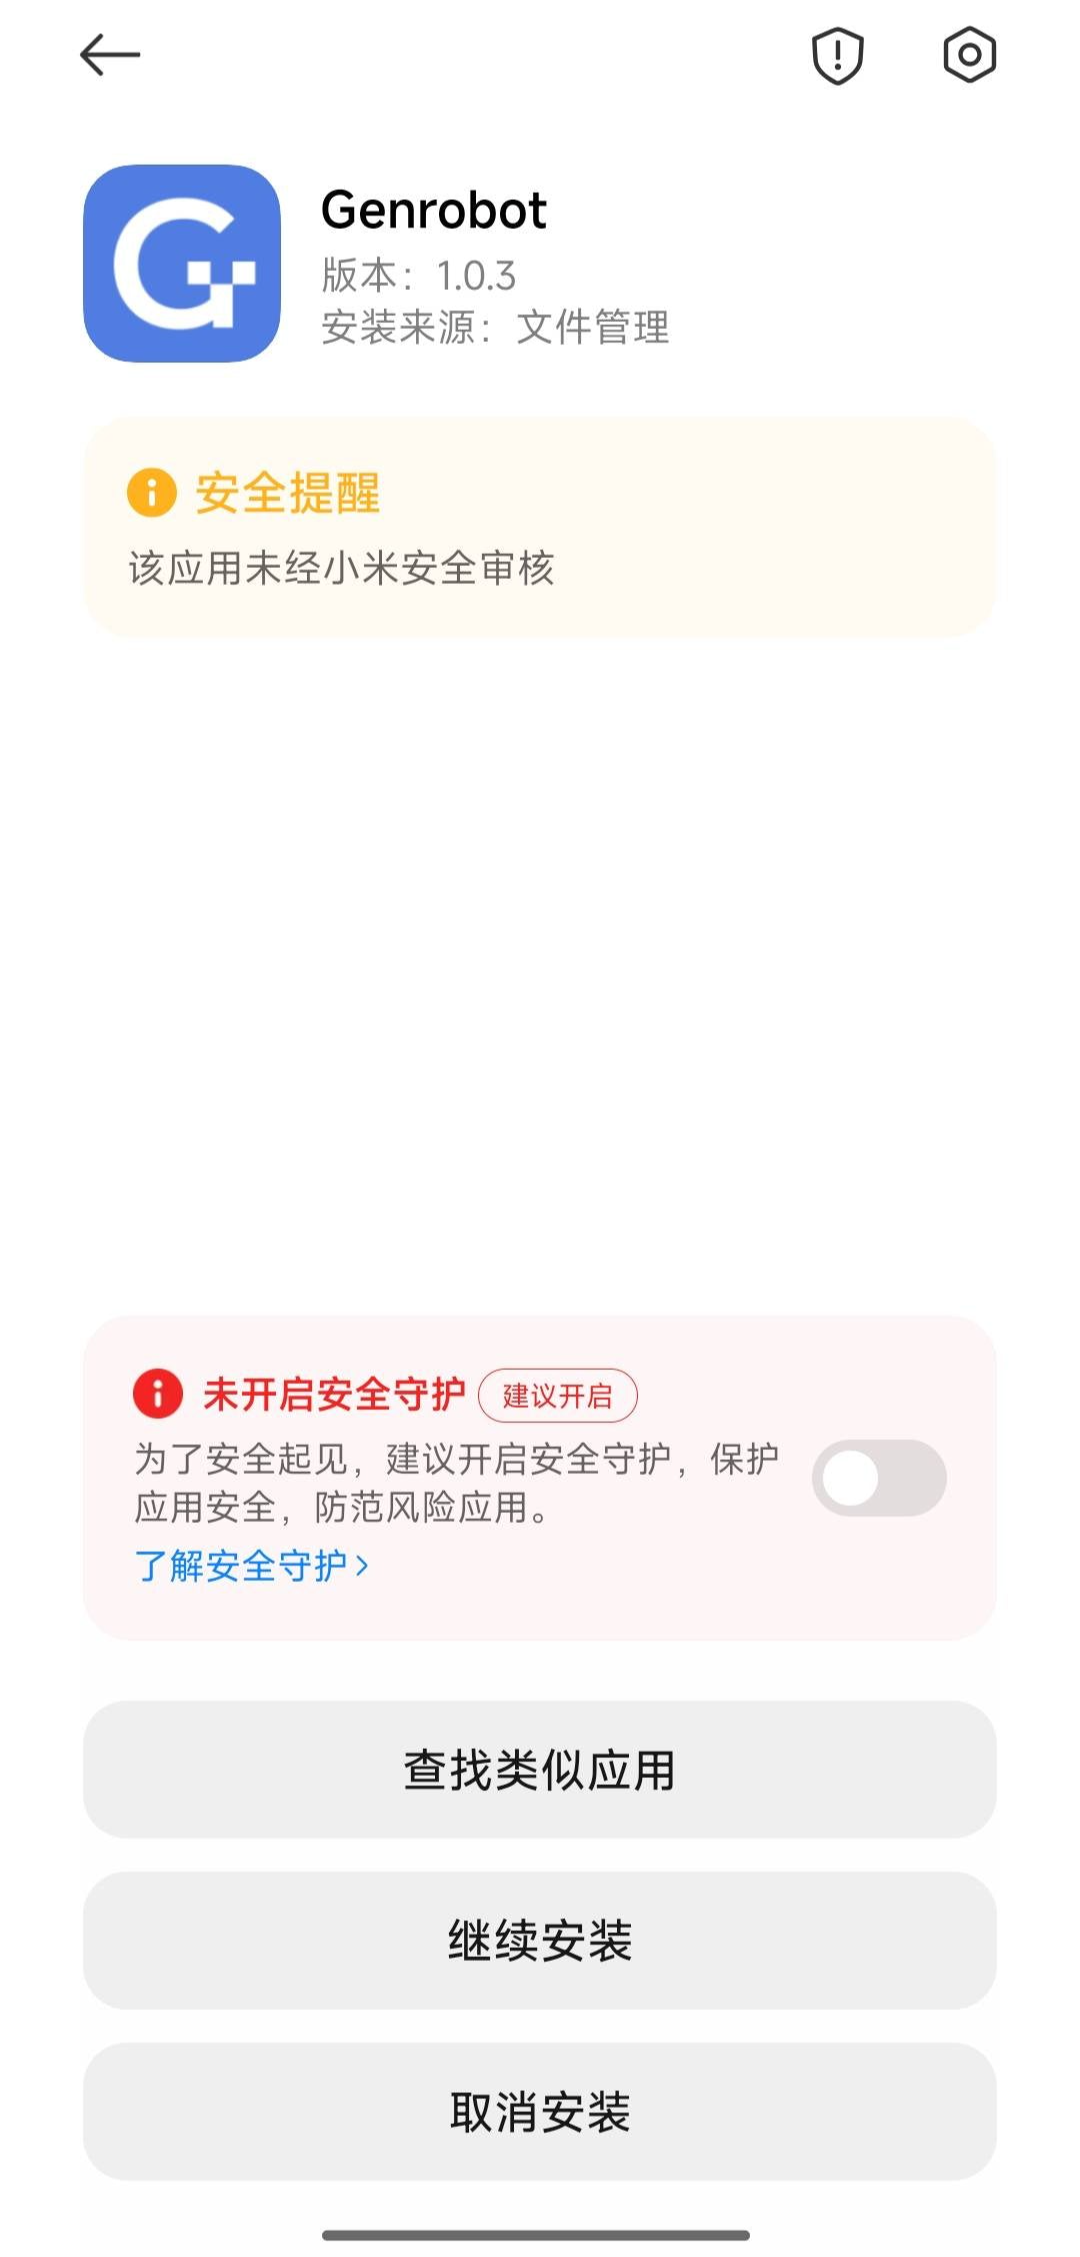
For Android:
- Save the APK package to your phone. The latest version can be found in the version update document.
- Install the package.
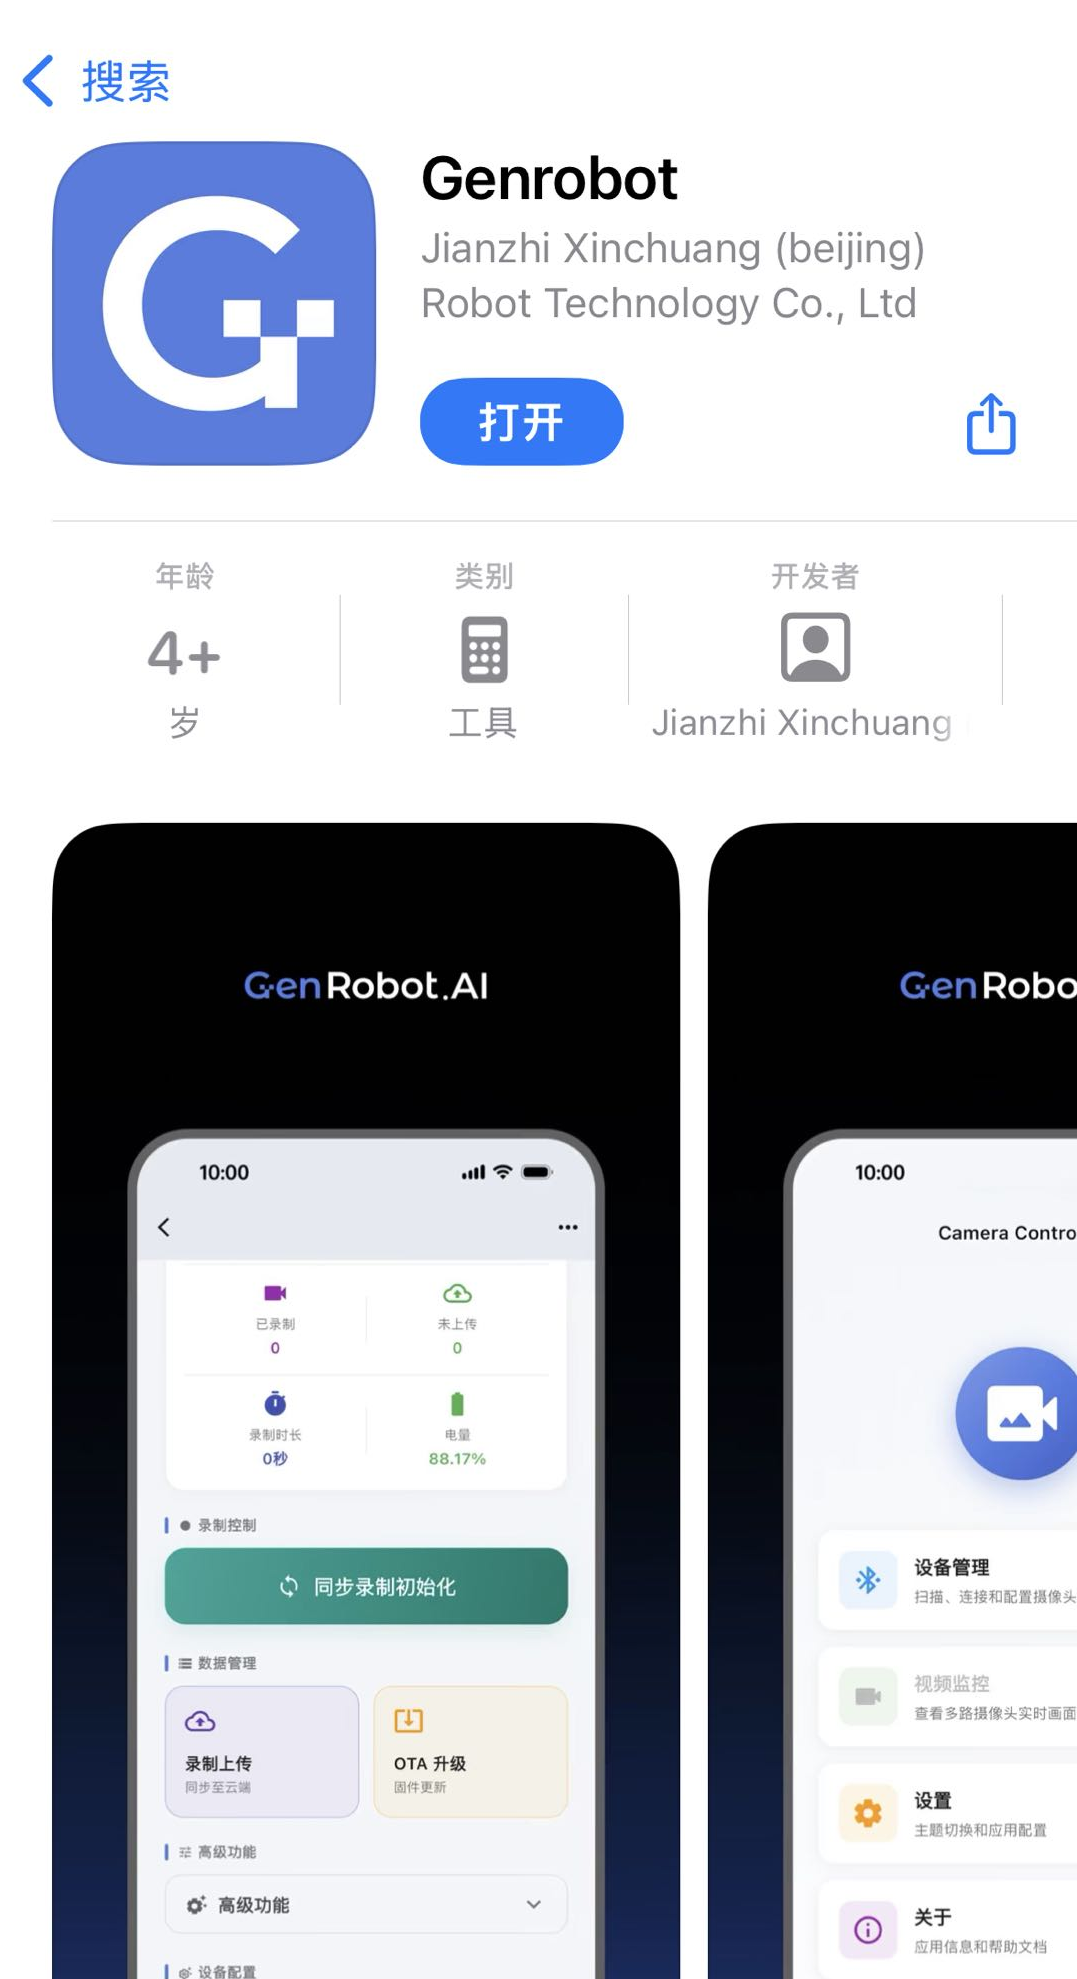
For iOS: search for genrobot in the App Store, then download and install it.
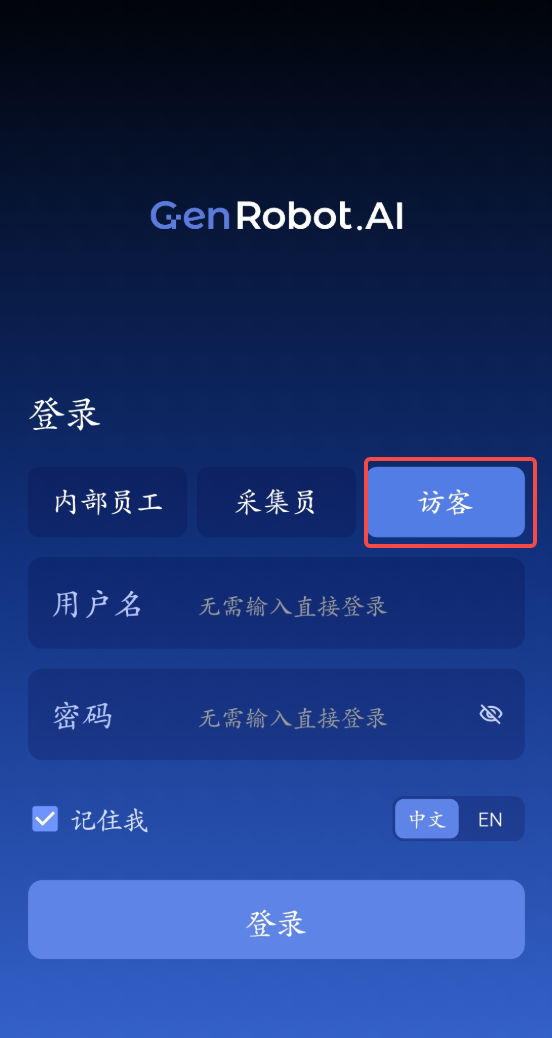
App login: select guest login.
DAS App Core Functions
App Device Connection
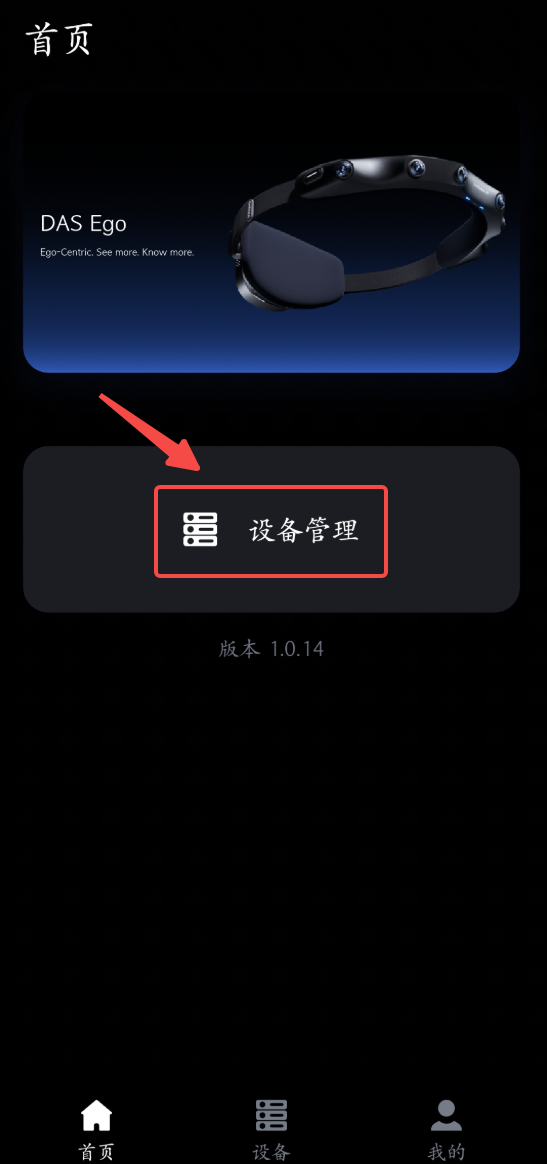
1. After installing the app, open it and tap Device Management.
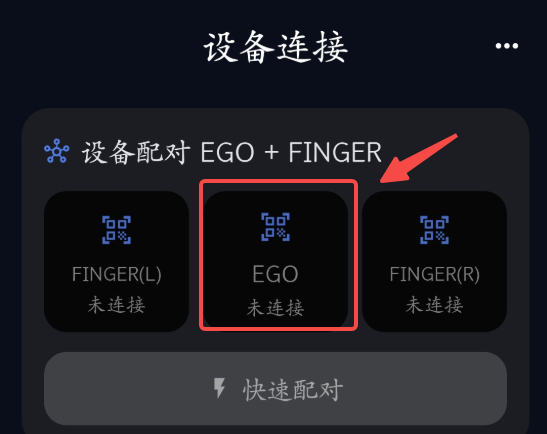
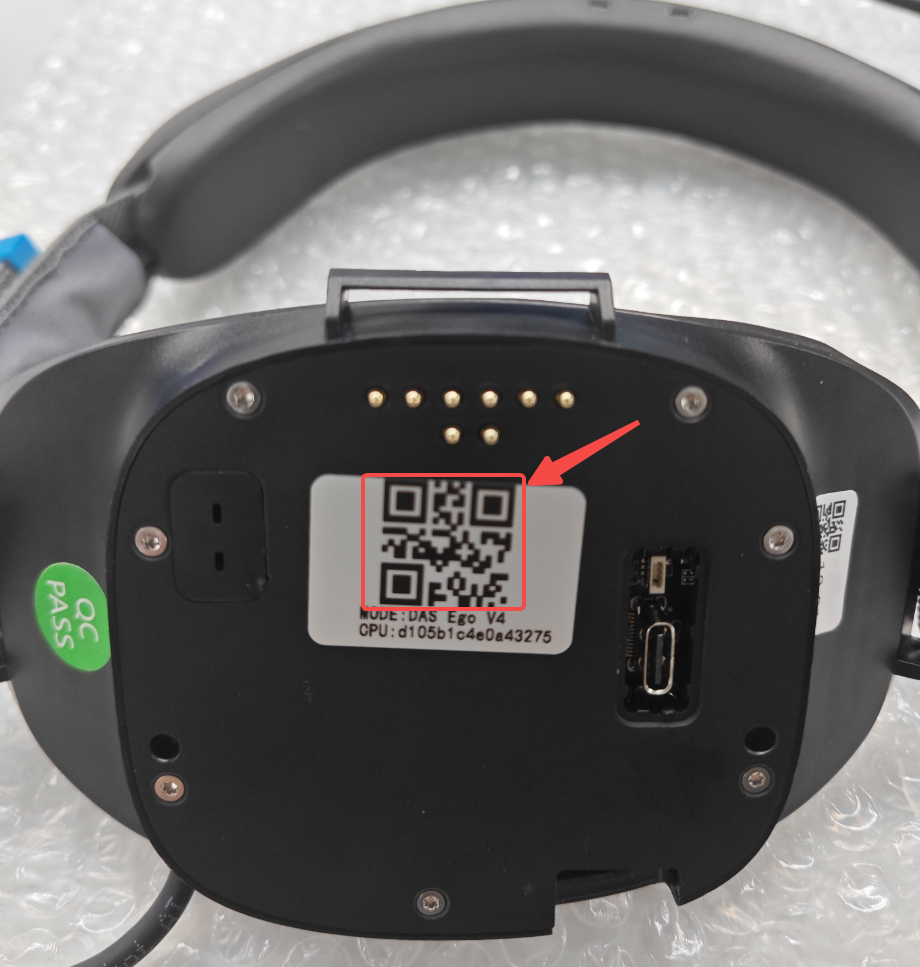
2. With the device powered on, tap the EGO scan button and scan the QR code on the back of the EGO device.
3. After connection succeeds, the device appears in the connected device list. Tap the right-side button to open details.
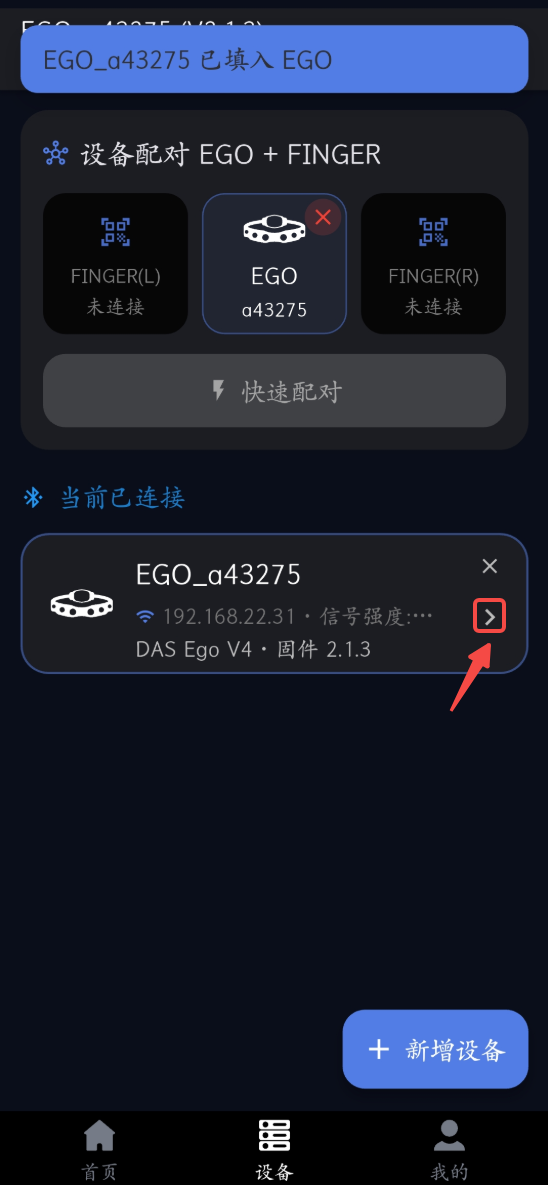
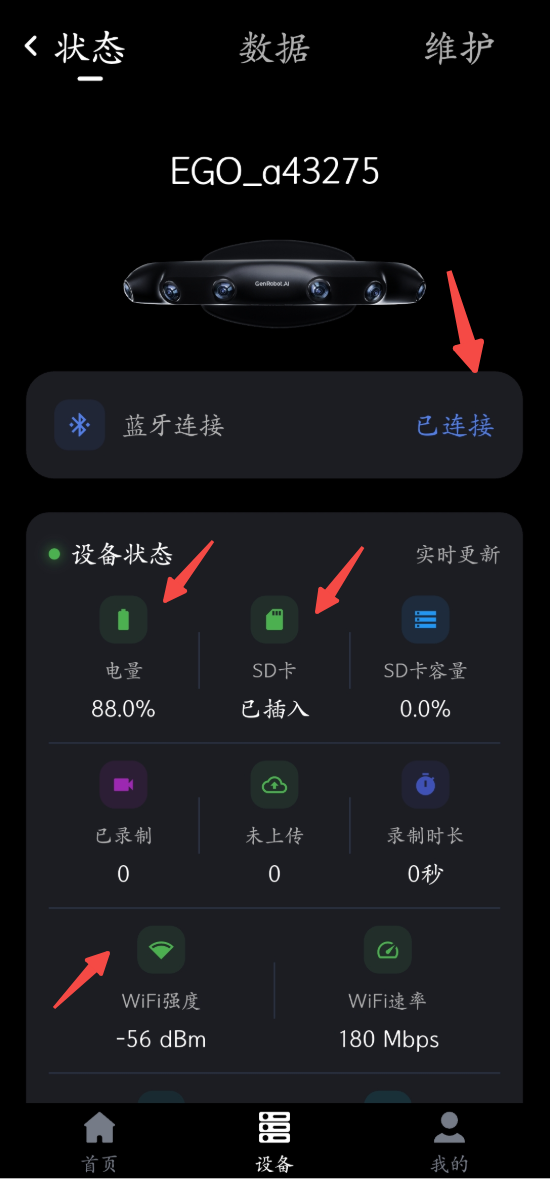
4. On Device Info - Status, confirm that Bluetooth, WiFi, SD card, and battery status are displayed normally.
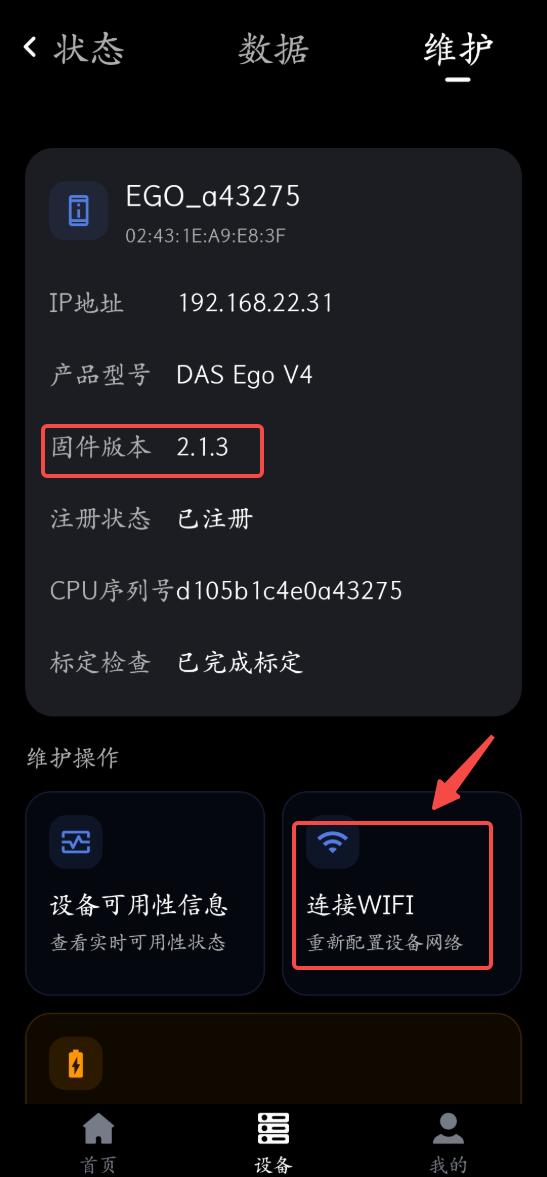
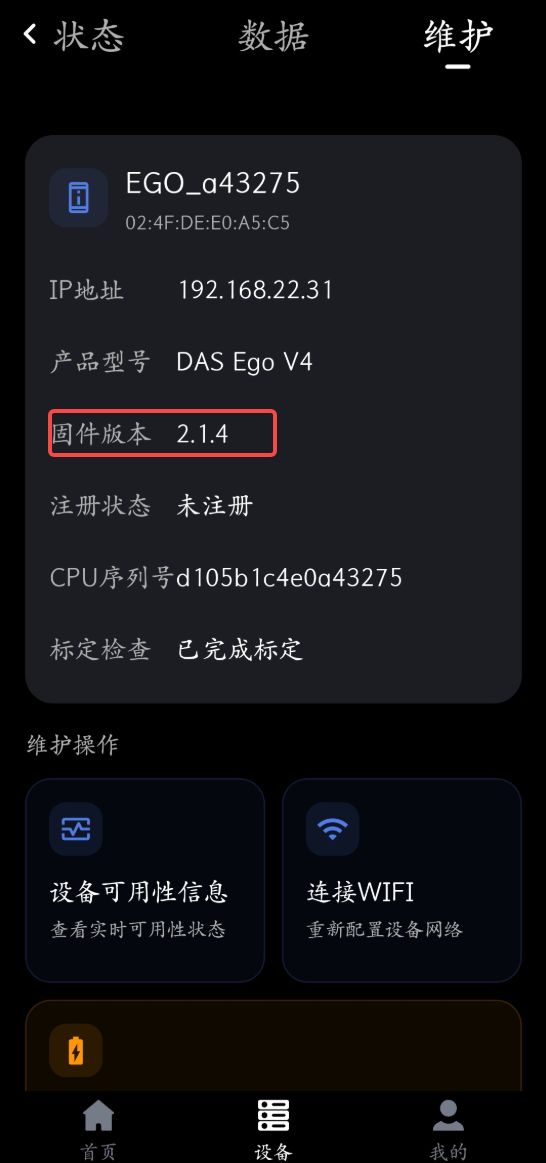
5. On Device Info - Maintenance, check the current firmware version and configure WiFi connection.

WiFi Connection
1. After the device is connected, tap the button to enter the device status page.

2. On the Maintenance page, tap Connect WiFi to enter the WiFi connection page.
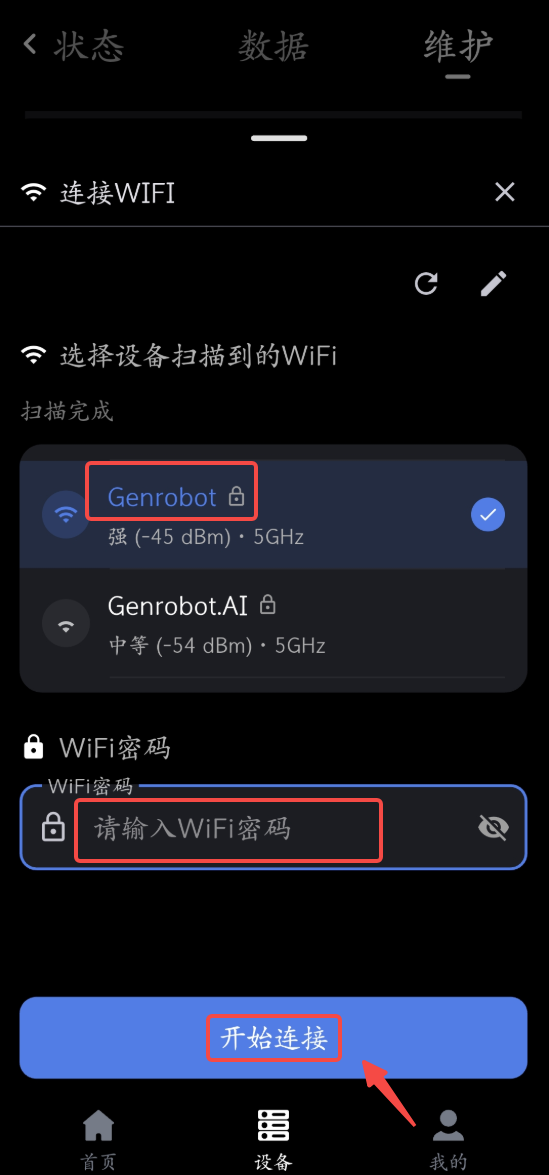
3. Tap Start Configuration to enter the WiFi connection page.

4. Select WiFi, enter the password, and tap Start Connection.
Firmware Upgrade
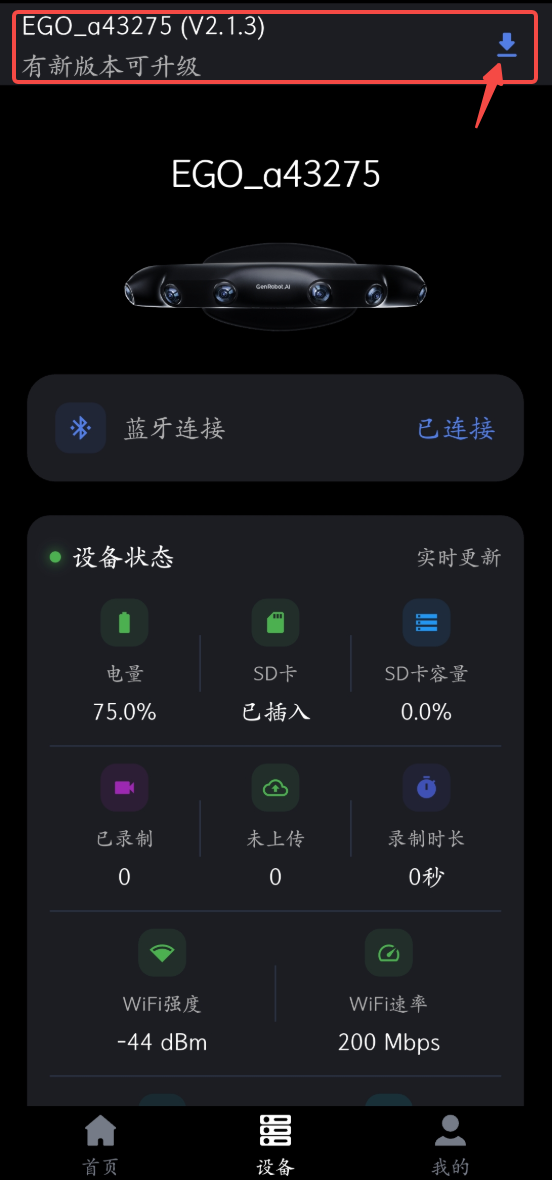
1. After connecting the device, the top bar prompts a firmware upgrade. Tap the download button to open the upgrade page.
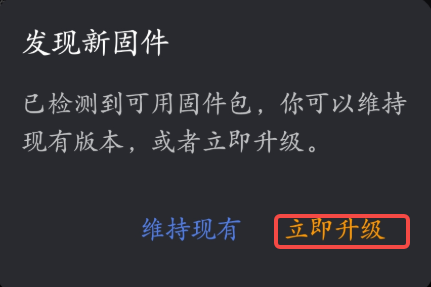
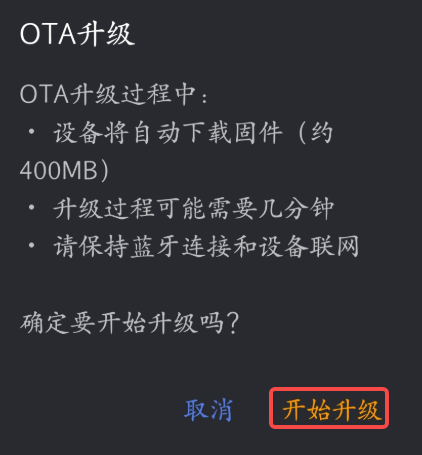
2. Tap Upgrade Now.
3. Wait for the upgrade to complete, restart the Ego device, reconnect the app, and connect WiFi.
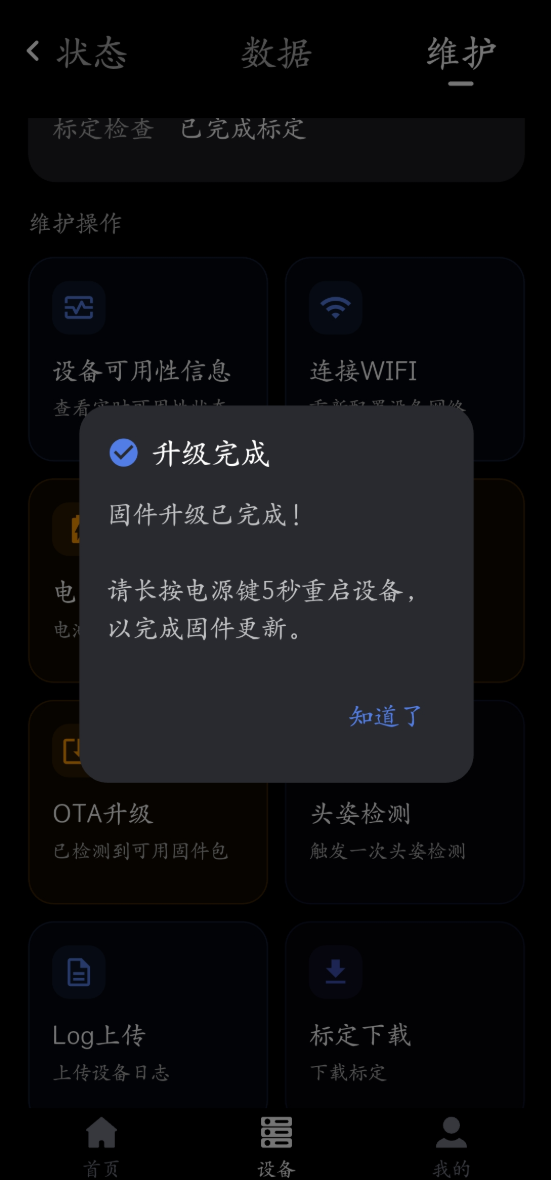
4. When the firmware version matches the latest version, the upgrade is successful.
Other
- Data - File Management: stores files recorded by the device; files can be downloaded and opened in the playback page to view recorded images.
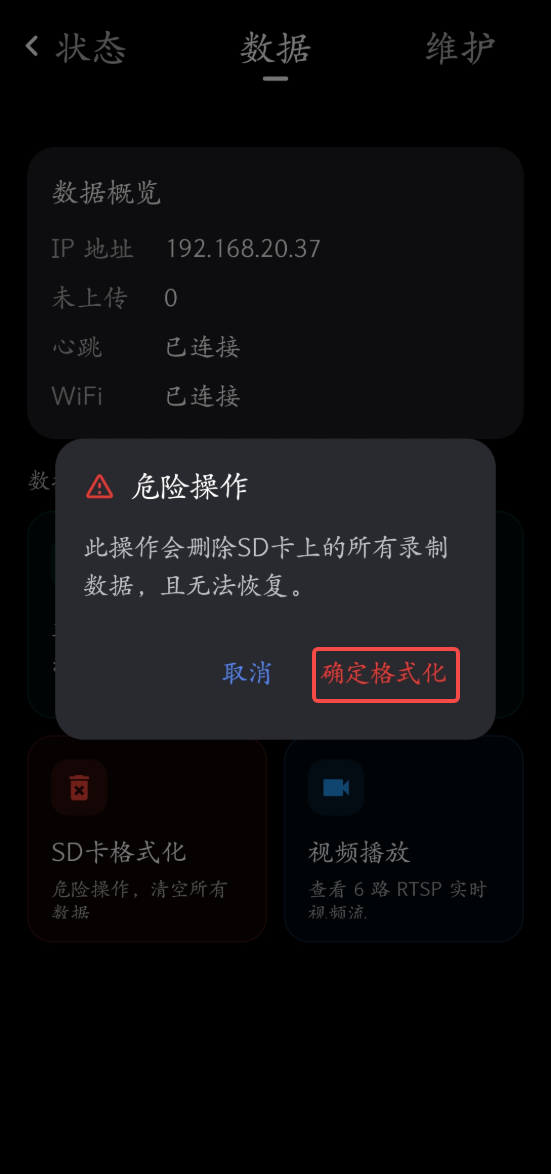
- Data - SD Card Formatting: format the SD card after recorded data has been copied or when you need to clear the SD card.
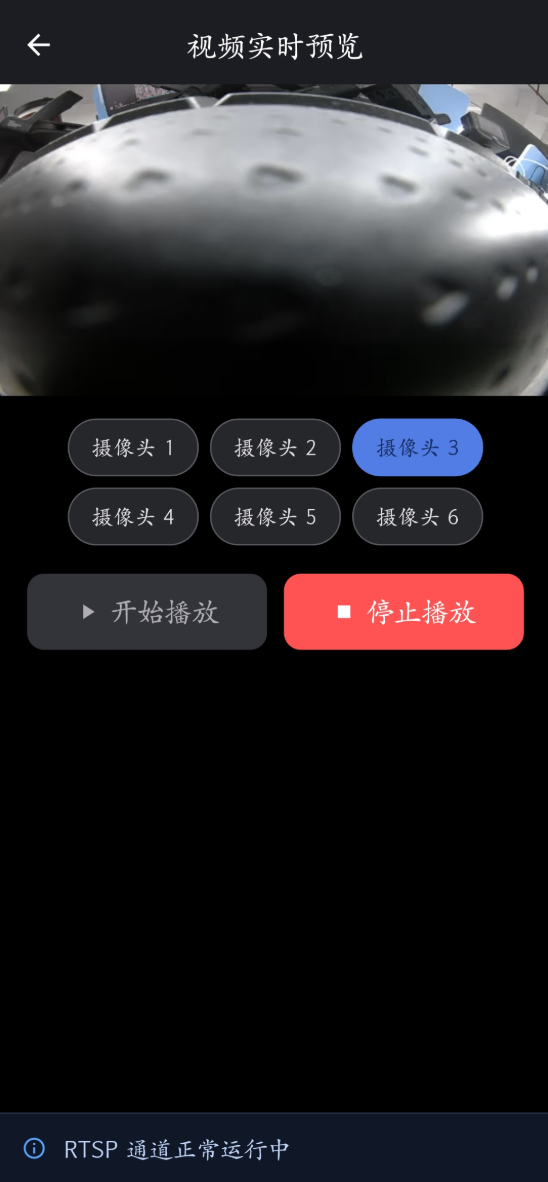
- Data - Video Playback: view six RTSP real-time video streams. The device and phone must be on the same network; preview is not supported during recording.
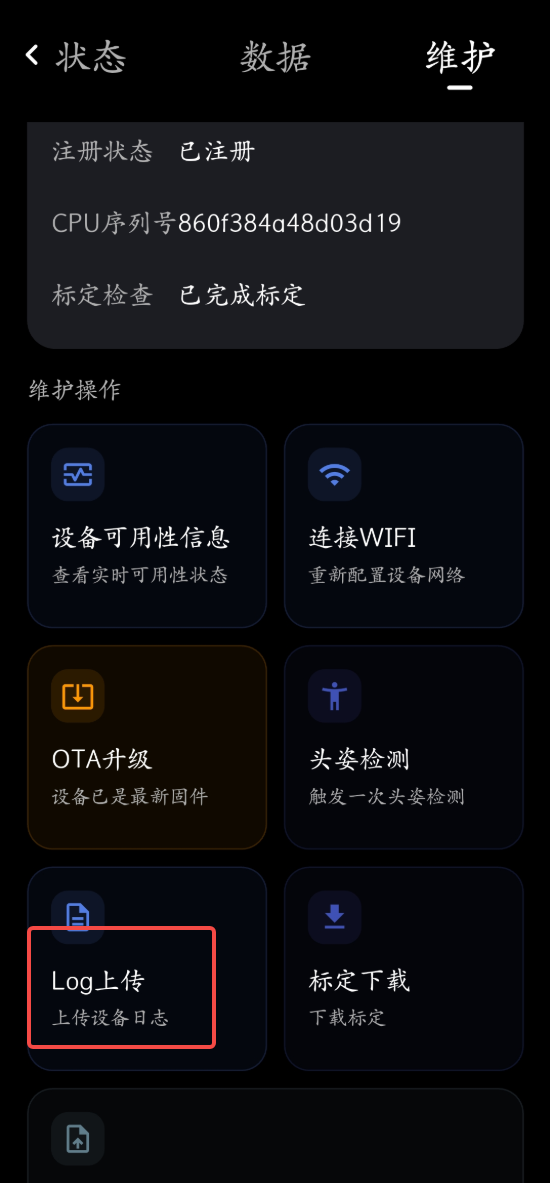
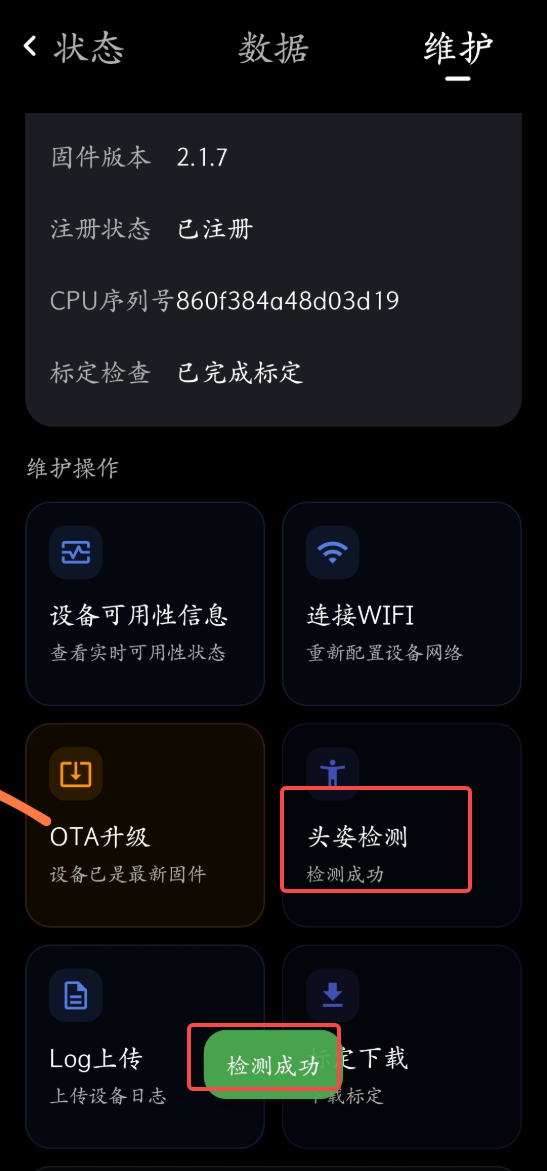
- Maintenance - Log Upload: upload device logs to the cloud in real time for engineering troubleshooting.
- Maintenance - Head Pose Check: check the pitch angle while wearing the device and confirm that the device is worn level.
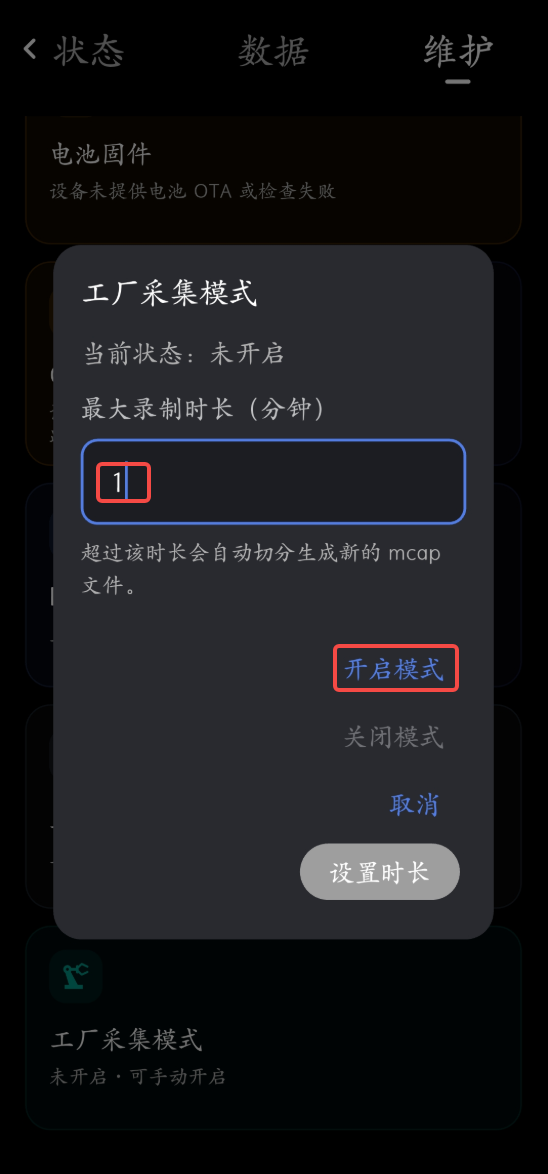
- Maintenance - Factory Collection Mode: supports continuous recording with automatic slicing and writing to disk at a specified interval.
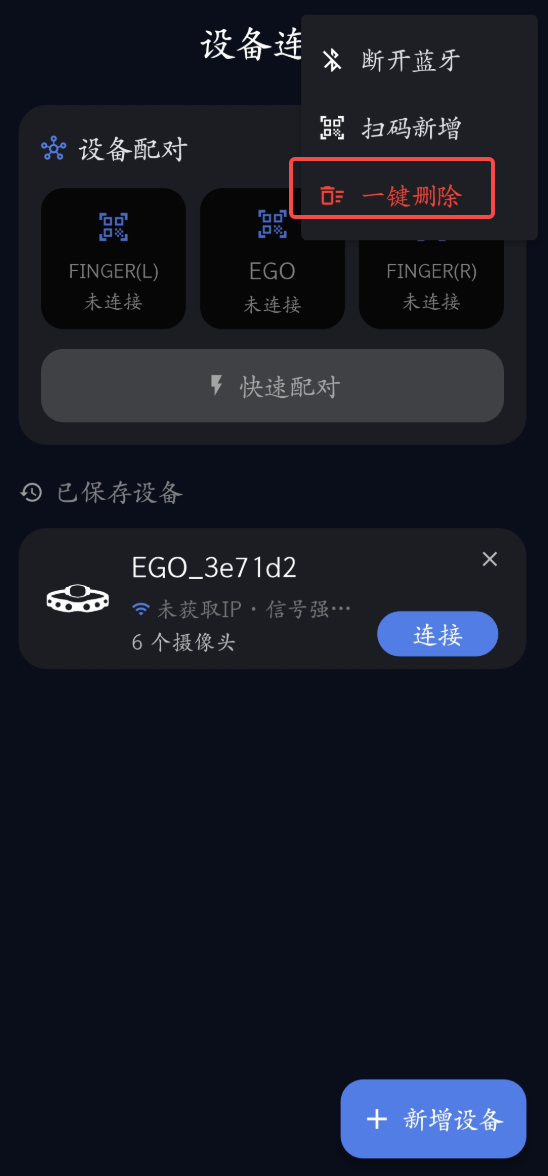
- Device Connection - One-click Delete: delete the historical connected device list.
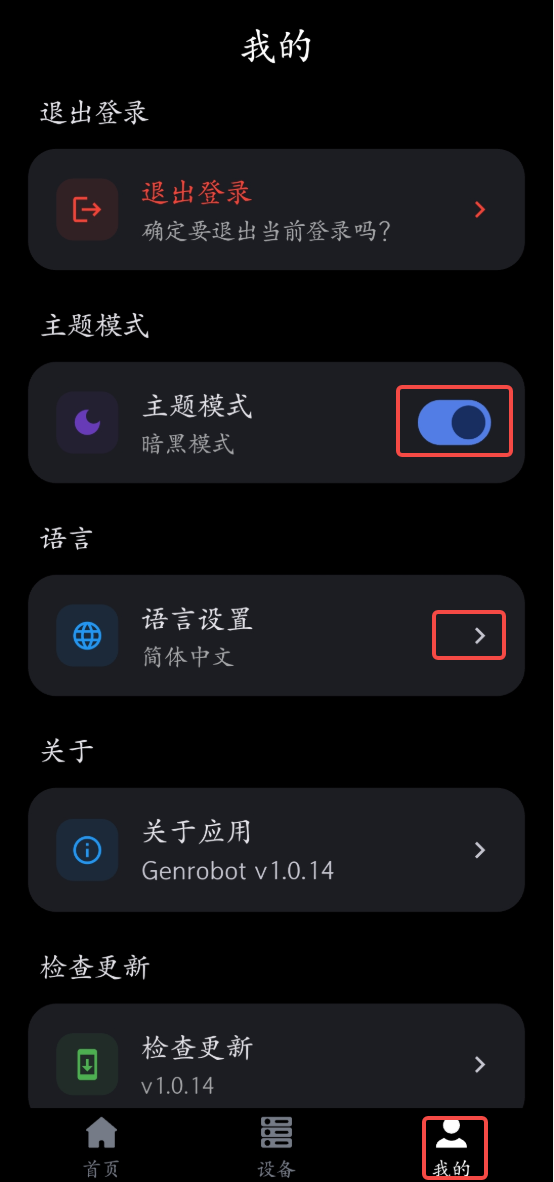
- Me: set theme mode and language.

4.3 Data Collection
4.3.1 Collect Data
- Press the power button once -> after hearing the voice prompt "Start recording" (English) or "开始录制" (Chinese), collection and recording can begin.
- Press the power button once again -> after hearing the voice prompt "End recording" (English) or "录制结束" (Chinese), the current collection and recording session has ended.
The voice prompt language depends on the language setting in the app: English -> English prompts; Simplified Chinese -> Chinese prompts.
4.3.2 ego-finger Pairing
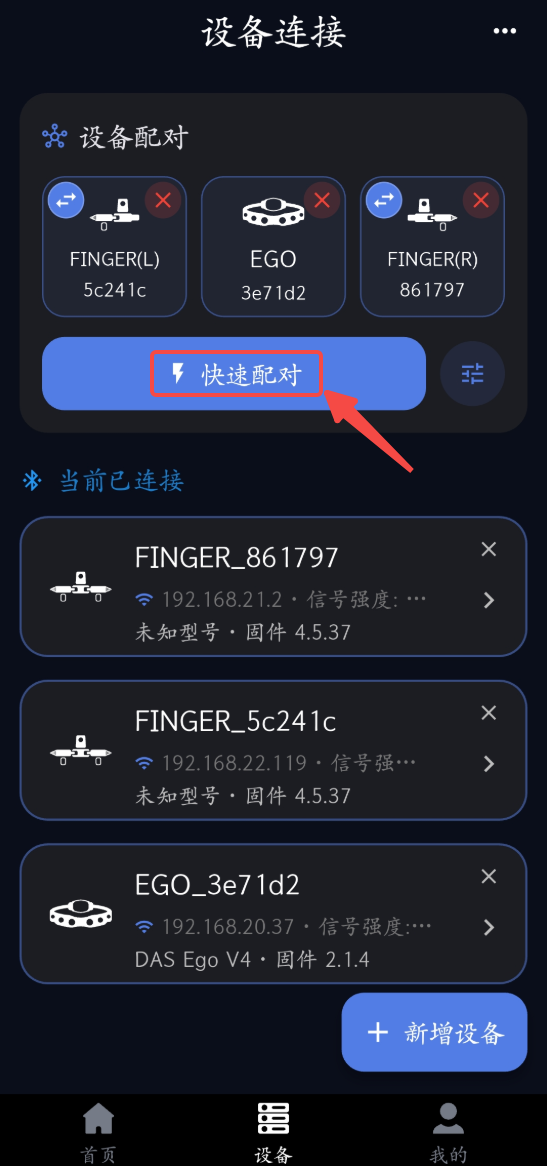
After Ego and Finger are connected, pair Ego with Finger:
- Tap Quick Pairing.
- After pairing succeeds, the green pairing frame in the App lights up and shows that device pairing is ready. Tap Stop to cancel pairing.
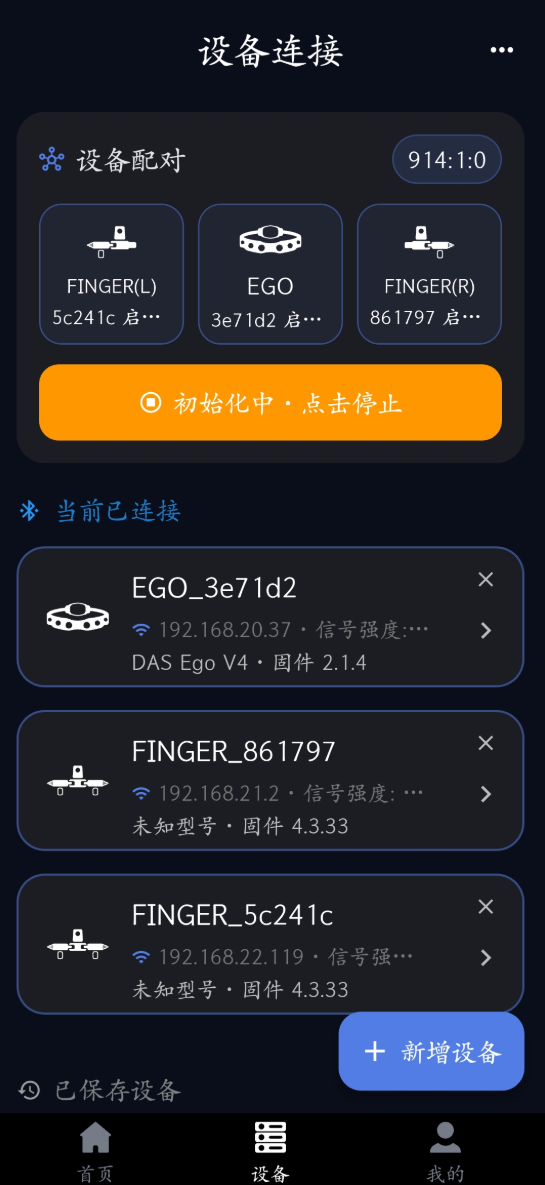
1. After the Ego and Finger devices are connected, tap Quick Pairing.
2. During pairing, the page displays "Initializing".
3. After pairing succeeds, the page displays "Device pairing ready".
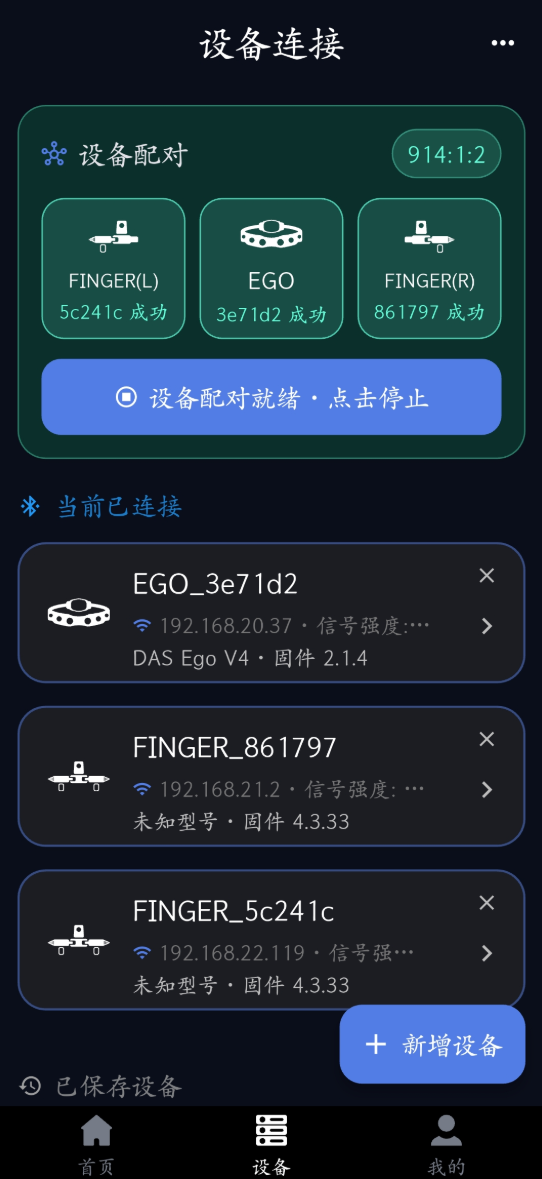
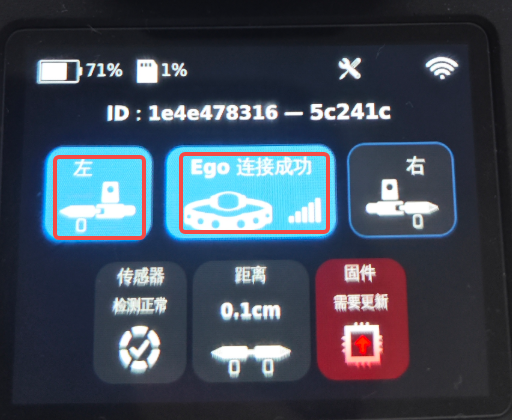
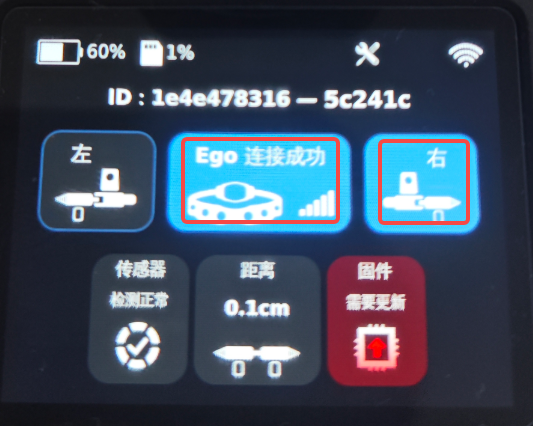
4. After pairing succeeds, the Ego connection icon on the home screen turns blue and shows signal strength, and the left / right icons turn blue.
4.4 Data Processing
4.4.1 Data Format and Storage
After recording, DAS Ego raw data is saved in MCAP format on the SD card. For an introduction to the MCAP data format, see the official https://mcap.dev/. For the complete MCAP proto format, see https://github.com/genrobot-ai/das-datakit/tree/main/proto.
After recording is complete, remove the SD card and use the included card reader to copy the data to a computer.
4.4.2 Data Visualization
Use the visualization tool at https://monitor.genrobot.click/#/ to open MCAP files for visualization.
- Open local data.
- After the data is opened, Ego data is selected automatically.


- For the main interface introduction, see Monitor Introduction.
- Open the details view to see recording results.


4.4.3 Data Post-processing (Docker Image)
Image Download
Run the following commands to pull the image. Replace the placeholders with the actual repository address and version as needed:
docker pull image-registry-domain/<namespace>/<oci-artifact-repository>:[image-version]
docker pull imagepublic.genrobotai.com/genrobot/ego_slam:v0.1.80-20260522042639
Image Usage
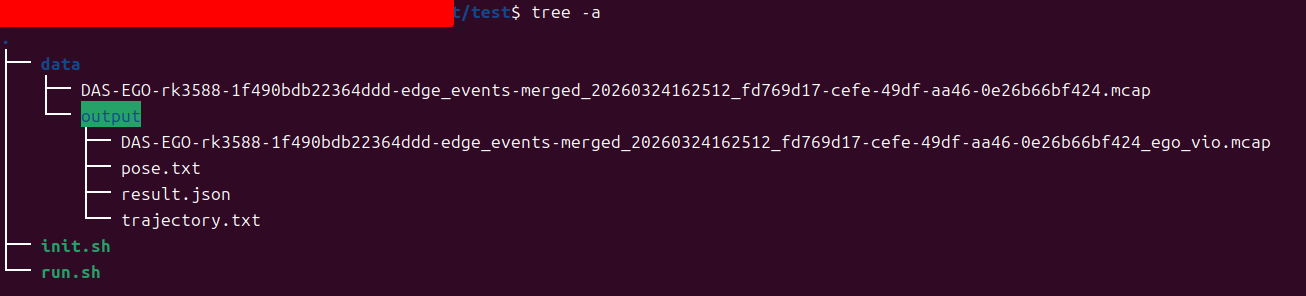
- Create a working directory. Place
init.shandrun.shin the working directory. You can refer to the directory structure below.

- Create
init.shin the working directory. Keep the content consistent with the image information and modifyIMAGE_NAMEandIMAGE_TAGas needed:
#!/bin/bash
IMAGE_NAME="imagepublic.genrobotai.com/genrobot/ego_slam"
IMAGE_TAG="v0.1.80-20260522042639"
VIO_VERSION="${IMAGE_TAG}"
echo "============================================"
echo "Checking image: ${IMAGE_NAME}:${IMAGE_TAG}"
echo "- VIO version: ${VIO_VERSION}"
echo "============================================"
docker pull ${IMAGE_NAME}:${IMAGE_TAG}
if [ $? -eq 0 ]; then
    echo "============================================"
    echo "Image available: ${IMAGE_NAME}:${IMAGE_TAG}"
    echo ""
    echo "Usage:"
    echo "  ./run.sh"
    echo "============================================"
else
    echo "Failed to fetch image"
    exit 1
fi- Create
run.shin the working directory to start the container. KeepIMAGE_NAMEandIMAGE_TAGconsistent with the previous step:
#!/bin/bash
IMAGE_NAME="imagepublic.genrobotai.com/genrobot/ego_slam"
IMAGE_TAG="v0.1.80-20260522042639"
CONTAINER_NAME="ego-slam-container"
# Version number
VIO_VERSION="${IMAGE_TAG}"
# Allow Docker to access X11 display
xhost +local:docker 2>/dev/null
docker run -it --rm \
    --name ${CONTAINER_NAME} \
    --privileged \
    -e DISPLAY=${DISPLAY} \
    -e VIO_VERSION="${VIO_VERSION}" \
    -v /tmp/.X11-unix:/tmp/.X11-unix:rw \
    -v /dev:/dev \
    -v $(pwd)/data:/app/data \
    ${IMAGE_NAME}:${IMAGE_TAG}
Add executable permissions to the scripts:
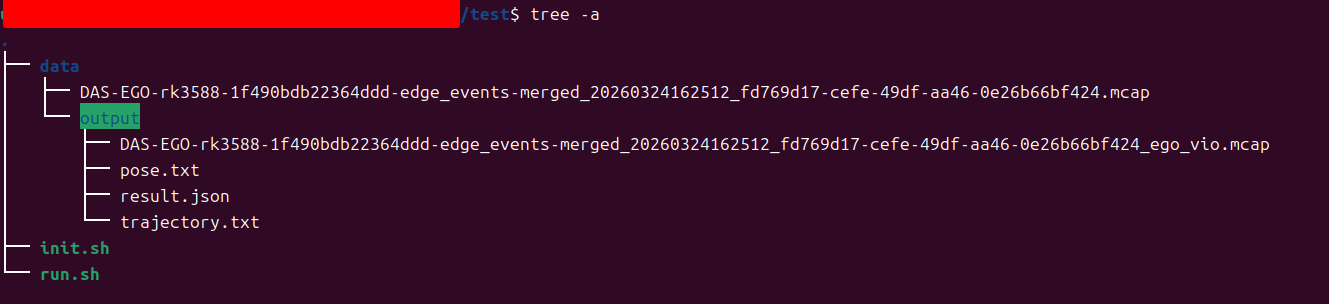
chmod +x init.sh run.sh.Create a
datafolder in the working directory.Copy the MCAP files to be processed into the
datadirectory.Run
./init.shto check and pull the image.Run
./run.shto enter the container. The script mounts the host X11 display and thedatadirectory. A successful run is shown below:

4.4.4 pipeline.sh (Ego SLAM Only)
Batch (-i)
Process all MCAP files in a directory and run Ego SLAM only.
/app/scripts/pipeline.sh -i /app/data/ --output-dir /app/data/output/

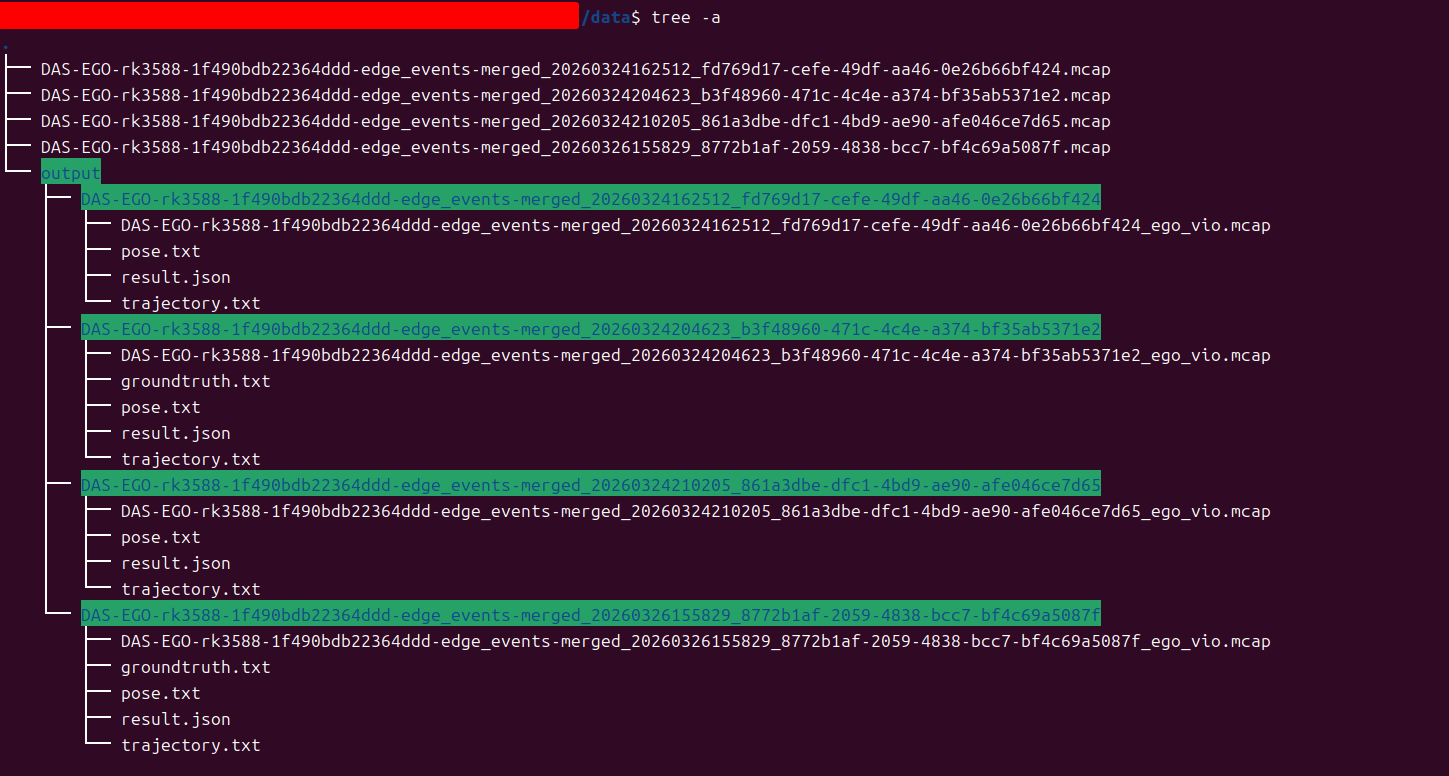
Single mcap (--input-dir)
The data directory can contain only one mcap. If multiple files exist, use -i instead.
/app/scripts/pipeline.sh --input-dir /app/data/ --output-dir /app/data/output/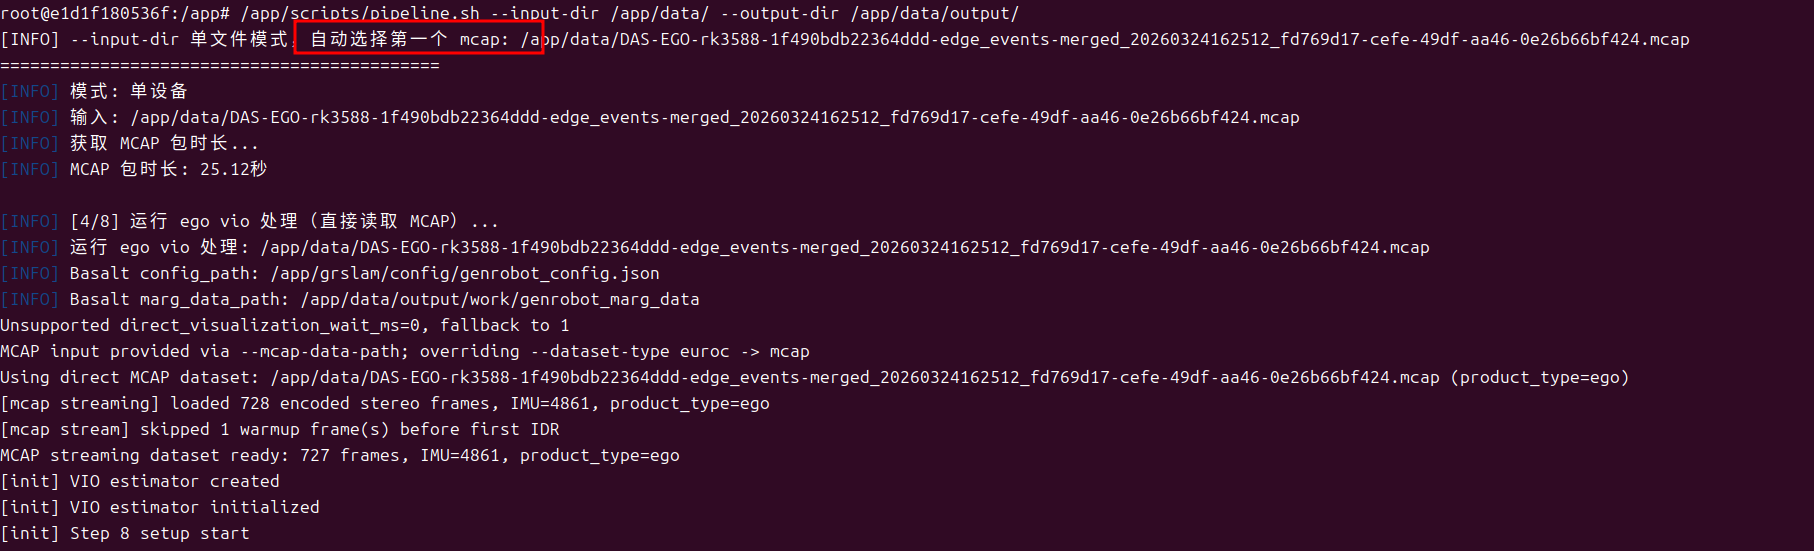

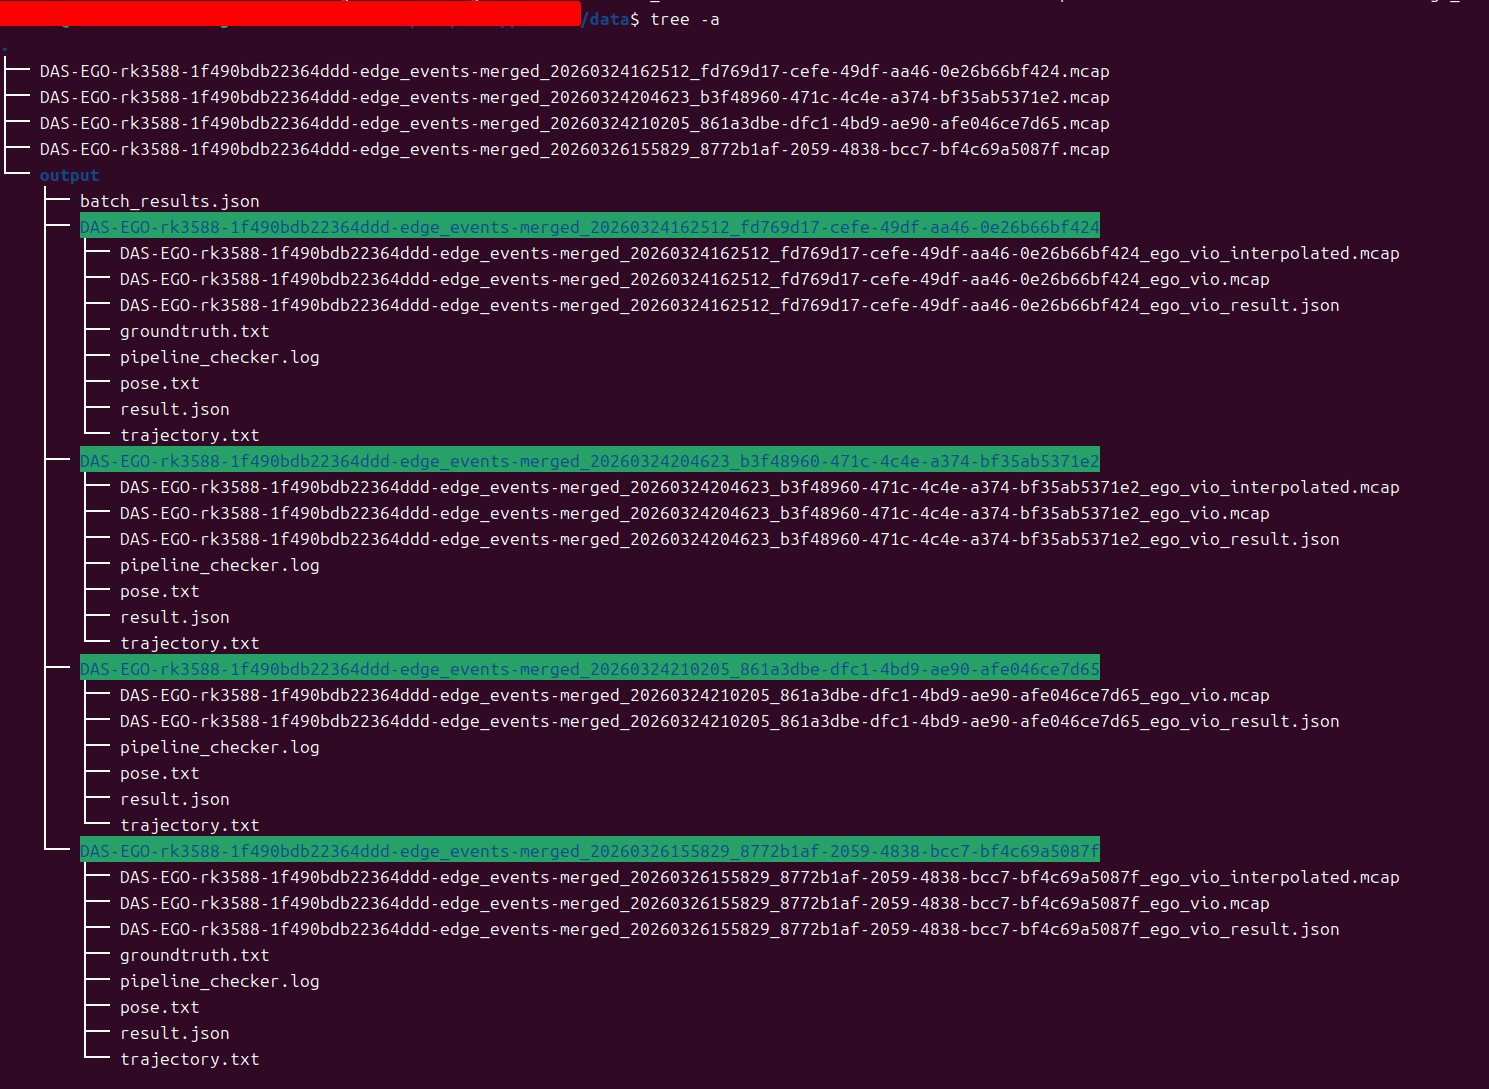
After processing is complete, results are written to the directory specified by --output-dir.
4.4.5 pipeline_checker.sh (Ego SLAM + Checker)
Batch (-i)
/app/scripts/pipeline_checker.sh -i /app/data/ --output-dir /app/data/output/
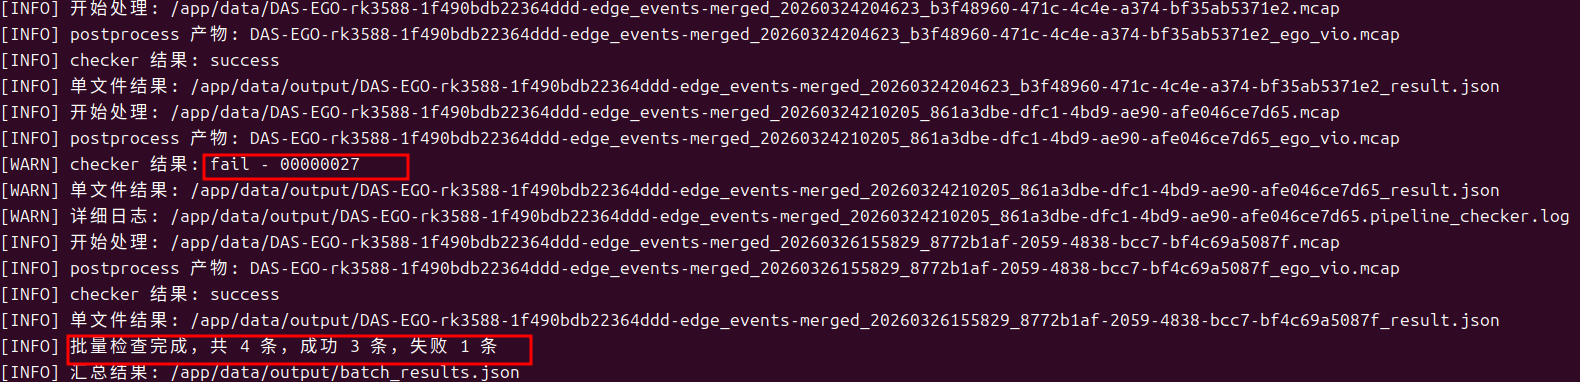
If checker errors such as 00000027 occur, refer to the Error Test section below.
Single Directory (--input-dir)
The directory can contain multiple mcap files, but only the first valid file is processed.
/app/scripts/pipeline_checker.sh --input-dir /app/data/ --output-dir /app/data/output/
When running correctly, the vio trajectory is written into the generated mcap, and checker validates the output mcap.
Error Test
| errorcode(Status) | Check item | Parameter configuration | Description | Priority | Remark |
|---|---|---|---|---|---|
| 00000000 | Overall success | -Success | All enabled checks passed | - | Enabled |
| 00000023 | Trajectory length check | -t, --tracker-threshold 10cm | Trajectory length is not greater than the threshold | P0 | Enabled |
| 00000024 | Trajectory coordinate range check | -e, --eef-pose-threshold | Trajectory coordinate range is greater than the threshold | - | Not enabled |
| 00000025 | Trajectory frame-drop check | -s, frame-drop threshold configuration | Trajectory frame drops exceed the threshold | P0 | Enabled |
| 00000027 | Trajectory smoothness check | -j, --jerk | Trajectory smoothness check failed | P0 | Enabled |
| 00000031 | Input file validity check | Input file path / file format / file content | Input file error | P1 | Enabled |
| 00000032 | Configuration validity check | Check switches configuration | No checks are enabled | P1 | Enabled |
| 00000033 | Runtime exception check | Internal processing logic | Processing exception | P1 | Enabled |
4.4.6 Result Visualization
Open https://monitor.genrobot.click/#/index and load the generated mcap in the visualization page to view related content.
5. Technical Reference
5.1 Topic List
Main topic introduction:
| Topic | Description | Frequency |
|---|---|---|
/robot0/sensor/camera0/compressed | cam0 image stream H.264 encoder | 30 Hz |
/robot0/sensor/camera1/compressed | cam1 image stream H.264 encoder | 30 Hz |
/robot0/sensor/camera2/compressed | cam2 image stream H.264 encoder | 30 Hz |
/robot0/sensor/camera3/compressed | cam3 image stream H.264 encoder | 30 Hz |
/robot0/sensor/camera4/compressed | cam4 image stream H.264 encoder | 30 Hz |
/robot0/sensor/camera5/compressed | cam5 image stream H.264 encoder | 30 Hz |
/robot0/sensor/imu | IMU info | 200 Hz |
/robot0/vio/eef_pose | vio eef pose | 30 Hz |
/robot0/vio/relative_eef_pose | relative vio eef pose | 30 Hz |
/robot0/sim/robot_info | urdf robot info: eef pose, joints | 30 Hz |
/robot0/sensor/camera0/camera_info | calibration info | 1 frame |
/robot0/sensor/camera1/camera_info | calibration info | 1 frame |
/robot0/sensor/camera2/camera_info | calibration info | 1 frame |
/robot0/sensor/camera3/camera_info | calibration info | 1 frame |
/robot0/sensor/camera4/camera_info | calibration info | 1 frame |
/robot0/sensor/camera5/camera_info | calibration info | 1 frame |
Among these topics:
camera0 to camera5 are arranged from left to right in the Ego top view. The /robot0/vio/eef_pose topic records the DAS Ego pose in the world frame, as shown in the tilted state below.
The /robot0/vio/relative_eef_pose topic records pose changes relative to the DAS Ego attitude at time 0, which is used as the world-frame origin, as shown in the aligned state below.

6. Troubleshooting and Maintenance
6.1 Common Voice Prompts
- When the device battery is low, you will hear the voice prompt "Low battery", indicating that the battery needs to be replaced.
- When no SD card is inserted, recording cannot start and the device prompts "No sdcard".
6.2 Known Limitations
Battery replacement during recording is not supported. Doing so may cause data corruption.
The current SD card format is FAT32 and does not support single recordings larger than 4 GB. If you need to record data longer than 20 minutes, use the included software (DiskGenius) to convert the SD card to exFAT format.